Category: Uncategorized

  • 4 Simple Ways to Fix Smartphone Charging Issues Without Tools

    n

    All of us have been there—your phone suddenly refuses to charge, or the battery drops way too fast. Whether it’s a sketchy charging port or a charger that seems to have given up. It’s always super annoying and throws off pretty much your whole day.

    nnnn

    But don’t worry! I’ve got four simple tricks to help you fix these issues, and the best part? You won’t need any special tools or tech expertise. By the end of this post, you’ll know exactly how to solve those charging headaches without getting one trying to.

    nnnn

    Let’s jump in and get your phone charging smoothly again—no screwdrivers or pro-level skills needed!

    nnnn
    n
    n

    What to keep in mind:

    nnnn
      n
    • Know Your Device: Understand the make and model of your smartphone. This can help you tailor the troubleshooting steps to your specific device. Some models may have unique features or settings that affect charging.
    • nnnn
    • Be Patient: Charging issues can sometimes be tricky to diagnose. Take your time with each step, and don’t hesitate to try different solutions. A little patience can go a long way in resolving the problem!
    • nnnn
    • Gather Your Tools: The solutions are tool-free. However, having a flashlight, a soft brush, or compressed air at hand can make the cleaning process a lot easier. These items will help you effectively inspect and clean the charging port without any damage.
    • n
    n
    n
    nnnnnnnn
    n

    Helpfull article:

    nnnn
    n
    nn
    nnnn
    n
    n

    How to Choose the Best Portable Charger for Your Smartphone in 2024

    nnnn

    Discover how to select the perfect portable charger for your smartphone in 2024. Learn about capacity, charging speed, size… Read more
     

    n
    n
    n
    n
    nnnn
    n

    Best latest article:

    nnnn
    n
    nnnnnnnnnnnnnnnn
    n

    Clearing the Charging Port: A Dust-Free Approach

    nnnn

    Cleaning your smartphone’s charging port is often the simplest solution to most charging problems, and it works surprisingly well. It sounds crazy, but about 6 out of 10 times, dust/dirt buildup is the reason your phone isn’t charging properly. This can happen easily, especially if you’re like most people who carry their phone in their pocket all day. Lint, dust, and other small debris can block the connection between your charger and phone. Which can ofcourse lead to some extremely frustrating charging issues. But don’t worry—cleaning it is easier than you might think!

    nnnn
    dusty charging port
    (Image credit: Gizchina)
    nnnn

    Before you start, it’s important to turn off your phone completely. You don’t want to risk any accidental damage while cleaning the port. Once it’s completely turned off, grab a flashlight or use another phone’s torch to peek into the charging port. If you see any dust or dirt in there, try blowing into the port gently to dislodge it. It may sound simple, but this trick works more often than you might expect. You can also use a soft brush or compressed air to help clear out any stubborn debris. Just avoid using anything sharp that could damage the port!

    nnnn
    n
    nnnnnnnn

    Subscribe to stay updated, it’s free!

    nnn
    nnnn

    If your charging port is still dirty after trying this, it might be time to call in a professional. A technician can safely clean the port without damaging your phone’s sensitive components. Fun fact: tiny particles from your pocket or bag are usually the main reason for charging port blockages. Taking a few minutes to clean it out could save you from a trip to the repair shop!

    nnnn

    Quick Steps to Clean Your Charging Port:

    nnnn
      n
    1. Fully turn off your phone.
    2. nnnn
    3. Use a torch to check the port for dust or debris.
    4. nnnn
    5. Gently blow into the port or use compressed air.
    6. nnnn
    7. Still blocked? Take it to a professional for a proper clean.
    8. n
    n
    nnnnnnnn
    n

    Swapping Out the Charging Cable: A Quick Connectivity Fix

    nnnn

    Swapping out your charging cable might be the easiest fix when your phone refuses to charge, and it’s often overlooked. Charging cables, especially the ones we use every day, can wear out a lot faster than you think. Over time, they get bent, twisted, or frayed, leading to poor connectivity between your phone and the power source. In fact, a damaged cable is one of the most common reasons for charging issues. With about 50% of users finding that a new cable solves the problem instantly.

    nnnn
    damaged lightning port cable
    (Image credit: Bussines Insider India)
    nnnn

    Before jumping to conclusions about your phone’s charging port or battery, try testing your phone with a different cable. You’d be surprised how many times the cable is the problem, and not the device. Make 100% sure the cable fits snugly into your phone and the charging brick. Also ofcourse check for any visible signs of wear & tear. If the connection still feels loose or inconsistent, it’s time to grab a replacement cable. Look for durable options, like those with reinforced ends, to avoid future frustrations. Or just try a different cable you have hanging around and see if that one does work.

    nnnn

    Pro tip: if you’ve been using the same cable for a long time, it’s a good idea to keep a spare around. Fun fact: cables with nylon braiding tend to last longer. They resist the usual wear and tear from constant bending a lot better than normal cables.

    nnnn

    Signs You Need a New Cable:

    nnnn
      n
    1. Frayed or exposed wires.
    2. nnnn
    3. Loose connection when plugged in.
    4. nnnn
    5. Inconsistent charging (works sometimes, doesn’t work other times).
    6. nnnn
    7. Cable feels warm to the touch when in use.
    8. n
    n
    nnnnnnnn
    n

    Resetting the Charging Circuitry: A Software-Based Solution

    nnnn

    Resetting the charging circuitry might sound a bit technical. However, it’s a quick and easy software-based solution that can fix a lot of common charging issues swiftly. Sometimes, your phone’s software glitches and miscommunicates with the hardware. This makes it seem like your phone isn’t charging properly, even when there’s actually no physical problem. This can happen after software updates, or when your phone’s been running for too long without a reboot. A simple reset can often solve this problem and restore proper charging functionality—no tools required!

    nnnn
    turn off iPhone
    (Image credit: WIRED)
    nnnn

    To reset the charging circuitry, all you need to do is fully power down your phone and let it sit for a minute or two. This gives the internal system a chance to refresh itself and clear out any minor bugs. After that, turn your phone back on and plug it in. You’ll often notice an immediate improvement, with the phone charging more reliably. If that doesn’t work, you can also try a soft reset or even a full restart. These methods clear the phone’s temporary memory, which can sometimes cause charging issues when it’s overloaded.

    nnnn

    Fun fact: According to tech experts, software resets resolve around 30% of smartphone charging problems. Fixing a lot of charging issues that might have seemed unsolvable at first glance! So, before heading to a repair shop, it’s always worth trying this quick fix.

    nnnn

    Steps to Reset Charging Circuitry:

    nnnn
      n
    1. Power off your phone completely.
    2. nnnn
    3. Wait at least 1-2 minutes.
    4. nnnn
    5. Turn the phone back on and plug in the charger.
    6. nnnn
    7. Still having trouble? Try a soft reset or full reboot.
    8. n
    n
    nnnnnnnn
    n

    Caring for the Battery: Extending the Lifespan

    nnnn
    nnnn

    Caring for your smartphone battery is crucial for extending its lifespan and ensuring your device runs smoothly. Most modern smartphones use lithium-ion batteries, which can last for several years with proper care. However, many users unknowingly shorten their battery life through everyday habits. Such as letting their phone die completely or keeping it plugged in all night. Did you know that maintaining a battery’s charge between 20% and 80% can significantly enhance its longevity? It’s a simple tip that can make a big difference!

    nnnn
    (Image credit: throughtheeyesofateenager.com)
    nnnn

    One of the best ways to care for your battery is to avoid extreme temperatures. Lithium-ion batteries don’t like heat or cold, so try to keep your phone away from direct sunlight or freezing conditions. Charging your phone in a cool, ventilated area can also help. Additionally, regularly updating your phone’s software can optimize battery performance by fixing bugs and improving efficiency. Many manufacturers release updates that can help your battery last longer, so it’s a good habit to stay up-to-date!

    nnnn

    Fun fact: Proper battery care can extend your smartphone’s lifespan by up to 30%! So, if you want your phone to keep going for as long as possible, adopting these battery tips is essential.

    nnnn

    Top Tips for Battery Care:

    nnnn
      n
    1. Regularly update your phone’s software.
    2. nnnn
    3. Avoid letting your battery drop below 20%.
    4. nnnn
    5. Keep your phone out of extreme temperatures.
    6. nnnn
    7. Use battery-saving modes when needed.
    8. n
    n
    nnnnnnnn
    n

    4 Simple Ways to Fix Smartphone Charging Issues – Conclusion

    nnnn

    And there you have it—four straightforward, no-tool fixes to tackle your smartphone charging problems! From cleaning out the charging port to resetting your device’s software, these quick solutions can significantly improve your device’s performance. Remember, around 6 out of 10 charging issues stem from dirt or faulty cables. So staying proactive with maintenance can save you a lot of hassle in the long run.

    nnnn

    Prevention is your best friend when it comes to keeping your phone charged and ready to go. Regularly check and clean your charging port, invest in high-quality cables, and follow good battery care practices. By keeping your battery charged between 20% and 80%, you can extend its lifespan by up to 30%!

    nnnn

    So next time your phone isn’t cooperating, don’t stress out. Refer back to these handy tips and give them a try. With just a little knowledge, you’ll have your phone powered up in no time. Without needing any fancy tools to get it running smoothly again!

    n
    nnnnnnnn
    n

    How To Fix Smartphone Charging Issues – FAQ’s

    nnnnnnnnnnnnn
    n
  • How to Fix Microphone Not Working on Windows 10 & 11 in 2024: 10 Easy Solutions

    n

    Is your microphone giving you the silent treatment again? Well, you’re not alone—around 68% of Windows users deal with microphone issues at least once a year.

    nnnn

    Whether you’re trying to hop on a Zoom call, join a gaming session, or record a podcast with your friends. A broken mic can throw everything off. However, don’t worry, I’ve got your back with some quick fixes that’ll have you up and running in no time.

    nnnn

    In this guide, I’ll walk you through 10 easy solutions that work on both Windows 10 and 11. From checking your sound settings to updating drivers, we’re covering everything you need to know to get your microphone working again.

    nnnn
    n

    What to keep in mind:

    nnnn
      n
    • Check your hardware: Before diving into fixes, ensure your mic is plugged in correctly. You can test it on another device to rule out any hardware issues.
    • nnnn
    • Verify your settings: Double-check that your microphone isn’t muted or disabled in your Windows sound settings. It’s a common mistake that can easily be overlooked.
    • nnnn
    • Watch for app conflicts: Some apps can sometimes take control of your mic settings. So it’s important to ensure the right permissions are set for the app you’re using.
    • n
    n
    nnnnnnnn
    n

    Helpfull article:

    nnnn
    n
    nn
    nnnn
    n
    n

    4 Easy Methods to Fix Wifi Connection Issues on laptop Windows 10

    nnnn

    If you’re having trouble connecting to your WiFi network, here are 4 easy fixes for Windows 10 users. First, check for simple issues like… Read more
     

    n
    n
    n
    n
    nnnn
    n

    Best latest article:

    nnnn
    n
    nnnnnnnnnnnnnnnn
    n

    1. Check Your Microphone Connection

    nnnn

    If your microphone isn’t working, the problem could be as simple as a loose connection or damaged cable. Whether you’re using a USB mic or a headset with a 3.5mm jack, checking the physical setup is a quick and easy first step to troubleshooting your issue. Here’s a step-by-step guide to verify and fix physical connection issues for your microphone.

    nnnn
    n

    Important tip:

    nnnn

    Always make sure to handle your microphone and cables with care. Avoid pulling or twisting the cables too harshly, as this can lead to long-term damage that may not be easily fixable. Keeping your gear in good condition is key to preventing future connection problems!

    n
    nnnn

    Steps to Verify and Fix Physical Microphone Connections:

    nnnn
      n
    1. Verify Physical Connections (USB, 3.5mm jack):n
        n
      • Make sure your microphone is properly connected. If you’re using a USB mic, check that it’s fully plugged into your computer’s USB port. For headsets with a 3.5mm jack, confirm the cable is firmly inserted into the audio jack on your PC. A loose connection can be the main reason your mic isn’t working.
      • n
      n
    2. nnnn
    3. Try Different USB Ports or Audio Jacks:n
        n
      • If your microphone still isn’t working, try connecting it to a different USB port or audio jack. Sometimes ports can become faulty, and simply switching to another one could resolve the issue instantly. This is especially useful for USB microphones, as different ports can have varying power outputs.
      • n
      n
    4. nnnn
    5. Inspect Cables for Damage or Wear:n
        n
      • Examine your microphone cables for any signs of damage, like fraying or exposed wires. Even small bends or tears in the cable can disrupt your mic’s performance. If you notice any damage, it might be time to replace the cable or the mic itself. Keeping an eye on cable health can save you from long-term microphone problems.
      • n
      n
    6. n
    nnnn
    damaged headphone cable
    (Image credit: Colin Toh/Headphonehonesty)
    nnnn

    By following these steps, you can quickly troubleshoot and resolve common microphone connection issues on your Windows device. Ensuring your microphone is physically connected properly, testing different ports, and inspecting for any cable damage can often solve the problem before diving into more complicated fixes. If none of these steps work, you might need to explore driver updates or system settings to further diagnose the issue.

    n
    nnnnnnnn
    n

    2. Update or Reinstall Audio Drivers

    nnnn

    If your microphone still isn’t working, the issue could be tied to outdated or malfunctioning audio drivers. Whether it’s due to a recent Windows update or something like a driver conflict. Updating or reinstalling drivers can often solve the problem. So here’s a step-by-step guide to help you access and refresh your audio drivers.

    nnnn

    Steps to Update or Reinstall Audio Drivers:

    nnnn
      n
    1. Access Device Manager to Update Drivers:n
        n
      • Start by opening the Device Manager on your Windows PC. You can do this by pressing Windows + X and selecting Device Manager from the menu. Once there, look out for Audio inputs and outputs, then find your microphone, and right-click on it. Then, select Update driver. After this, Windows will search for and install any available updates for your microphone’s driver.
      • n
      n
    2. n
    nnnn
    update microphone driver windows
    nnnn
      n
    1. Uninstall and Reinstall Audio Drivers:n
        n
      • If updating your drivers doesn’t fix the problem, you may need to completely reinstall the driver. In Device Manager, right-click your microphone and select Uninstall device. After that, restart your computer. When your PC boots up again, Windows will automatically reinstall the audio drivers. Which will potentially resolve any conflicts that were affecting your microphone.
      • n
      n
    2. n
    nnnn
    uninstall device windows device manager
    nnnn
      n
    1. Use Windows Update to Find Latest Driver Versions:n
        n
      • Sometimes, your system’s drivers may need to be updated via Windows itself. Go to Settings > Update & Security > Windows Update and click on Check for updates. If there are any updates available, including audio drivers, install them and restart your computer. Keeping your system updated ensures that all drivers are current and might just resolve your microphone issues.
      • n
      n
    2. n
    nnnn
    update windows
    nnnn
    n

    Important tip:

    nnnn

    After updating or reinstalling drivers, always restart your computer to allow the changes to happen. This helps ensure that the new drivers are properly loaded and functioning correctly. If the problem persists, you may want to explore third-party driver update tools to find drivers that Windows might have missed!

    n
    nnnn

    By following these steps, you can tackle microphone issues related to drivers and improve your overall system performance. However, if you’re still having trouble, it may be time to explore other solutions. Consider adjusting settings or checking for hardware problems.

    n
    nnnnnnnn
    n

    3. Run the Windows Troubleshooter

    nnnn

    If your microphone still just wont work, running the built-in audio troubleshooter on Windows might be the solution. It is a quick and easy way to identify and fix common issues. The troubleshooter can help diagnose problems with your microphone. It can detect misconfigurations and it can also apply fixes automatically without you having to dive into complex settings. Here’s how you can use it to get your microphone back on track.

    nnnn

    Steps to Run the Audio Troubleshooter:

    nnnn
      n
    1. Locate and Run the Audio Troubleshooter:n
        n
      • To get started, go to Settings by pressing Windows + I. Then, navigate to System > Sound. Scroll down to the Advanced sound options section and click on Troubleshoot. This will launch the audio troubleshooter, which is designed to detect and fix common microphone problems on your system.
      • n
      n
    2. n
    nnnn
    nnnn
      n
    1. Follow On-Screen Instructions to Diagnose Issues:n
        n
      • Once the troubleshooter is open, it will guide you through a series of on-screen instructions. Be sure to answer the prompts accurately as this will be important to find the issue. The prompts will be stuff like selecting your microphone device or confirming the type of problem you’re experiencing. After you’ve done that, the tool will analyze your system for issues. It will provide helpful suggestions about what the problem may be.
      • n
      n
    2. nnnn
    3. Apply Suggested Fixes Automatically:n
        n
      • If the trouble-shooter detects any issues, it will offer you a list of suggested fixes. You can choose to apply these fixes automatically, which may include resetting settings or reinstalling drivers. Once the fixes are applied, you can test your microphone again to see if the issue has been solved.
      • n
      n
    4. n
    nnnn
    n

    Important tip:

    nnnn

    If the troubleshooter still doesn’t fix the problem, you can try running it a few more times. Or you can also restart your PC before trying other solutions. Sometimes the audio troubleshooter needs a fresh start to properly resolve issues. It’s a great first step before moving on to more manual fixes like updating drivers or adjusting settings.

    n
    nnnn

    By using the audio troubleshooter, you can quickly narrow down microphone issues and apply fixes with ease. However, if the problem persists, you may need to explore more in-depth solutions. Though, this tool is a great starting point for most common microphone problems.

    n
    nnnnnnnn
    n

    4. Adjust Microphone Privacy Settings

    nnnn

    If your microphone still isn’t working, the solution might be in your privacy settings. Windows allows you to control which apps have access to your microphone which can come in very handy. However, if permissions are restricted, your mic won’t work properly. Adjusting these settings is quick and easy, and could be the key to solving your microphone problems. Here’s a step-by-step guide to review and update your privacy settings for the mic.

    nnnn
    n

    Important tip:

    nnnn

    Always double-check app permissions after installing new software. Sometimes Windows blocks microphone access by default. So reviewing your privacy settings after every new install can prevent microphone problems from cropping up unexpectedly.

    n
    nnnn

    Steps to Adjust Microphone Privacy Settings:

    nnnn
      n
    1. Navigate to Windows Privacy Settings:n
        n
      • First, open Settings by pressing Windows + I, then go to Privacy on the left sidebar. Then, scroll down to Microphone under the App permissions section. This will show you the microphone privacy settings where you can manage which app can access your mic.
      • n
      n
    2. n
    nnnn
    nnnn
      n
    1. Enable Microphone Access for desired Apps:n
        n
      • In the Microphone settings page, make sure the toggle under Allow apps to access your microphone is turned on. If this option is disabled, no apps will be able to use your microphone, which is probably causing the issue. Once this is enabled, apps will be able to access your microphone, depending on individual permissions.
      • n
      n
    2. nnnn
    3. Review App Permissions Individually:n
        n
      • Scroll down to the list of apps and check which ones have permission to use your microphone. You can toggle microphone access on or off for each app individually. If the app you’re trying to use is blocked, simply turn the permission on and try again. This is especially important for apps like Zoom, Discord, or Skype, which need mic access to function properly.
      • n
      n
    4. n
    nnnn

    By adjusting your privacy settings, you can quickly solve issues related to microphone access. If your microphone is still not working after reviewing permissions. Then you might need to explore driver updates or hardware troubleshooting as demonstrated in the next steps.

    n
    nnnnnnnn
    n

    5. Configure Microphone Settings in Windows

    nnnn

    If your microphone still isn’t working correctly, it could be because of some incorrect sound settings. Accessing your sound settings in the Control Panel allows you to adjust the default recording device and fine-tune your mic’s boost and levels. This can often solve audio issues and improve microphone performance. Here’s a step-by-step guide to help you make these adjustments.

    nnnn

    Steps to Adjust Microphone Sound Settings:

    nnnn
      n
    1. Access Sound Settings in Control Panel:n
        n
      • Start by opening the Control Panel on your Windows PC. You can do this by typing “Control Panel” in the search bar. Once your inside, navigate to Hardware and Sound and then click on Sound. In the pop-up window, go to the Recording tab, where you’ll find your microphone listed along with other audio devices.
      • n
      n
    2. n
    nnnn
    nnnn
      n
    1. Set Default Recording Device:n
        n
      • In the Recording tab, locate your microphone in the list of devices. Right-click on it and select Set as Default Device. This ensures that Windows uses your microphone as the default for all recording and communication purposes. If you have multiple microphones connected, setting the correct one as the default is crucial for apps like Zoom or Discord to work properly.
      • n
      n
    2. n
    nnnn
    nnnn
      n
    1. Adjust Microphone Boost and Levels:n
        n
      • To fine-tune your microphone, right-click your mic in the Recording tab and select Properties. In the properties window, go to the Levels tab. Here, you can adjust both the microphone volume and boost. If your microphone is too quiet, increasing the boost may help. However, be careful not to raise it too much, as it can cause background noise or distortion.
      • n
      n
    2. n
    nnnn
    nnnn
    n

    Important tip:

    nnnn

    If you’re still having issues, try lowering or increasing the microphone levels incrementally. As even the smallest adjustments can make a big difference in sound quality. Always test your microphone after making these changes to ensure the levels are well-balanced.

    n
    nnnn

    Accessing the sound settings and adjusting your default recording device and levels is often an easy fix. It’ll often resolve microphone issues and improve sound quality. If the problem persists, you may need to explore further troubleshooting steps like reinstalling drivers or checking physical connections.

    n
    nnnnnnnn
    n

    6. Check App-Specific Microphone Settings

    nnnn

    Sometimes the issue with your microphone may not be in your system settings but within the communication app itself. Apps like Skype, Discord, and Zoom have their own audio settings that can override your computer’s configuration. Double-checking these settings can often fix the problem fairly quickly. So here’s a guide to help you review and adjust microphone settings in your communication apps.

    nnnn

    Steps to Review and Adjust Microphone Settings in Communication Apps:

    nnnn
      n
    1. Review Settings in Communication Apps (Skype, Discord, etc.):n
        n
      • Each app has its own audio settings, so start by opening the app you’re using. Go to the Settings or Preferences menu, and then look for the Audio or Voice & Video section. This is where you can configure how the app uses your microphone and headphones. Make sure everything looks correct and kind off matches your system settings.
      • n
      n
    2. nnnn
    3. Ensure Correct Input Device is Selected:n
        n
      • In the audio settings of the app, you’ll see a section for Input Device or Microphone. Ensure the correct microphone is selected—this is especially important if you have multiple input devices connected. For example, a headset and a built-in mic. If the wrong device is chosen, the app won’t pick up sound from your preferred microphone.
      • n
      n
    4. nnnn
    5. Test Microphone Within App Settings:n
        n
      • Most communication apps allow you to test your microphone directly in the settings. Look for a Test Microphone button or similar option. Speak into your mic, and the app will play back the audio to help you confirm whether it’s working. If you don’t hear anything, try adjusting the mic sensitivity or switching input devices until it works.
      • n
      n
    6. n
    nnnn
    n

    Important tip:

    nnnn

    Always check app settings after installing updates. Some updates can reset audio preferences. Regularly review your settings to avoid unexpected mic issues during important calls or meetings.

    n
    nnnn

    By doing the steps listed above, you can quickly resolve audio issues without having to mess with system-wide settings. If your mic still doesn’t work, consider troubleshooting other areas like drivers or physical connections. Or keep reading for more methods on how to fix your mic.

    n
    nnnnnnnn
    n

    7. Disable Audio Enhancements

    nnnn

    If the problem still persists, it might be caused by unnecessary audio enhancements that interfere with your sound quality. Disabling these enhancements can help clear up any distortions or glitches in your audio. Here’s how to access your sound device properties and disable audio enhancements to ensure your microphone works as expected. (keep in mind that the following guide is for windows 10 only)

    nnnn
    n

    Important tip:

    nnnn

    If you notice any sound distortion or strange effects when using your microphone. Then disabling audio enhancements should be one of the first steps you take. Enhancements may work well for speakers, but they don’t really mix well with mics and can often cause more harm than good.

    n
    nnnn

    Steps to Disable Audio Enhancements:

    nnnn
      n
    1. Access Sound Device Properties:n
        n
      • First, right-click on the Sound icon in your taskbar and select Sounds. In the window that appears, go to the Recording tab. Then find your microphone from the list of devices, right-click on it, and choose Properties. This will take you to the device settings where you can make adjustments specific to your mic.
      • n
      n
    2. n
    nnnn
    access sound device properties
    nnnn
      n
    1. Navigate to the Enhancements Tab:n
        n
      • In your microphone’s properties window, click on the Enhancements tab. This is where various audio enhancements are listed. These can sometimes cause issues like echoes, delays, or poor sound quality when enabled.
      • n
      n
    2. nnnn
    3. Disable All Audio Enhancements:n
        n
      • Check the box next to Disable all enhancements or uncheck any individual enhancements that are currently active. Once you’ve disabled them, click Apply and OK to save the changes. Disabling these enhancements can often clear up audio issues and ensure your microphone captures sound without interference.
      • n
      n
    4. n
    nnnn

    Disabling audio enhancements through your sound device properties can instantly improve microphone clarity and eliminate unwanted sound effects. If you’re still having trouble, checking other areas like physical connections or app settings. Or try some of the following fixes.

    n
    nnnnnnnn
    n

    8. Update Windows to the Latest Version

    nnnn

    Keeping your system up to date is essential for ensuring your microphone works properly. As updates often contain important fixes and improvements for your hardware like for example your mic. Installing the latest Windows updates can resolve bugs that might be causing your microphone to malfunction. Here’s a quick guide to check for and install updates on your Windows device.

    nnnn

    Steps to Update Windows and Fix Microphone Issues:

    nnnn
      n
    1. Check for Windows Updates:n
        n
      • Start by opening Settings (press Windows + I) and navigate to Update & Security. From there, click on Windows Update on the left sidebar. This will show you if any updates are available for your system. If there are no updates listed, you can manually check by clicking Check for updates.
      • n
      n
    2. n
    nnnn
    check for windows updates
    nnnn
      n
    1. Install All Available Updates:n
        n
      • If any updates are available, click Download and Install to get the latest versions of the recent important system files. These updates can include fixes for known microphone issues, driver updates, or performance improvements that affect how your mic functions. Make sure to install all updates to keep your system running smoothly.
      • n
      n
    2. nnnn
    3. Restart Your Computer After Updating:n
        n
      • Once the updates are installed, restart your computer to apply the changes. This step is crucial because some updates don’t take effect until after a restart. After rebooting, test your microphone to see if the issue has been fixed.
      • n
      n
    4. n
    nnnn
    n

    Important tip:

    nnnn

    Always check for updates regularly. Even if your microphone is working fine, keeping your system up to date is always handy. As it ensures that you won’t run into any new bugs or security vulnerabilities in the future.

    n
    nnnn

    By checking for and installing Windows updates, you can fix microphone issues and keep your system optimized for peak performance. If the problem persists after updating, you might need to look into driver updates or other hardware-related troubleshooting steps.

    n
    nnnnnnnn
    n

    9. Perform a System Restore

    nnnn

    If your microphone was working fine before but suddenly stopped, a recent change to your system might be the problem. System Restores can help by rolling back your PC to an earlier time when everything was functioning correctly. Here’s how to access System Restore and use it to fix microphone problems.

    nnnn
    n

    Important tip:

    nnnn

    Always back up important files before performing a System Restore, as some recent changes may be undone in the process. While it won’t affect personal files, it’s better to be safe, especially if you’ve installed new apps or updates recently.

    n
    nnnn

    Steps to Use System Restore for Fixing Microphone Issues:

    nnnn
      n
    1. Access System Restore Through Control Panel:n
        n
      • Start by opening the Control Panel on your Windows device (by typing ”control panel” in the Windows search bar”. Then navigate to System and Security, then click on System. On the left-hand side, you’ll see an option for System Protection—click on it. In the new window, choose System Restore. This feature allows you to revert your system to a previous state. Which can often help resolve software issues affecting your microphone.
      • n
      n
    2. n
    nnnn
    system control panel windows
    nnnn
      n
    1. Choose a Restore Point Before the Issue Began:n
        n
      • Once you access System Restore, you’ll be prompted to choose a restore point. Then you’ll want to select a date and time when your microphone was working fine. This is crucial for ensuring that any recent changes causing the issue are undone. If available, you can check Show more restore points for additional options.
      • n
      n
    2. nnnn
    3. Follow the Wizard to Complete the Restore Process:n
        n
      • After selecting the appropriate restore point, follow the on-screen instructions to proceed with the restoration process. The wizard will guide you through the steps and confirm that your system will be braught back to the chosen date. Once the process is complete, your computer will restart. Then, you can test your microphone to see if the problem is resolved.
      • n
      n
    4. n
    nnnn

    Using System Restore is a great way to fix microphone issues caused by recent system changes. If the problem persists, you may need to explore other troubleshooting options like checking drivers or updating system settings.

    n
    nnnnnnnn
    n

    10. Use the Windows Recording Audio Troubleshooter

    nnnn

    If your microphone issues persist, downloading and running the Microsoft Recording Audio Troubleshooter might be the solution. It’s a great way to identify and automatically fix common microphone problems. This tool scans for issues and provides recommended fixes to get your mic back on track. Here’s how to use the troubleshooter effectively.

    nnnn

    Steps to Use the Microsoft Recording Audio Troubleshooter:

    nnnn
      n
    1. Download the Microsoft Recording Audio Troubleshooter:n
        n
      • Start by visiting the Microsoft website and searching for the Recording Audio Troubleshooter tool. Then, just download the file to your PC. Don’t worry, it’s a lightweight tool that’s easy to install and specifically designed to diagnose and resolve microphone-related issues.
      • n
      n
    2. nnnn
    3. Run the Tool and Follow Prompts:n
        n
      • Once downloaded, open the tool and click Next to begin the troubleshooting process. The tool will scan your system for any potential issues affecting your microphone. It will prompt you with a series of questions or options based on the detected problems. So be sure to follow the instructions carefully.
      • n
      n
    4. nnnn
    5. Apply Suggested Fixes:n
        n
      • After the scan is complete, the tool will suggest possible fixes for the issues it found. Choose to apply the recommended fixes, and the tool will make the necessary adjustments to your system. Once finished, test your microphone to ensure everything is working as expected.
      • n
      n
    6. n
    nnnn
    n

    Important tip:

    nnnn

    The Microsoft troubleshooter is particularly useful for solving issues you might not be able to diagnose manually. If the tool doesn’t resolve your problem, it might still provide clues about deeper system issues. It also might indicate hardware failures that require further action.

    n
    nnnn

    By downloading and running the Microsoft Recording Audio Troubleshooter, you can quickly address microphone issues with minimal effort. If problems persist, you may need to explore other solutions, like adjusting privacy settings or checking physical connections.

    n
    nnnnnnnn
    n

    How To Fix Microphone Not Working on Windows 10/11 – FAQ’s

    nnnnnnnnnnnnn
    n
  • How to Connect PS4 Controller to PS5 in 5 Simple Steps (2024 Guide)

    n

    Are you one of the 117 million gamers who have rocked a PS4 console and its iconic DualShock 4 controller? If you’ve recently made the leap to the PS5 but can’t bear to part with your trusty controller, then you’re in for a treat!

    nnnn

    Connecting your PS4 controller to the PS5 might seem tricky at first, but it’s totally doable. It can really enhance your gaming experience, especially for certain titles or if you just prefer the ps4 controller.

    nnnn

    In this guide, I’ll take you step-by-step through the connection process, as well as highlight any compatibility issues you might encounter. and share some tips to make sure you’re back in the game with your favorite controller in no time.

    nnnn
    n

    What to keep in mind:

    nnnn
      n
    • Check game compatibility: Not all PS5 games support the PS4 controller. So it’s important to check which titles you plan to play are compatible before connecting.
    • nnnn
    • Update your PS5: Ensure your PS5 is running the latest software version for optimal performance and compatibility with the PS4 controller.
    • nnnn
    • Wired vs. wireless connection: Decide if you want to connect your PS4 controller via USB or Bluetooth. As the setup process varies slightly for each method, but both are super easy.
    • n
    n
    nnnnnnnn
    n

    Helpfull article:

    nnnn
    n
    nn
    nnnn
    n
    n

    Easy 5 Step Tutorial: Connect PS5 Controller to PS5 and PC

    nnnn

    This post gives a 5-step tutorial on connecting your PS5 controller to your PS5 and PC. It also includes troubleshooting tips and FAQs… Read more
     

    n
    n
    n
    n
    nnnn
    n

    Best latest article:

    nnnn
    n
    nnnnnnnnnnnnnnnn
    n

    Understanding PS4 Controller Compatibility with PS5

    nnnn

    If you’re wondering which PS5 games support the PS4 controller then I will answer that question really quickly for you. Here’s the deal: you can use a DualShock 4 on the PS5. However, it only works with PS4 games played through backward compatibility. Which means that you won’t be able to play newer PS5 titles with your old controller.

    nnnn

    This is because Sony wants you to experience those games with the full capabilities of the new DualSense controller. However, for a lot of retro gamers or those looking to revisit their PS4 collection, this is great news. Fun fact: around 4,000 PS4 games are compatible with the PS5. So there’s no shortage of options to enjoy with your trusty DualShock!

    nnnn
    ps4 controller on table
    nnnn

    However, of course, there are limitations. Aside from the lack of support for PS5 games, you also miss out on some cool features that the DualSense offers. For example some key-features like adaptive triggers and haptic feedback. These features are designed to give you a more immersive experience, especially in PS5-exclusive games.

    nnnn
    n
    nnnnnnnn

    Subscribe to stay updated, it’s free!

    nnn
    nnnn

    So while the PS4 controller is fine for your old favorites and still a great controller. You’ll want to switch to the DualSense for the full next-gen experience. Also, keep in mind that the DualShock 4 has to be connected either wirelessly or with a USB cable. Though, keep in mind that some games may respond better in wired mode, especially for online play.

    nnnn

    Here’s a quick breakdown of what to expect:

    nnnn
    FeatureDualShock 4 (PS4 Games)DualSense (PS5 Games)
    Works with PS4 gamesYesYes
    Works with PS5 gamesNoYes
    Haptic Feedback & Adaptive TriggersNoYes
    nnnn

    On the plus side, using your old PS4 controller comes with some clear benefits. First, it’s a great money-saver! If you’re not ready to drop extra cash on another DualSense controller which can be around $80. using your old DualShock can help you keep costs low.

    nnnn

    Plus, if you’ve spent years playing on a PS4, the controller might just feel more familiar and comfortable to you. That familiarity can be a big bonus, especially when you’re just diving into the world of PS5. You might want a bit of a more comfortable experience as you explore new games. So while the DualShock 4 has its limits, it’s still a solid option for casual play and revisiting old favorites!

    n
    nnnnnnnn
    n

    How to Connect Your PS4 Controller to PS5 Using a USB Cable (Wired Method)

    nnnn

    Have a PS5 but want to use your trusty PS4 controller for some retro gaming sessions? Well, you’re in luck! While the PS5 is all about the new DualSense controller, you can still connect your PS4 DualShock to your PS5. However, you can only use it when playing older PS4 games. Here’s a quick guide to get your controller set up and ready for action in no time.

    nnnn
    n

    Important tip:

    nnnn

    If you’re connecting your controller via a wired connection, ensure you’re using a high-quality USB cable. A poor-quality cable might cause connection issues or even fail to charge your controller properly.

    n
    nnnn

    Steps to Connect Your PS4 Controller to PS5:

    nnnn
      n
    1. Ensure Your PS4 Controller is Charged:n
        n
      • Before starting, make sure your PS4 controller has enough battery. Plug it in for a charge if needed. A fully charged controller will give you up to 8 hours of gameplay, so it’s best to start with a full battery to avoid unnecesarry interruptions.
      • n
      n
    2. nnnn
    3. Turn On Your PS5 Console:n
        n
      • Power up your PS5 by pressing the power button on the console. Make sure the system is fully booted before attempting to connect your controller. Having the latest system update ensures that everything works smoothly.
      • n
      n
    4. nnnn
    5. Connect Your PS4 Controller via USB Cable:n
        n
      • Take a USB cable and connect your PS4 controller to the PS5. Plug one end into the controller and the other into the console. This wired connection is required for the initial pairing process and ensures the devices sync properly.
      • n
      n
    6. nnnn
    7. Press the PS Button on Your PS4 Controller:n
        n
      • After connecting the controller via USB, press the PS button located in the center of your PS4 controller. The light bar should flash briefly and then turn solid, confirming the connection with the PS5.
      • n
      n
    8. nnnn
    9. Start Gaming with Your Wired Connection:n
        n
      • Once connected, you can immediately start playing PS4 games on your PS5. The wired connection also ensures you won’t experience input lag and keeps your controller charged throughout your gaming session.
      • n
      n
    10. n
    nnnn
    wired ps4 controller
    (Image credit: Nerd Techy)
    n
    nnnnnnnn
    n

    How to Connect Your PS4 Controller to PS5 Wirelessly

    nnnn

    If you’re looking to use your PS4 controller wirelessly with your PS5, you’re in luck! Whether you prefer the feel of the DualShock 4 or just want a backup controller, connecting it to your PS5 is a quick and simple process. Plus, playing wirelessly gives you more freedom to move around during gameplay. Here’s a step-by-step guide to get your PS4 controller paired with your PS5 in no time.

    nnnn
    ps4 controller wireless
    nnnn

    Steps to Connect Your PS4 Controller to PS5 Wirelessly:

    nnnn
      n
    1. Ensure Your PS4 Controller is Charged:n
        n
      • Before starting, make sure your PS4 controller is charged. A fully charged controller gives you 4-8 hours of use! So make sure to plug it in for a bit if needed to avoid mid-game interruptions.
      • n
      n
    2. nnnn
    3. Turn On Your PS5 Console:n
        n
      • Press the power button on your PS5 to turn it on. Let the system fully boot up and check for any updates to ensure everything runs smoothly when pairing your controller.
      • n
      n
    4. nnnn
    5. Go to Settings > Accessories > General > Bluetooth Accessories:n
        n
      • Head to the settings menu on your PS5. Navigate to “Accessories,” select “General,” and then choose “Bluetooth Accessories.” This will allow your console to search for nearby Bluetooth devices, including your PS4 controller. Click on the tekst below for a full guide on how to do this.
      • n
      n
    6. n
    nnnn
    Guide with images on how to find ”bluetooth accesories” tab in settings and find your ps4 controller on ps5n
    n

    How to find ”bluetooth accesories” tab in settings and connect PS4 controller on the PS5

    nnnn
      n
    1. Navigate to the settings tab from the home screen.
    2. n
    nnnn
    settings button homescreen ps5
    nnnn

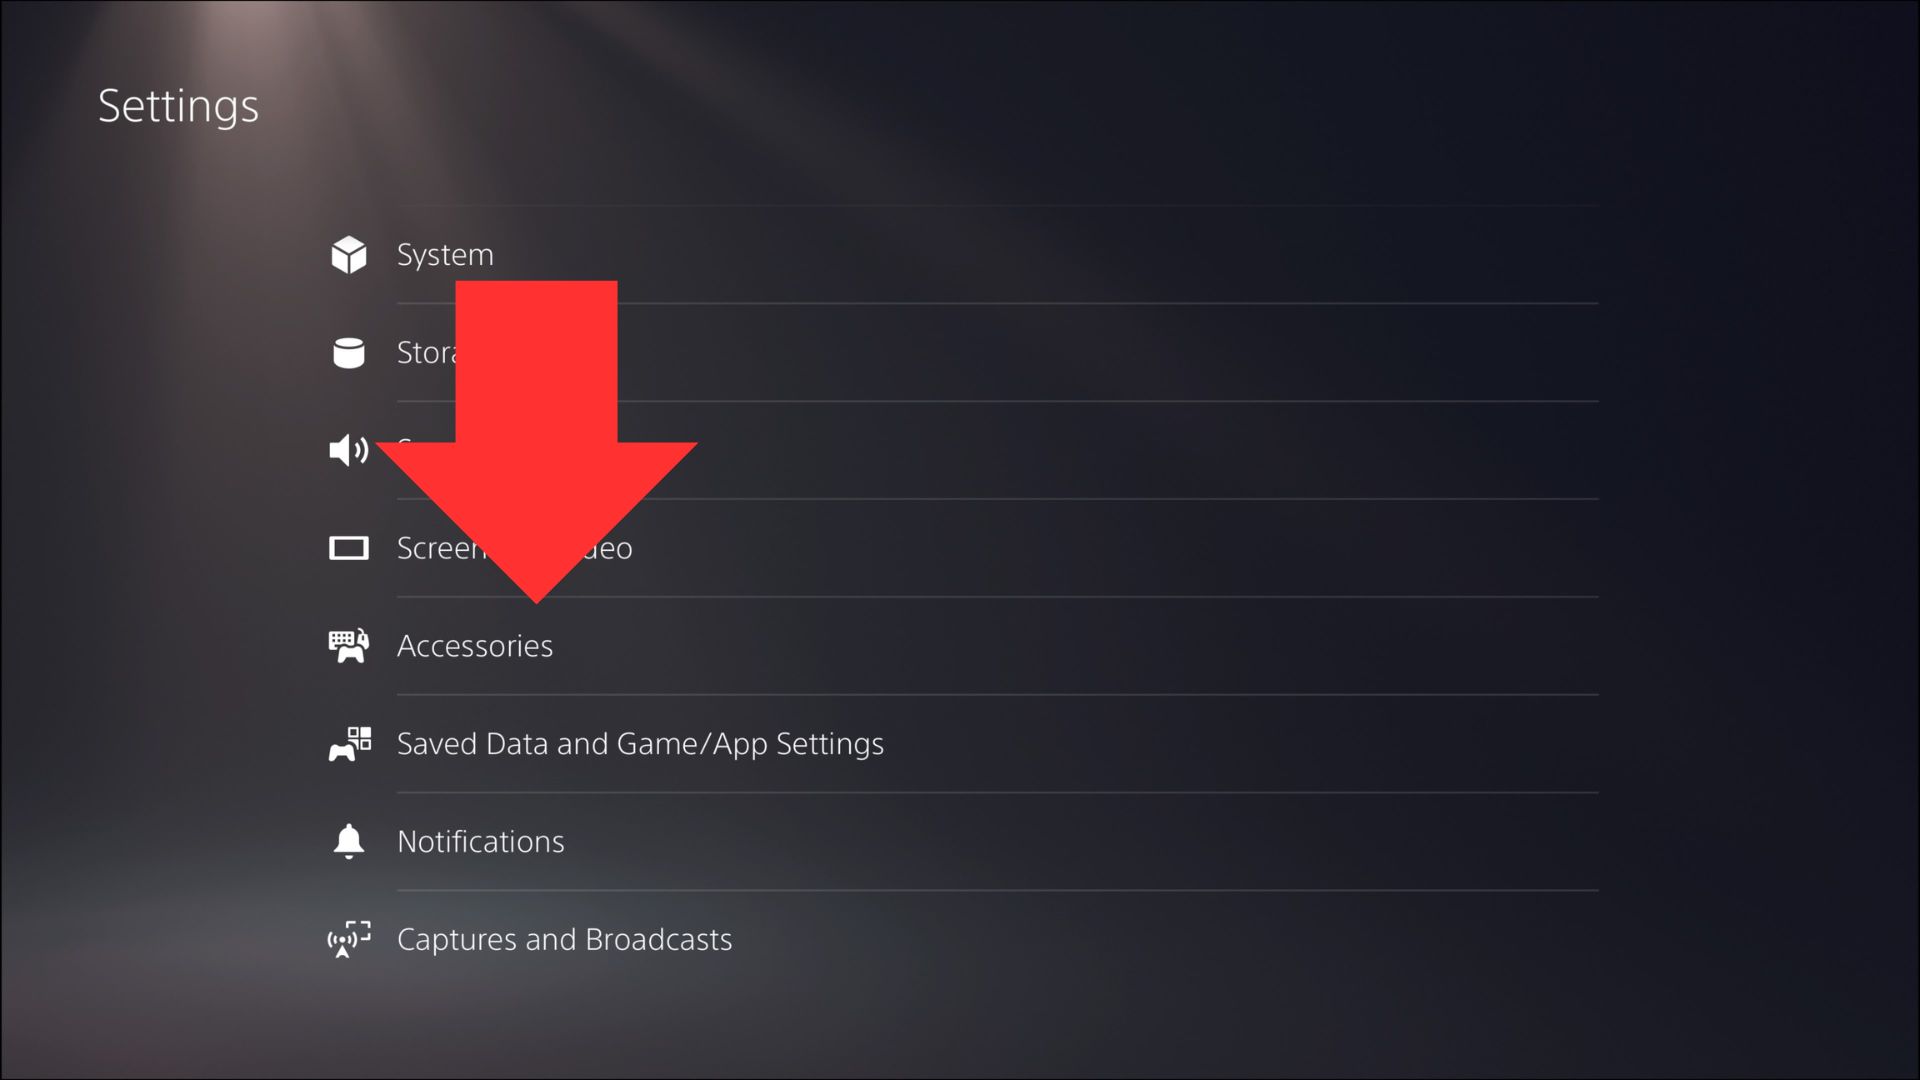
    2. When your in the settings tab scroll down to the accessories.

    nnnn
    ps5 settings
    nnnn

    3. Once you’re in accessories navigate to Bluetooth accessories under general.

    nnnn
    bluetooth accesories tab ps5
    nnnn

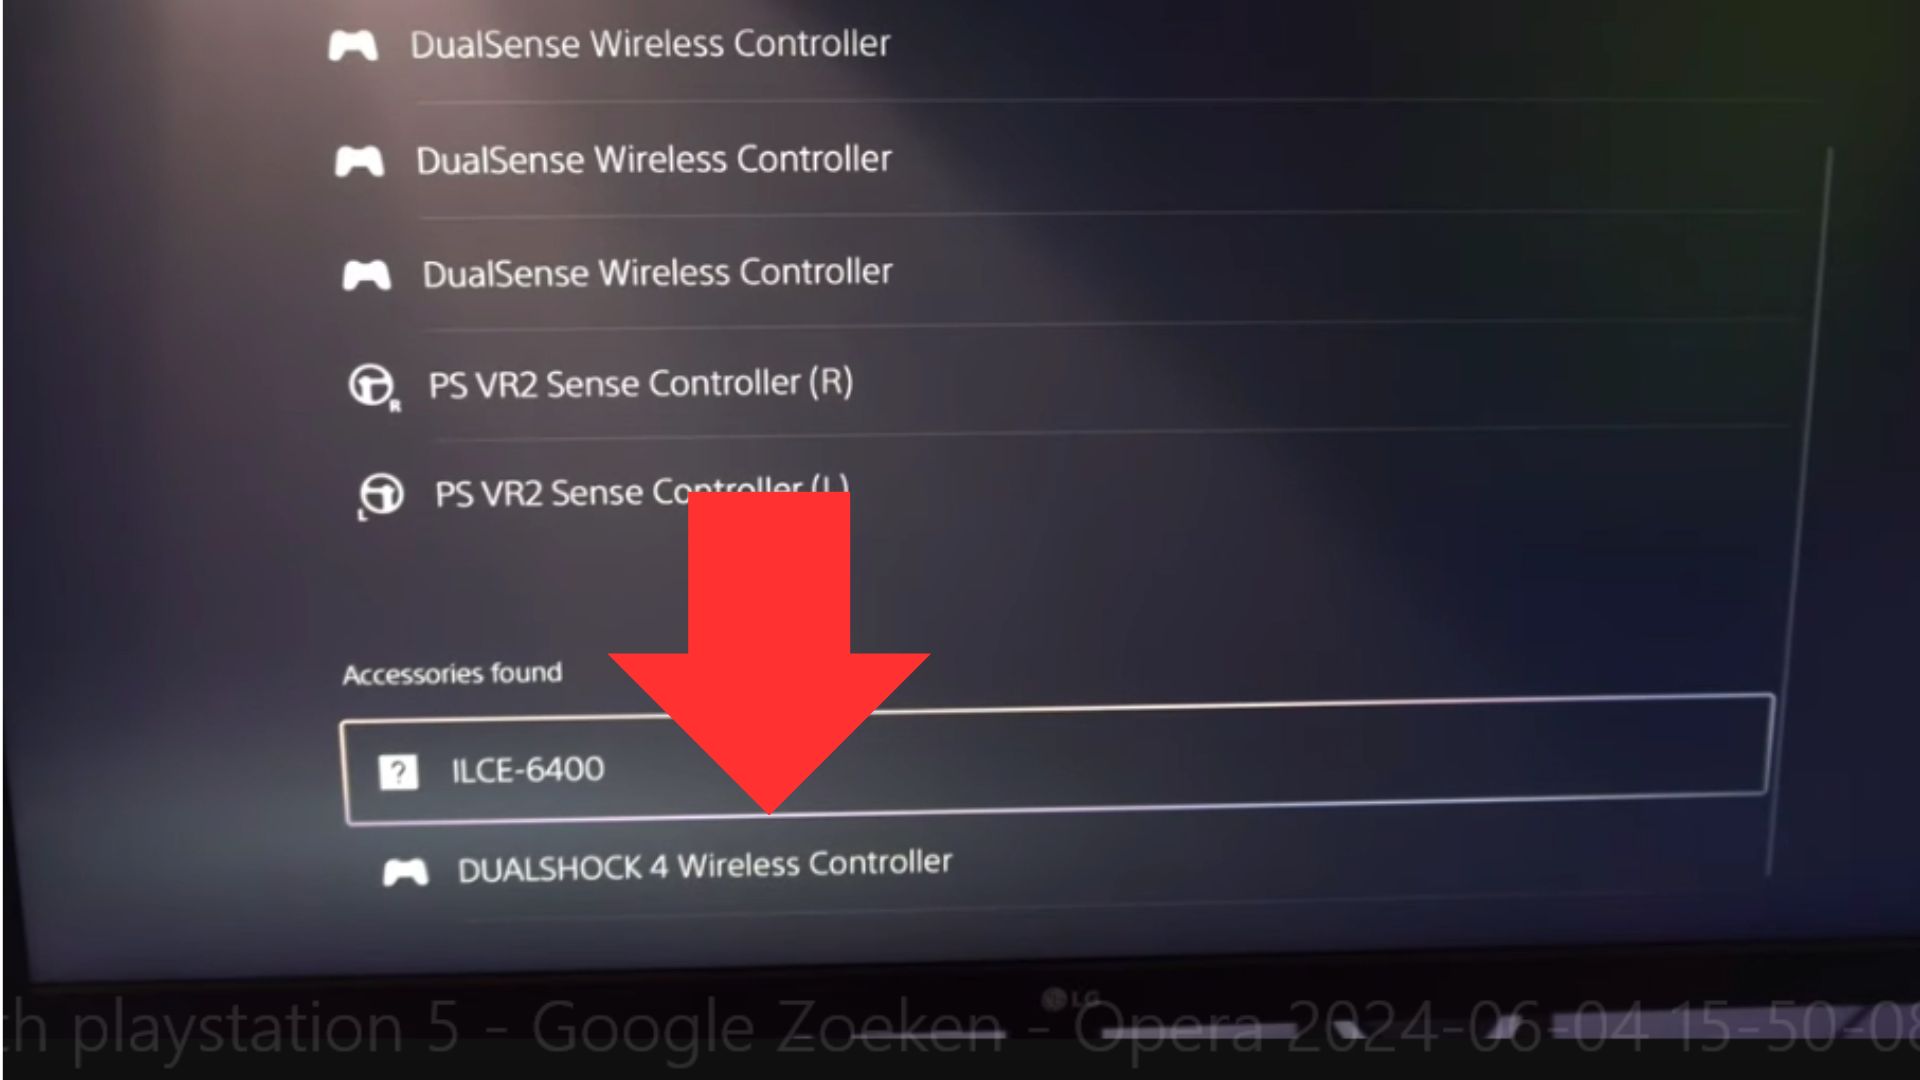
    4. Turn on your PS4 controller and put it into Bluetooth pairing mode, you can do this by holding down the sharing and the PlayStation button. After this, your controller should show up under ”accessories found”.

    nnnn
    ps5 accessories ps4 controller
    nnnn

    5. Now all you’ll have to do is select your Dualshock 4 controller, select an account, and you’re good to go!

    n
    n
    nnnn
      n
    1. Put Your PS4 Controller in Pairing Mode:n
        n
      • Press and hold the PS button and the Share button on your PS4 controller at the same time. Keep holding them until the light bar on the controller starts flashing, indicating it’s ready to pair with your PS5.
      • n
      n
    2. nnnn
    3. Select Your Controller on the PS5 and Start Gaming Wirelessly:n
        n
      • In the “Bluetooth Accessories” menu, your PS4 controller should appear. Select it to pair with your PS5. Once connected, you can start gaming wirelessly, enjoying the comfort and flexibility of playing without cables!
      • n
      n
    4. n
    n
    nnnnnnnn
    n

    Troubleshooting Common Connection Issues

    nnnn

    Bluetooth connections are super handy, but they can be a bit unpredictable sometimes. If you’re having trouble connecting your PS4 controller or to stay connected to your PS5. Then don’t worry, because the interference might be the issue. Fun fact: devices like your phone, tablet, or even your Wi-Fi router can cause Bluetooth interference, especially if they’re nearby. to fix this you can try to reduce the number of active Bluetooth devices in your area. Or keep your PS5 and controller as close as possible to ensure a stable connection. After you’ve tried these things, the problem should be fixed. However, if the problem still isn’t fixed then keep reading because I have a few more solutions coming up.

    nnnn

    If you’ve tried moving devices and your controller still isn’t connecting, it might be time for a reset. Resetting your PS4 controller is easy and can solve a lot of common connection problems. Just grab a small tool like a paperclip and find the tiny reset button on the back of the controller. Press and hold it for about 5 seconds, and the controller will fully reboot. After resetting, reconnect the controller to your PS5 using a USB cable. Then press the PS button to pair it again.

    nnnn
    reset button ps4 controller
    nnnn

    Sometimes, even after resetting, your controller might not pair or stay connected. In that case, you can try a few different solutions. First, make sure your controller is fully charged, as low battery can cause connection issues. If the problem persists, try using a different USB cable, as faulty or damaged cables can prevent pairing. Lastly, check for any PS5 system updates, as these updates often include fixes for connectivity issues. If all else fails, unpair the controller from the PS5’s Bluetooth devices list and try pairing it again from scratch.

    nnnn

    Common Solutions for Controller Connectivity Issues:

    nnnn
      n
    • Reduce Bluetooth Interference: Keep other Bluetooth devices away from your PS5 and controller.
    • nnnn
    • Reset Your Controller: Use a paperclip to press the reset button on the back of your controller.
    • nnnn
    • Try a Different USB Cable: Faulty cables can prevent pairing or cause random disconnects.
    • nnnn
    • Check for Updates: Ensure your PS5 system is fully updated to avoid compatibility issues.
    • n
    n
    nnnnnnnn
    n

    Maximizing Your PS4 Controller Experience on PS5

    nnnn

    Using a PS4 controller on a PS5 doesn’t mean you’re stuck with the default settings. There are actually plenty of customization options available! You can still adjust things like button mappings and sensitivity settings to fit your playstyle. Just head to the PS5 settings menu and navigate to “Accessories” and then “Controllers.” Once there you’ll find options for customizing your controller’s button layout and adjusting the stick sensitivity. Fun fact: nearly 50% of gamers tweak their controller settings to boost their performance. So don’t hesitate to do the same with your PS4 controller.

    nnnn
    ps5 controller settings
    (Image credit: Adam Vjestica/theshortcut.com)
    nnnn

    Another important step is checking and updating your PS4 controller’s firmware. Keeping your controller’s software up to date ensures better performance and can fix annoying bugs. Unfortunately, you can’t update the firmware through the PS5 directly. However, you can connect your PS4 controller to a PS4 console or a PC using the official PlayStation software. Just plug it in, and if there’s an update available, follow the on-screen instructions to install it. Keeping your firmware current is especially important if you experience connection issues or unresponsive buttons.

    nnnn

    Battery life is a common concern when using a PS4 controller with the PS5, especially for long gaming sessions. There are a few simple tips to extend your controller’s battery life. Firstly, you should lower the light bar brightness and disable the vibration feature—both are known to drain tons of battery power. You can also reduce the idle time before the controller turns off automatically. Lastly, consider using a wired connection whenever possible. This keeps the battery charged while you game and prevents it from running out at a crucial moment.

    nnnn

    Tips for Extending Battery Life:

    nnnn
      n
    • Lower Light Bar Brightness: A dimmer light bar helps conserve battery power.
    • nnnn
    • Disable Vibration: Turning off vibration can significantly extend battery life.
    • nnnn
    • Use a Wired Connection: Keep your controller plugged in to avoid battery drain during long sessions.
    • nnnn
    • Adjust Auto-Sleep Settings: Set the controller to turn off after a short period of inactivity.
    • n
    n
    nnnnnnnn
    n

    How to connect your PS4 controller to PS5 – Conclusion

    nnnn

    Connecting your PS4 controller to your PS5 is a lot easier than you might think! By following just a few simple steps, you can enjoy the comfort and familiarity of your trusty DualShock 4. While also being able to play compatible games on your shiny new console. While there are some limitations, like not being able to use it for PS5-specific titles. It’s still a great way to get more use out of your existing hardware and save some money on buying extra controllers.

    nnnn

    So, whether you’re sticking with your PS4 controller for nostalgia or just want a backup, it’s definitely worth giving it a try. Have you already connected your PS4 controller to your PS5? Feel free to share your experience in the comments—maybe you’ve got some tips or tricks others can benefit from!

    n
    nnnnnnnn
    n

    How To Connect Your PS4 Controller To PS5 FAQ’s

    nnnnnnnnnnnnn
    n
  • Cool Tech For Teenagers June

    n

    Have you ever wanted some cool tech to spice up your room or gaming setup? Well, you’ve come to the right place, welcome back to tech for teenagers in this episode I’m going over the 4 best tech products for teens under €40. These won’t just be the generic RGB mousemats or a headphone stand, these are 4 of the coolest tech products that I bet you’ve probably never seen before. These products would also make for great gifts for that tech lover in your family or friend group. After tons of research, I can assure you these are the best/coolest/most useful tech products for teenagers under €40. I have done a few blog posts like this before so be sure to check those out when you’re done reading this.

    nnnn
    nhttps://www.youtube.com/watch?v=omNSvPdxtUEn
    nnnn

    Top 4 Cool Tech For Teenagers June

    nnnn

    Contents:

    nnnn

    USB Desk Fan

    nnnn

    Full Laptop Cleaner

    nnnn

    Speaker + Pixel Art

    nnnn

    Affordable Wireless Earbuds

    nnnn

    Popsocket Wallet

    nnnn

    nnnn

    USB Desk Fan

    nnnn
    nnnn

    Desk fans are a great way to keep your hands nice and cool in those hot summer days. Although you think it might look stupid it’s actually really nice, especially for individuals that sweat more often. Now we’ve established what desk fans are I want to introduce you to the Smart Devil desk fan, because from everything I’ve seen this is the go-to option for a nice and reliable desk fan. it’s simple and quiet which is exactly what you need from a desk fan and best of all it’s USB-powered which is amazing because USB is such a universal way of powering accessories. You can plug it into your pc, phone charger, or many other places which is great.

    nnnn

    nnnn
    smartdevil desk fan
    nnnn

    Why Is It Better Than Other Desk Fans?

    nnnn
    nnnn

    You now know why this is a good desk fan but let me tell you why I think it’s one of the best desk fans. Firstly it’s insanely quiet, even at 75% you won’t hear it with your headphones on. But that it’s powerful doesn’t mean that it has to be big because this one definitely isn’t, at only 5,23 inches this is ideal for any desk or even in your car. As well as some other reasons these are the main reasons why I think that it’s one of the best or even the best desk fan for anyone.

    nnnn

    nnnnnnnn

    Full Laptop Cleaner

    nnnn
    nnnn

    Now we all know that laptops can get dirty, whether it’s under the keyboard or a fifly screen we’ve all seen it before. Now you might have heard of a keyboard cleaner and of course a screen cleaner but have you ever seen one product that can do both? Probably not and neither did I before coming across it while researching for this blog post. But now I’ve seen it, it makes a lot of sense. this way you don’t need both a keyboard clean and a screen cleaner, now you can have both in 1! A truly amazing 2-in-1 product that can help you with cleaning your phone, laptop, tablet, or any screen for that matter, and for sure worthy of being mentioned on this month’s tech for teenagers.

    nnnn

    nnnn
    Oxo full laptop cleaner kit
    nnnn

    nnnnnnnn

    Speaker + Pixel Art

    nnnn
    nnnn

    This product is definitely the most unique on this list but that doesn’t mean it’s not worth trying because it would for sure spice up your room and make it stand out from the rest. Definitely, something you don’t see often, it’s basically a pixel art display which is also a speaker. It’s also not bad as a speaker, it’s a single speaker there’s a good amount of detail and bass but do consider this speaker is from 2015 so don’t be expecting too much for the sound. One thing that I do really like about this speaker how however is that it’s also wireless, the battery life however isn’t that amazing, on a full charge it will only run for 2-3 hours so I would recommend keeping it plugged in. The pixel art panel is also very customizable via the free app, you can make it do anything you want.

    nnnn

    nnnn
    Davoom Aurabox
    nnnn

    What About The App?

    nnnn
    nnnn

    As I just said this speaker also comes with a free app and you can do all the customizing you want on it. You can even make it an alarm clock or just a regular clock to replace your normal clock with or even set it as a thermometer if you want to. You’re able to control every lead individually, making you able to draw anything you want. While a bit outdated the app is still pretty good and easy to understand. A personal use case would be to put it on a shelf and display the time so I can have a speaker and a cool clock in one. I would say it’s definitely worth a shot as it’s only $40 which is pretty reasonable for a speaker these days.

    nnnnnnnn

    Affordable Wireless Earbuds

    nnnn
    nnnn

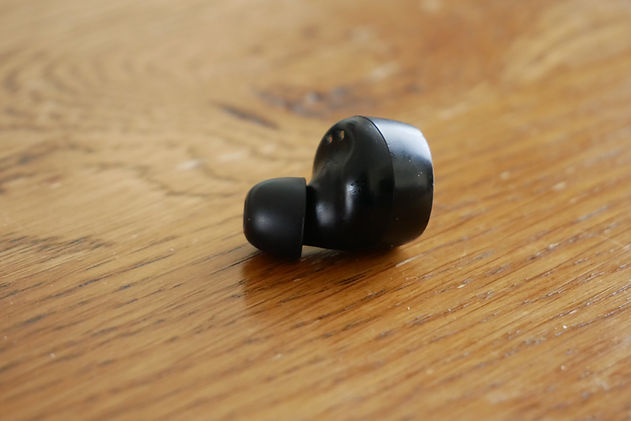
    Second to last on this list is a product I’ve actually talked about before, it’s the Jlab Go Air Pop Pro True Wireless earbuds. Now you might think ”why are they on this list?” Well, I thought as these were the best products under $40 this product deserved a spot. I still personally use this product almost every day as I’ve been doing for the last year or so. They’re super solid earbuds that won’t break the bank. If you want to learn more about this product I have a dedicated blog post here where I tell you about everything these earbuds have to offer.

    nnnn

    nnnn
    Jlab Go Air Pop True Wireless Earbuds
    nnnn

    nnnnnnnn

    Popsocket Wallet

    nnnn
    nnnn

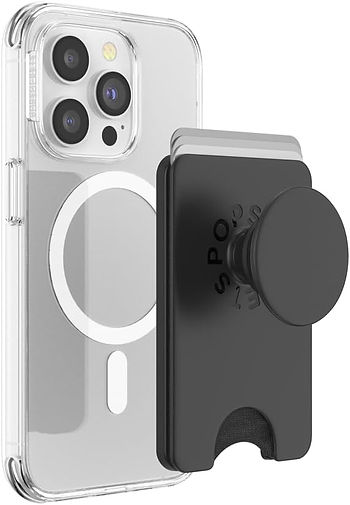
    Now last on this list is another product I use every single day, the popsocket phone wallet. I always used to have my card behind my phone case, but it would always be annoying to get out and it added a lot of thickness to my phone. However with the wallet from Popsocket, those issues are no more, it’s easy to get out and can fit up to 3 cards! Whilst also has a pop socket which I find very useful in my day-to-day use of my phone, which I find very nice to grip. That’s not all tho because the people at Popsocket have made it possible to quickly swipe it off so you can still wirelessly charge your phone, truly genius!

    nnnn

    nnnn
    Popwallet
    nnnn

    Daily Use

    nnnn
    nnnn

    As I already said I’ve been using this product for the last year or so and it still works great so let me tell you how I use this product every day. As is said this product as well as being a wallet is also a pop socket which is not only nice to grip but also allows you to prop up your phone when en where ever you aren’t. I also find it very satisfying to slide the pop socket bit out and in, so I’ll be fidgeting with it all the time when it’s in my pocket or in my hands. The wallet is also very handy, I basically only keep my debit card in there but whenever I have a train ticket or something I can also put it there with peace of mind that I won’t lose it.

    nnnnn
  • JLAB GO AIR POP Review 2024: Are These the Best Earbuds Under $25?

    n
    n
    n
    n
    n

    JLab Go Air Pop Review ★★★★☆

    n
    n
    n n

    The JLab Go Air Pop delivers great sound quality and solid durability without breaking the bank.

    n
    n

    Pros:

    n

    + Good sound quality

    n

    + Very durable

    n

    + Handy charging cable on the bottom

    n

    + Good quality hinge

    n

    Cons:

    n

    Can bug out pretty often

    n

    Mediocre battery-life

    n
    n

    Best Deals:

    n

    $25.00 at Amazon

    n

    $24.88 at Walmart

    n

    $24.99 at Best Buy

    n
    n
    n
    n
    nnnn

    Imagine getting crisp, clear audio without spending a fortune! That’s exactly what JLAB promises with their GO AIR POP earbuds. In a world where top-tier earbuds can set you back hundreds of dollars, it’s hard to believe that a pair under $25 could actually deliver some decent quality.

    nnnn

    However, after testing these earbuds for about a year with numerous drops and hundreds of listening hours. I can confidently say they might just be the hidden gems of the audio world. Whether you’re rocking out to your favorite playlists or catching up on podcasts, finding the right pair of earbuds is key.

    nnnn

    Did you know the average person spends over 4 hours a day listening to audio content? That’s a lot of time to be stuck with uncomfortable or low-quality sound! I’ve had my fair share of listening time with premium and budget earbuds. But the GO AIR POPs have really surprised me with their durability and sound quality.

    nnnn

    After more than a year of daily use, they’ve held up way better than I initially expected. Even the hinge, which can be a weak spot for cheaper buds, is still in great shape. So, if you’re looking for reliable, affordable earbuds, keep reading because I’m going to break down everything you need to know!

    nnnn
    n

    Helpfull article:

    nnnn
    n
    nn
    nnnn
    n
    n

    Are Earbuds Bad for Your Ears: Understanding the Risks

    nnnn

    Using earbuds can potentially harm your ears, leading to issues like hearing loss and ear infections. Adhering to the 60-60 rule… Read more
     

    n
    n
    n
    n
    nnnn
    n

    Best latest article:

    nnnn
    n
    nnnn
    nhttps://www.youtube.com/watch?v=eJVDFOpuEDYn
    nnnn

    Jlab Go Air Pop Review 2024

    nnnn

    n Why you can trust me✅n I spent hours researching, analysing and evaluating each product before mentioning them. Learn more about through the eyes of a teenager n n here.n n

    nnnnnnnnnnnnnnnn
    n

    ONE MINUTE REVIEW – JLAB Go Air POP Review

    nnnn

    Here’s a quick, 1-minute review for those who just want the highlights! If you want a deeper dive and more detailed thoughts, stick around for the rest of the blog post.

    nnnn

    Sound Quality:

    nnnn
      n
    • Solid for the price: After using the JLAB GO AIR POP for over a year, I can say the sound quality is fantastic for under $25.
    • nnnn
    • Lacks a bit of bass: Sometimes the bass could be stronger, but overall it’s pretty impressive.
    • nnnn
    • Occasional bugs: Every now and then, one earbud might stop working, which is pretty annoying but doesn’t happen often.
    • nnnn
    • Volume control: One issue is that you can’t fine-tune the volume well. It’s either too soft or too loud with minimal adjustment in between.
    • n
    nnnn

    Fun fact: Did you know that over 70% of listeners value sound quality over brand when choosing earbuds? That’s why these hit the sweet spot at this price!

    nnnn

    Hinge Durability:

    nnnn
      n
    • Built to last: The hinge is still rock solid after over a year of daily use.
    • nnnn
    • No rattling: It feels premium and doesn’t wobble at all.
    • nnnn
    • Minor nitpick: It makes a bit of a loud click when you close it,but for $22, that’s no big deal!
    • n
    nnnn
    Hinge Jlab Go Air Pop
    nnnn

    Price:

    nnnn
      n
    • Incredibly affordable: Priced at just $24.99 on Best Buy, these earbuds dominate their price range, offering better sound and durability than 90% of the competition.
    • n
    nnnn

    If you’re looking for affordable earbuds that don’t sacrifice too much, the JLAB GO AIR POP might be your perfect match!

    nnnn
      n
    • 8,4/10 Overall Score
    • n
    n
    nnnnnnnn
    n

    Comfort and Fit: Will They Stay Put?

    nnnn

    When it comes to earbuds, finding the right fit is everything. The JLAB GO AIR POP earbuds come with three different ear tip sizes, which is awesome because everyone’s ears are different. Personally, I’ve had earbuds in the past that just wouldn’t stay in my ears, no matter how much I adjusted them. But with these, the variety of tips lets you pick the perfect size for a snug and comfy fit. The right size isn’t just about comfort—it’s also about getting the best sound. Fun fact: Did you know that poorly fitting earbuds can reduce sound quality by up to 30%? So, making sure they fit right is essential for both comfort and performance.

    nnnn
    Earbud Jlab Go Air Pop
    (Image credit: throughtheeyesofateenager.com)
    nnnn

    Speaking of comfort, I’ve worn these for hours on end, whether I’m studying, gaming, or just binge-watching YouTube, and they don’t start to feel uncomfortable. The soft silicone tips do a great job of staying gentle on your ears even after extended use. Some earbuds can feel like they’re digging into your ears after a while, but not these. If you plan on using them for long periods, you’ll definitely appreciate how comfortable they are, even if you’re wearing them all day.

    nnnn
    n
    nnnnnnnn

    Subscribe to stay updated, it’s free!

    nnn
    nnnn

    Now, if you’re like me and enjoy running or biking, stability is just as important as comfort. These earbuds stay in place really well, even during exercise. I’ve had other cheap earbuds pop out every time I moved too much, which is super annoying. But with the GO AIR POP, once you find the right ear tip size, they sit securely. Whether you’re hitting the gym or just going for a walk, they stay put.

    nnnn

    Here’s a quick comparison of how they stack up against others in this price range:

    nnnn
    EarbudsFit & ComfortStability During ExercisePrice
    JLAB GO AIR POPComfortable with 3 sizesGreat stability during movement$22
    Anker Soundcore Life P2Decent, but larger tipsTends to slip during intense exercise$30
    Skullcandy DimeLess comfortable, limited sizesModerate stability, can shift during movement$25
    nnnn

    In this price range, the GO AIR POP really stands out. While some other budget earbuds might be a bit more expensive, they don’t always offer the same level of fit and stability. Whether you’re lounging at home or out for a jog, these earbuds are a solid choice for under $25.

    nnnn
      n
    • Comfort and fit rating: 9/10
    • n
    n
    nnnnnnnn
    n

    Sound Quality: Punching Above Its Weight?

    nnnn

    Let’s talk about sound quality, starting with the bass response. For earbuds under $25, the bass on the JLAB GO AIR POP’s are surprisingly solid. It’s not going to blow your mind if you’re used to high-end earbuds like a pair of Sony’s will. But, for this price, it packs a decent punch. I’ll admit, sometimes it can feel a bit meh, especially if you’re into bass-heavy music like EDM or hip-hop.

    nnnn

    But overall, the bass doesn’t distort, and it holds up well for most music genres. Fun fact: Bass frequencies are usually the first to suffer in cheaper earbuds. So the fact that these hold their ground is pretty impressive.

    nnnn
    jlab go air pop loose earbuds
    (Image credit: headphonesaddict/Peter Susic)
    nnnn

    Next up, the mids and highs. This is where these earbuds really shine. Vocals and instruments come through really clearly, and you can easily pick up on the little details in your music. Whether I’m listening to podcasts, watching videos, or just chilling to some acoustic tracks, the mids and highs are consistently strong. Some cheaper earbuds can sound muffled or muddy in this range, but the GO AIR POP delivers crisp, clear audio.

    nnnn

    In terms of the overall sound signature, I’d say these are more balanced than you’d expect for the price. Sure, they don’t have the super-deep bass you might find in pricier models. But the clarity of the mids and highs make up for it.

    nnnn

    They’re great for general listening and casual use, and they also don’t overpower any particular frequency range. This makes them versatile for different types of content, from music to podcasts.

    nnnn

    So, how do they compare to pricier alternatives? Well, you get what you pay for, right? If you’re used to high-end earbuds like the AirPods Pro or Sony’s WF-1000XM4. Then you’ll notice the difference in bass depth and noise cancellation.

    nnnn

    However, for casual listeners who don’t want to drop hundreds of dollars for some earbuds. Then the GO AIR POP holds its own pretty well and is overall a great option. They’re not trying to compete with premium earbuds, but they offer a solid listening experience for a fraction of the price.

    nnnn

    Here’s a quick comparison of the sound quality across different price points:

    nnnn
    EarbudsBassMids & HighsOverall Sound SignaturePrice
    JLAB GO AIR POPDecent, lacks depth in bass-heavy tracksClear and crispBalanced for general use$22
    AirPods ProDeep, rich bassExcellent clarityDynamic and immersive$279
    Sony WF-1000XM4Powerful, punchy bassSuperior mids & highsRefined, premium sound$249
    nnnn
      n
    • Overall Sound Quality Rating: 8/10
    • n
    n
    nnnnnnnn
    n

    Durability: Can These Budget Buds Take a Beating?

    nnnn

    When it comes to the build quality of the JLAB GO AIR POP, they’re honestly pretty impressive for earbuds in this price range. The materials feel durable, with a smooth, matte finish that makes them look and feel more expensive than they are.

    nnnn

    The charging case is compact but sturdy, even after a year of tossing it into bags and dropping it many times. The hinge is also still intact, which is rare for budget earbuds. Sure, you’re not getting luxury materials, but for under $25, you get a surprisingly robust product.

    nnnn
    durability jlab go air pop
    My case after 1+ years of daily use and many high drops (Image credit: throughtheeyesofateenager.com)
    nnnn

    While official stress testing results aren’t available, I’ve definitely put these earbuds through some personal stress tests. They’ve been dropped countless of times, gotten a little wet during rainy bike rides, and they’re still going strong.

    nnnn

    The IPX4 rating also give them a decent amount of water resistance. So you won’t have to worry about sweat or light rain ruining them. Most budget earbuds tend to wear out quickly after heavy use, but these have been remarkably resilient.

    nnnn

    Compared to other earbuds in this price range, the durability of the JLAB GO AIR POP stands out. I’ve had other cheap earbuds that barely made it past six months before the sound quality dipped or the charging case hinge broke. But the GO AIR POP has held up really well.

    nnnn

    Most long-term user report a similar experience, with most users saying they’ve had barely any problems. All of them said that these buds have some solid durability, even after a few years of consistent use. While there are occasional issues like one earbud losing sound, it’s pretty rare.

    nnnn

    On top of that, JLAB’s warranty and customer support are a huge plus. You get a 2-year warranty, which is almost unheard of at this price. And if you do run into any issues, their customer support is generally responsive and helpful. For budget earbuds, having a reliable warranty and support is a big game-changer. Especially considering that most competitors offer limited to no protection.

    nnnn
    EarbudsBuild QualityDurabilityWarranty & SupportPrice
    JLAB GO AIR POPSturdy with a solid hingeLong-lasting for daily use2-year warranty, responsive support$22
    Anker Soundcore Life P2Decent, but less durableShorter lifespan, hinge issues18-month warranty, average support$30
    Skullcandy DimeAverage materials, flimsy caseProne to damage over time1-year warranty, slow support$25
    nnnn
      n
    • Overall Durability & Support Rating: 9/10
    • n
    n
    nnnnnnnn
    n

    Battery Life and Charging

    nnnn

    Let’s start things off with the single charge duration of the JLAB GO AIR POP earbuds. On a full charge, these earbuds give you around 8 hours of continuous playtime! Which is super solid for budget earbuds. Most earbuds in this price range usually only last 4-5 hours before needing a recharge, so getting 8 hours is a real bonus.

    nnnn

    It’s perfect for long listening sessions, whether you’re binge-watching your favorite show or going on a day trip. Fun fact: The average person spends about 4 hours a day using audio devices. Meaning these earbuds can last you almost two full days on just a single charge!

    nnnn
    charging jlab go air pop
    (Image credit: headphonesaddict/Peter Susic)
    nnnn

    Now, let’s talk about the total playtime with the charging case. Including the case, the JLAB GO AIR POP can give you up to 32 hours of playtime. That means you can get three additional charges out of the case before you need to charge it.

    nnnn

    The compact size of the case makes it super easy to carry around, so you’re never too far from an extra charge. For comparison, a lot of budget earbuds max out at 20-24 hours total playtime with their cases. Making these definitely on the higher end of the spectrum.

    nnnn

    In terms of charging time and methods, the JLAB GO AIR POP comes with an integrated USB charging cable. Which I personally find super convenient because you don’t need to carry an extra cable around all the time.

    nnnn

    It takes about 2 hours to fully charge both the earbuds and the case, which is pretty standard. Quick charging isn’t available, but for the price, that’s not too surprising. Still, the relatively short charging time means you won’t be waiting around too long before they’re ready to go again. However, these earbuds aren’t able to charge wirelessly. Which can be pretty important if you’re used to charging your buds with a wireless charger.

    nnnn

    When you look at battery life compared to competitors, the GO AIR POP definitely holds its own. While some more expensive models like the Anker Soundcore Life P2 offer around 7 hours of playtime per charge and 40 hours total with the case. The GO AIR POP delivers close to the same for a much lower price. Many cheaper options often top out at 5 hours per charge, so getting 8 hours from these is a huge win for budget-conscious buyers.

    nnnn

    Here’s a quick comparison of battery life across different earbuds:

    nnnn
    EarbudsSingle Charge DurationTotal Playtime with CaseCharging TimePrice
    JLAB GO AIR POP8 hours32 hours2 hours€22
    Anker Soundcore Life P27 hours40 hours1.5 hours€30
    Skullcandy Dime4.5 hours12 hours2.5 hours€25
    nnnn
      n
    • Overall Battery Life Rating: 8.5/10
    • n
    n
    nnnnnnnn
    n

    Pros and Cons: The Good, The Bad, and The Budget-Friendly

    nnnn

    Let’s start with the pros of the JLAB GO AIR POP earbuds. At their price point, these earbuds offer some seriously impressive features that make them a top pick for budget-conscious buyers. Here’s the quick list:

    nnnn

    Pros:

    nnnn
      n
    • Affordable price: At around $22, these earbuds are hard to beat in terms of value.
    • nnnn
    • Good sound quality for the cost: While they may not compete with some higher-end models like AirPods or Sony’s. They do offer surprisingly solid audio for the price, with clear mids and highs.
    • nnnn
    • Long battery life: 8 hours on a single charge and 32 hours total with the case is excellent. Especially consider these buds are in the budget category.
    • nnnn
    • Durable build: The materials and sturdy case design make these earbuds more durable than most budget options.
    • nnnn
    • Comfortable fit: With multiple ear tip sizes and a lightweight design, they’re extremely comfortable, even for extended use.
    • nnnn
    • IPX4 water resistance: Perfect for light exercise or use in the rain without worrying about sweat or water damage.
    • n
    nnnn

    Of course, there are also some cons that you should consider:

    nnnn

    Cons:

    nnnn
      n
    • Lacks strong bass: The sound can feel a bit flat in the bass department. Especially if you prefer bass-heavy music like Hip-Hop or Dubstep.
    • nnnn
    • No quick charge feature: While the battery life is great, there’s no option for quick charging. Which can be a bit of a drawback if you’re in a rush.
    • nnnn
    • Limited volume control: The volume settings can feel a bit unbalanced, as it often jumps from too soft to quite loud without much in between.
    • nnnn
    • Occasional connectivity issues: Some users report that one earbud may randomly lose connection, though this seems to happen infrequently.
    • nnnn
    • Basic touch controls: While functional, the touch controls are a bit limited compared to more expensive models.
    • n
    nnnn
    (Image credit: throughtheeyesofateenager.com)
    nnnn

    Now, who are these earbuds best suited for? The JLAB GO AIR POP earbuds are ideal for students, casual listeners, and anyone on a budget really. If you’re looking for solid sound quality without dropping a bunch of cash, then these earbuds are perfect for you.

    nnnn

    They’re also a great choice for commuters or gym-goers who want something affordable but reliable for everyday use. Plus, with their lightweight and comfortable design, they’re ideal for long listening sessions, whether you’re studying, working, or just chilling.

    nnnn
      n
    • Overall Rating: 8/10
    • n
    n
    nnnnnnnn
    n

    Value for Money: How Do They Stack Up?

    nnnn

    When diving into a comparison with other sub-$25 earbuds, the JLAB GO AIR POP stand out as a strong contender. There are many alternatives in this price range, like the Skullcandy Dime or Anker Soundcore Mini. However, most offer decent sound quality but often skimp on battery life or build quality.

    nnnn

    For instance, the Skullcandy Dime has a more compact design but only provides about 4.5 hours of playtime on a single charge, which is significantly less than the GO AIR POP’s impressive 8 hours.

    nnnn

    While the Anker Soundcore Life P2 might give a slightly better bass response, it typically retails closer to the €30 mark. Which makes it a less attractive option for budget buyers. Overall, the GO AIR POP excels in delivering a balanced sound profile and robust battery life, making it hard to ignore.

    nnnn
    FeatureJLAB GO AIR POPSkullcandy DimeAnker Soundcore Life P2
    Price€22€25€30
    Single Charge Duration8 hours4.5 hours7 hours
    Total Playtime with Case32 hours12 hours40 hours
    Water ResistanceIPX4IPX4IPX7
    Sound QualitySolid mids and highsDecent overallStrong bass response
    Touch ControlsBasicFunctionalMore advanced
    Build QualityDurable and sturdyCompact but less durableGood quality
    Warranty2 years1 year18 months
    nnnn

    With this table, you can easily see how the JLAB GO AIR POP compares with other popular options in the same price range. It’s clear that while the GO AIR POP shines in terms of single charge duration and warranty. Other models may offer advantages like deeper bass or longer total playtime with their cases.

    nnnn
      n
    • Overall Value For Money Rating: 8.5/10
    • n
    nnnn
    n

    Jlab Go Air Pop Price Comparison:

    nnnnnn
    nnn
    n n
    nnnnnn
    nnn
    n n
    nnnnnn
    nnn
    n n
    n
    n
    nnnnnnnn
    n

    Jlab Go Air Pop Review – FAQ’s

    nnnnnnnnnnnnn
    n
  • Apple Maps vs Google Maps: The Ultimate Navigation Showdown in 2024

    n

    Choosing between Apple Maps and Google Maps can feel like navigating a maze without a map! In 2024, these two mapping giants are still leading the way, but which one stands out? Google Maps is a global favorite with over 1 billion active users every month—seriously, that’s a lot of trips! Meanwhile, Apple Maps shines with its smooth integration into iPhones and other iOS devices. So, which one will guide you best? Let’s break down the key features and see which app earns the top spot in the navigation world!

    nnnn
    n

    Helpfull article:

    nnnn
    n
    nn
    nnnn
    n
    n

    HOW TO CLEAR CACHE ON IPAD: QUICK AND EASY METHODS FOR 2024

    nnnn

    Discover simple steps to clear cache on your iPad, boosting performance and freeing up storage. Learn multiple methods to… Read more
     

    n
    n
    n
    n
    nnnn
    n

    Best latest article:

    nnnn
    n
    nnnn
    nhttps://www.youtube.com/watch?v=D1s_zSjgTRYn
    nnnnnnnnnnnnnnnn
    n

    The Evolution of Apple Maps and Google Maps

    nnnn

    Apple Maps had a rocky start when it launched in 2012, as it was filled with errors that caused loads of frustration for users. From missing towns to incorrect locations, it had it all. Because of this, people quickly started to notice the app’s lack of accuracy compared to Google Maps, which was released 7 years prior.

    nnnn

    Apple’s decision to replace Google Maps with their own service in iOS 6 led to widespread criticism. With later even an apology from the company, which is a very rare thing for Apple to do. Tim Cook encouraged users to try alternatives like Google Maps or MapQuest while Apple worked to improve their own app.

    nnnn
    apple maps meme
    (Image credit: X/FalcDanny)
    nnnn

    Google Maps, on the other hand, has been the go-to choice for digital navigation for years. Launched in 2005, it quickly became the dominant force, offering advanced features like Street View, which launched in 2007.

    nnnn

    Google Maps didn’t just help you get from point A to point B—it changed how people explore the world. While Apple Maps was stumbling, Google was continuously refining its platform. They were adding real-time traffic updates, offline maps, and public transit directions, making them the #1 navigation system.

    nnnn
    n
    nnnnnnnn

    Subscribe to stay updated, it’s free!

    nnn
    nnnn

    Fast forward to today, and both Apple Maps and Google Maps have made significant strides. Apple Maps introduced major updates in 2015, with improved accuracy, public transit data, and more detailed visuals.

    nnnn

    Google Maps, meanwhile, continues to evolve, recently adding features like eco-friendly routing and detailed indoor mapping for airports and malls. According to recent data, Google Maps holds about 65% of the global market share for navigation apps, while Apple Maps accounts for around 25%. The gap is closing, but Google still leads in terms of overall user base and overall functionality.

    nnnn

    Here’s a quick comparison of some major key milestones:

    nnnn
    FeatureGoogle MapsApple Maps
    Launch Year20052012
    Street View20072020 (Look Around)
    Turn-by-turn Navigation20082012
    Real-time Traffic20072013
    Public Transit Data20112015
    nnnn

    Despite its early setbacks, Apple Maps has come a long way, and both apps continue innovating in the digital mapping world.

    n
    nnnnnnnn
    n

    User Interface and Design: A Visual Voyage

    nnnn

    When it comes to app layout and ease of use, both Apple Maps and Google Maps have their own strengths an weaknesses. Apple Maps sticks to a clean, minimalist design with very easy-to-navigate menus and clear icons. It’s designed to be intuitive and simple. And for iPhone users, they feel right at home with the rest of the iOS interface.

    nnnn

    Google Maps, on the other hand, is packed with features, but this sometimes makes it feel a bit more cluttered. However, Google’s wealth of features is neatly tucked away in menus. And once you get used to the layout, it’s super easy to use.

    nnnn
    apple maps vs google maps design
    nnnn

    In terms of color schemes and aesthetics, Apple Maps takes a more modern and minimalist approach. It mostly sticks to soft, neutral tones that are easy on the eyes. Roads are shown in muted colors, with important details like transit stations or landmarks standing out just enough without being too overwhelming.

    nnnn

    Google Maps leans more toward functionality, using brighter colors and bolder contrasts. While this makes it easier to spot key locations at a glance, some users may find it a bit more visually busy. Especially when compared to Apple’s sleek design. If you prefer a calmer & simper look, Apple Maps might be more appealing to you.

    nnnn

    Both platforms offer some customization options, though Google Maps leads the way in this regard. You can change the map type (like satellite or terrain view), set personalized labels, and even create custom maps for your needs.

    nnnn

    Apple Maps on the other hand keeps things simpler, with fewer options to tweak. When it comes to accessibility, both apps are fairly inclusive. Google Maps has a variety of features, like voice navigation for blind or low-vision users. As well as detailed information on wheelchair accessibility.

    nnnn

    Apple Maps offers similar options, like voiceover support and route suggestions that consider accessibility. However, Google Maps tends to have more data available on this front.

    nnnn

    Here’s a quick comparison of customization and accessibility:

    nnnn
    FeatureGoogle MapsApple Maps
    Map CustomizationHigh (Satellite, Terrain, Custom Maps)Low (Standard, Transit)
    Accessibility InfoDetailedImproving, but limited
    Color SchemeBold, High ContrastMinimalist, Soft Tones
    Voice NavigationYesYes
    nnnn

    In short, both platforms excel in different areas, so your choice depends on whether you prefer more customization and data (Google) or a clean, intuitive experience (Apple).

    n
    nnnnnnnnnnnnnnnn
    n

    Why Does Apple Have A Navigations System?

    nnnn

    Now you might be thinking that Apple Maps is pretty good, but why did Apple even create this? Google Maps was the number 1 navigation system 10 years before Apple even started. Well simply put, Apple’s trying to create an ecosystem that is hard to leave. Apple wants every app that you use to be theirs.

    nnnn
    why does apple maps exist
    nnnn

    They’re doing this to make the user more loyal to the company so they will never leave their ecosystem. Passing it down generation by generation and recommending it to all of their friends and family.

    nnnn

    An even better example of this is iMessage and FaceTime. While some Android users can technically use them, it just feels awkward. It almost makes you feel like you’re missing out and pushes people to switch to Apple. Just so they can stay in touch with friends and family more easily.

    n
    nnnnnnnn
    n

    Apple Maps Vs Google Maps – Conclusion

    nnnn

    In this Apple Maps vs. Google Maps comparison, both apps have shown significant evolution, with each bringing unique strengths to the table. Google Maps, with its long-standing dominance and global coverage, still reigns as the go-to choice for many. Its reliable turn-by-turn navigation, real-time traffic updates, and extensive public transit information make it a favorite for users who want accurate data worldwide.

    nnnn

    With 65% of the market share, Google’s lead is undeniable, but Apple Maps, holding 25%, has made impressive strides. Its seamless integration with iOS, user-friendly design, and privacy-focused approach are steadily closing the gap.

    nnnn

    Apple Maps may have had a rough launch in 2012, but today it’s much more competitive, especially in remote urban areas. It offers a minimalist design, clean interface, and features like lane guidance that make it ideal for iPhone users.

    nnnn

    However, Google Maps still has the edge in areas like global public transit coverage and cycling directions. If customization and comprehensive data are priorities, Google is hard to beat. However, for those already invested in Apple’s ecosystem, Apple Maps’ privacy features and smooth experience are hard to ignore.

    nnnn

    Ultimately, your choice between the two apps comes down to your preferences and needs. Google Maps excels with features and data, while Apple Maps focuses on creating a unified, privacy-driven ecosystem. Apple’s strategy mirrors what it has done with other apps like iMessage and FaceTime. Building tools that encourage users to stay within its ecosystem, passing loyalty from generation to generation. Whether you prioritize navigation features or a streamlined experience within your devices, both apps will get you where you need to go. So, why not test both and see which fits your style best?

    n
    nnnnnnnn
    n

    Apple Maps Vs Google Maps – FAQ’s

    nnnnnnnnnnnnn
    n
  • Cool Tech For Teenagers November

    n

    In this episode of my monthly series ”Tech For Teenagers”, I will feature cool tech that students can use to make school easier. From basic things like a power bank to extremely cool gadgets that will blow you away! These 5 tech products will blow everyone at your school away and are very handy and easy to use! Why use normal boring school stuff if you can get the coolest futuristic gadgets for under €30. As usual, I will feature 4 different tech products, this month all in the symbol of school and they are all under €30 and carefully picked through the eyes of a teenager.

    nnnn

    Top 4 Cool Tech For Teenagers

    nnnn
    nnnn

    Contents:

    nnnn

    Iniu Powerbank

    nnnn

    How Is It So Small?

    nnnn

    Rocketbook Core Reusable Smart Note Book

    nnnn

    How To Use Rocketbook Core Reusable Smart Notebook

    nnnn

    MATEIN Travel Laptop Backpack

    nnnn

    The Features

    nnnn

    Dugio Large Pencil Case Zipper Pencil Pouch

    nnnn

    Is It Big Enough?

    nnnn

    nnnn

    Iniu Powerbank

    nnnn
    nnnn

    This futuristic power bank is more than meets the eye, it might look like a redesigned power bank but if you see what it is capable of you will be amazed. With 11.424 mostly positive reviews with a 4.6-star average, this is one of the best-reviewed power banks on Amazon, and for good reason. At about the size of a card, this thing has a capacity of 10000mAh! That is roughly enough to charge an iPhone 12 mini 3 times over! The charging speed is also really solid, it charges at 22,5 Watts which is considered fast charging but not super fast. It’s able to charge most phones to around 50% within 30 minutes.

    nnnn

    nnnn
    INIU Powerbank
    nnnn

    nnnn

    How Is It So Small?

    nnnn
    nnnn

    Before I talk about how small it is you should know that 10000mAh is a bit of a lie, although that is the capacity the 3.7 Volts of its battery has to be boosted to 5 Volts so there is a 10% loss of capacity. So realistically this power bank will have a capacity of around 8000 to 9000 Volts. Which is still really good and able to charge an iPhone 12 mini 12 times over.

    nnnn

    The reason why power banks are getting smaller is that lately the technology has gotten better and we are using more efficient materials that can store so much capacity in such a small space.

    nnnn

    nnnn
    INIU Powerbank size
    nnnn

    nnnnnnnn

    Rocketbook Core Reusable Smart Notebook

    nnnn
    nnnn

    You might be thinking to yourself, what does a smart notebook even mean? Well, a smart notebook basically means a notebook that you can save online and then reuse. It works like this, you will be taking notes or writing and all you have to do to save it online is scan it and it will convert it to a digital document with digital re-writable text. Then you can just wipe the test away on your notebook with water and reuse it, it’s that easy!

    nnnn

    It’s also very eco-friendly because you only have to use it once, scan it, and then just wipe it away to reuse it. If you have to write an online assignment but prefer to write on paper this smart notebook will also allow you to do that and gives you much more freedom.

    nnnn

    nnnn
    Rocketbook Core Smart Notebook
    nnnn

    nnnn

    How To Use Rocketbook Core Reusable Smart Notebook

    nnnn
    nnnn

    It might look a bit confusing to use but it’s actually really easy! All you have to do to get the text online is download their app called: Rocketbook then just scan whatever it is that you want to have online and then send it to popular cloud apps like google docs and you’re good to go. Another cool feature is that you can set the symbols at the bottom of the page to be for example your mail and then when you want to scan it it will automatically send that page to your mail if you have marked that symbol. It’s really nice and very user-friendly with a lot of nice-to-have features included for just €15,70!

    nnnn

    nnnn
    Rocketbook Core Smart Notebook cool feature
    nnnn

    nnnnnnnn

    MATEIN Travel Laptop Backpack

    nnnn
    nnnn

    You can’t make a list of gadgets for students and not feature a backpack, it’s something students use every day. This backpack is packed with all the tech you will ever need and all the room you need for all the stuff students need to bring to school these days. Everything from a charger for your phone to bands to attach to your suitcase for easier traveling. This backpack doesn’t miss anything, it’s all there! At the moment it is €32 but when you add the coupon it saves you €6 making it only €26.

    nnnn

    nnnn
    MATEIN Travel Backpack
    nnnn

    The Features

    nnnn
    nnnn

    This bag has literally every feature you would ever need, the first and probably most handy feature of this backpack is its pocket at the side where you can pass through the charging cable from your power bank that sits on the inside. The second handiest feature of this backpack is all the space it offers, everything you want to fit in your backpack will fit in from your laptop to your earbuds space isn’t a concern with this backpack. It’ ‘s also water resistant which is perfect for students that go through the rain a lot to get to school and as I mentioned it’s also ”multipurpose” with the bands that attach to your suitcase which is a cool feature but I wouldn’t call it multipurpose as it’s still just a bag but then attached to your suitcase.

    nnnn
    MATEIN BAckpack Feature #1
    nnnn
    MATEIN BAckpack Feature #2
    nnnn
    MATEIN BAckpack Feature #3
    nnnn
    MATEIN BAckpack Feature #4
    nnnn
    MATEIN BAckpack Feature #5
    nnnn

    nnnnnnnn

    Dugio Large Pencil Case Zipper Pencil Pouch

    nnnn
    nnnn

    This pencil case might not look that special but it’s everything you ever wanted from a pencil case. There is space in here for literally everything from your earbuds to even small calculators or even the INIU Powerbank could fit in this pencil case. It’s 24 cm/ 9,4 inches long which is slightly smaller than a typical ruler but still big enough to fit 1,5 iPhone 15s for perspective. It has 2 side pockets and 1 main in the middle and also pouches in the side to fit extra accessories in. It’s also the best overall pencil case on Amazon and has 4,6 stars. It also looks really cool and unique and also has 6 different styles, all at the same price (€12,99).

    nnnn
    Dagio Large pencil case
    nnnn

    Is It Big Enough?

    nnnn
    nnnn

    Well to summarize for most people it’s more than big enough, it’s so big I can’t think of one thing that you would need to fit in that you can’t. The dimensions are shown in the picture below but it’s a very nice size and it makes very well use of the size. It’s not crazy big but that would also not be practical I think that it’s about the best size a pencil case could be.

    nnnn
    Dagio Large pencil case size
    nnnn

    nnnnn
  • Cool Tech For Teenagers December Christmas Gifts

    n

    Today, in this month’s Tech for Teenagers Christmas edition, I will feature 3 tech products to gift for Christmas or to put on your wish list all under €40. If you want to buy a present for someone but don’t know what to buy, then you’ll get some inspiration from this. From basic stuff like a good power bank to insanely cool gadgets that will help them for the rest of their lives! Some of these products have already been featured in earlier posts in this series, but I just think that these products would also make for a great gift. These 3 coolest tech products are mostly day-to-day gadgets like the power bank but with a special twist on it.

    nnnn

    Top 5 Cool Tech For Teenagers Christmas Gifts Edition

    nnnn
    nnnn

    Contents:

    nnnn

    3 In 1 Charger

    nnnn

    Is It Fast?

    nnnn

    Iniu Powerbank 

    nnnn

    How Is It So Small? 

    nnnn

    APHERMA Massage Gun

    nnnn

    Is It Good For Your Body

    nnnn

    nnnn

    3 In 1 Charger

    nnnn
    nnnn

    Starting with this 3 1 charger from a company called Manfh, this charger can charge anything and can fold in half! With loads of positive reviews and Amazon’s pick for this price range, this product is one of the best executions of a 3 in 1 charger under €40. Because it can fold in half and deliver 25W of fast charging which is pretty good for a wireless charger, this product will help anyone clear some desk space. 

    nnnn

    Because it’s a 3 1 charger it can charge your: phone, smartwatch, and earbuds! You can imagine this is very handy for someone who has all these devices to charge but doesn’t want a cluttered workspace. And if you’re devices are charged and you don’t need it anymore, you can even fold it in half and tuck it away! This is a very clean and futuristic-looking design, but still simplistic enough that it would probably fit in with the rest of their/your workspace. The quality is also really good and I see a lot of positive reviews about its build quality.

    nnnn

    nnnn
    3 in 1 charger
    nnnn

    Is It Fast?

    nnnn
    nnnn

    It looks good and the build quality is good, but does it also charge your device fast? Well, the short answer is: yes, because it’s only for iPhones/apple devices and their latest models can charge at only 20W this wireless charger will achieve their maximum charging speed. Because it’s charging at its max speed, the latest models will go from 0% to 100% in around 2 hours or so which is just as fast as a wired charger. Do keep in mind that if you have multiple devices charging at the same time it will of course take longer. And on their Amazon page they are lying about their 25W charging speed, this is 20W because the actual charger that goes in the wall socket is a 20W charger.

    nnnn
    how fast 3 in 1 charger
    nnnn

    nnnnnnnn

    Iniu Powerbank

    nnnn
    nnnn

    I have already featured this product in the last Tech for Teenagers: Cool Tech For Teenagers in November, but I truly think this product deserves a spot on this list because it makes for a perfect gift. The text that you’re about to read is from the latest Cool Tech For Teenagers because I think I explained it very well there.

    nnnn

    This futuristic power bank is more than meets the eye, it might look like a redesigned power bank but if you see what it is capable of you will be amazed. With 11.424 mostly positive reviews with a 4.6-star average, this is one of the best-reviewed power banks on Amazon, and for good reason. At about the size of a card, this thing has a capacity of 10000mAh! That is roughly enough to charge an iPhone 12 mini 3 times over! The charging speed is also really solid, it charges at 22,5 Watts which is considered fast charging but not super fast. It’s able to charge most phones to around 50% within 30 minutes.

    nnnn

    nnnn
    3 in 1 power bank
    nnnn

    How Is It So Small?

    nnnn
    nnnn

    Before I talk about how small it is you should know that 10000mAh is a bit of a lie, although that is the capacity the 3.7 Volts of its battery has to be boosted to 5 Volts so there is a 10% loss of capacity. So realistically this power bank will have a capacity of around 8000 to 9000 Volts. Which is still really good and able to charge an iPhone 12 mini 3 times over.

    nnnn

    The reason why power banks are getting smaller is that lately the technology has gotten better and we are using more efficient materials that can store so much capacity in such a small space.

    nnnn
    how smal iniu powerbank
    nnnn

    nnnnnnnn

    APHERMA Massage Gun

    nnnn
    nnnn

    Although it might sound stupid, this massage gun is great for family members who have muscle pains because of a lot of work or being very active. This is the best thing to end your day with when your muscles are hurting and you’ve had a long day. It’s also great for your body to recover from muscle pain. The cool thing about this exact massage gun is that it’s got a lot of cool features for such a low price (€29,99) it is on discount at the moment so normally it’s around €50. Let’s start with all of their different speed levels that it’s capable of, in total there are 30 speed levels! What that does is give you a different massage for each situation, for example, levels 16-20 are used for pain relief whilst levels 26-30 are used for a professional massage. Other nice features include USB-C charging (want to know more about USB-C? Click here) and around 6-8 hours of battery life which is more than enough for at least a month or so last but not least it’s also very lightweight due to its compact design. All in all it’s an amazing massage gun for the price and a great gift for a family member that often struggles with muscle pains.

    nnnn

    nnnn
    aspherma massage gun
    nnnn

    Is It Good For Your Body

    nnnn
    nnnn

    Whilst this is an amazing product, it can severely harm you if you aren’t using it correctly. So, yes it is good for your body if you use it correctly. A few side-effects that could occur if you use this product excessively or over sensitive areas like your eyes:

    nnnn
      n
    • Damage to blood vessels (arteries and veins). There have been reports of people suffering strokes through damage to the arteries in their neck or blood clots that formed in other blood vessels. You can avoid this if you stick to using the massage gun over large muscles and avoid areas where blood vessels are prominent (see below).
    • nnnn
    • Excessive damage to muscles leads to rhabdomyolysis (a condition that can damage the kidneys) either through excessive use or because the person has a systemic illness. This can be avoided by following the guidelines below.
    • nnnn
    • Damage to eyes after using the gun on the face.
    • nnnn
    • Damage to the pleura (the sack that surrounds the lungs).
    • n
    nnnn

    As a general rule of thumb, you shouldn’t use this product over any kind of damaged skin like a wound or rash, and also not on your neck, face, or head. If you have any kind of other medical issues I would recommend looking on Google and or asking a doctor for help. 

    nnnn

    Also special thanks to SIP for most of this information.

    nnnnn
  • What Charger Does Android Use?

    n

    (Image credit: Shutterstock)

    nnnn

    What charger does Android use, and is it better than iPhone chargers? Great question! Well the quick answer is that Android uses the USB-C port, which is not only super fast but also incredibly efficient.

    nnnn

    Compared to iPhone’s old Lightning port, USB-C is the clear winner. It’s versatile, faster for both charging and data transfer, and compatible with a ton of other devices. Fun fact: USB-C can deliver up to 100 watts of power, which is why it’s also used in devices like the Nintendo Switch and many laptops.

    nnnn

    There are actually a few types of USB, but the one that fits your Android is usually USB-C. The other end of your cable is usually USB-A, which is the chunkier plug that goes into your wall adapter or car charger.

    nnnn

    The cool thing about USB-C is that it’s slowly becoming the standard, even for iPhone’s! In fact, the newest iPhone models have finally switched to USB-C. So Apple fans are just now catching up to the tech that Android users have been enjoying for years now.

    nnnn

    USB-C isn’t just better for speed—it’s also more durable and easier to use. No more guessing which way to plug it in, and because it’s universal, you can charge multiple gadgets with the same cable. Whether you’re powering up your smartphone, tablet, or gaming console, USB-C has you covered. So, if you ask me, Android’s charging game has been ahead of the curve for quite a while!

    nnnn
    n

    Helpfull article:

    nnnn
    n
    nn
    nnnn
    n
    n

    How to Choose the Best Portable Charger for Your Smartphone in 2024

    nnnn

    Discover how to select the perfect portable charger for your smartphone in 2024. Learn about capacity, charging speed, size… Read more
     

    n
    n
    n
    n
    nnnn
    n

    Best latest article:

    nnnn
    n
    nnnnnnnnnnnnnnnn
    n

    Understanding the Benefits of USB-C Charging

    nnnn

    Is USB-C good, and why is everyone using it? Well, it’s pretty much a must-have these days, and for good reason. USB-C can charge a ton of different devices, from phones to laptops, and it’s quickly become the go-to option for fast charging and data transfer. It’s faster and more reliable than most other cables out there. With support for USB 3.1 Type-C ports, USB-C handles larger charging currents—anywhere between 3A to 5A—which means faster charging for your devices.

    nnnn
    Usb-c charger
    (Image credit: Alexander_Evgenyevich / Shutterstock.com)
    nnnn

    One of the coolest things about USB-C is that it even supports reverse charging. Do you ever run out of battery and need to charge your phone, but don’t have a charger? With USB-C, you can plug your phone directly into someone else’s device and borrow some of their battery. It’s a pretty handy feature that can save the day when you’re low on power. Plus, USB-C is designed to last, built to handle at least 10,000 plug-ins and unplugging, making it super durable.

    nnnn

    What makes USB-C especially stand out is its ability to support high wattage—sometimes over 200W. Meaning it can charge devices much faster than most traditional chargers. And because it’s more efficient, USB-C draws less power, saving energy in the long run. So, whether you’re charging your phone, gaming console, or laptop, USB-C is clearly one of the best options available today.

    nnnn

    Key benefits of USB-C:

    nnnn
      n
    • Fast charging speeds: Handles currents between 3A to 5A for quicker charges.
    • nnnn
    • Data transfer efficiency: Faster and more reliable than older cables.
    • nnnn
    • Reverse charging: Use one device to charge another when needed.
    • nnnn
    • Durability: Designed for at least 10,000 plug-ins and unplugging.
    • nnnn
    • High wattage support: Can handle up to 200W+, ideal for charging larger devices.
    • nnnn
    • Energy-efficient: Draws less power than traditional chargers.
    • n
    n
    nnnnnnnn
    n

    USB-C vs. Lightning Port: The Ultimate Showdown

    nnnn

    USB-C and Apple’s Lightning port have been battling it out since iPhones first adopted the Lightning connector back in 2012. Over the years, both cables have seen major changes, but today, USB-C is the clearly the definitive winner. Even Apple has recognized this, which is why they’ve made the switch to USB-C for all their latest models. So, why is USB-C better? Well, it boils down to two main reasons: it’s more universally compatible with other devices, and it offers significantly faster speeds for both data transfer and charging.

    nnnn
    lightning port vs USB-c
    nnnn

    Firstly, USB-C is more convenient because it’s already widely used for so many devices. That means you don’t need two completely different cables anymore—one for your iPhone and another for everything else. Whether it’s your Android phone, Nintendo Switch, or laptop, USB-C works for all of them. The second reason USB-C is better is its sheer speed. When it comes to data transfer for example, Lightning cables top out at a pretty slow 480 Mbps, while USB-C can handle an insane 40 Gbps—which is 85 times faster! Imagine transferring a whole movie in seconds instead of minutes.

    nnnn
    n
    nnnnnnnn

    Subscribe to stay updated, it’s free!

    nnn
    nnnn

    But it’s not just about data speeds. Charging is another area where USB-C crushes Lightning. While Lightning maxes out at 20W, USB-C can handle up to a massive 240W—which is 12 times faster! So, whether you’re powering up your phone or your laptop, USB-C gets the job done in way less time.

    nnnn

    Here’s a quick comparison of the two:

    nnnn
    FeatureUSB-CLightning
    Data Transfer SpeedUp to 40 Gbps480 Mbps
    Max Charging Power240W20W
    CompatibilityWidely universalOnly Apple devices
    DurabilityHighModerate
    nnnn

    So, in the battle of USB-C vs Lightning, USB-C easily takes the crown with faster speeds, higher charging capacity, and universal compatibility.

    n
    nnnnnnnn
    n

    Why USB-C Became the Standard for Android

    nnnn

    USB-C has become the go-to charging solution for Android, but it wasn’t always this way. Before USB-C, Android devices used something called micro-USB, which was much slower and less efficient. Over time, as technology advanced and devices demanded more and more power and faster data transfer speeds. It became clear that micro-USB just couldn’t keep up.

    nnnn

    Which is when USB-C changed the game with its faster charging, reversible design, and universality across multiple devices. Today, it’s the standard for not only Android phones but also laptops, tablets, and even most gaming consoles.

    nnnn
    android phone charging
    (Image credit: ARSTechnica)
    nnnn

    One of the biggest reasons USB-C won over micro-USB is its fast charging capability. With support for higher power delivery, USB-C can charge your phone much quicker than older cables ever could . It’s designed to handle more current, which means you can power up your device faster and get on with your day. On top of that, the data transfer speeds are miles ahead—USB-C can transfer data at up to 40 Gbps! Which makes it perfect for anyone who needs to move files quickly between devices. This massive jump in performance is why USB-C became the logical choice for all modern Android devices.

    nnnn

    Another reason USB-C became the standard is its universality. Unlike micro-USB, which was specific to certain devices, USB-C works with almost everything—from smartphones to laptops. That means fewer cables cluttering up your drawer and more convenience when traveling or working on the go. Plus, the reversible design means no more fumbling to plug it in the right way. It just works, no matter which side you use.

    nnnn

    Here’s a quick look at how USB-C stacks up against micro-USB:

    nnnn
    FeatureUSB-CMicro-USB
    Charging SpeedUp to 240WMax 18W
    Data Transfer SpeedUp to 40 GbpsUp to 480 Mbps
    Reversible DesignYesNo
    Device CompatibilityUniversalLimited
    DurabilityAt least 10,000 usesRoughly 1,500 uses
    nnnn

    In short, USB-C became the standard for Android because it’s faster, more versatile, and far more user-friendly than anything that came before it. Whether you’re charging your phone or transferring files, USB-C makes it quicker, simpler, and way more efficient than micro-USB ever did.

    n
    nnnnnnnn
    n

    How to Choose the Best Charger for Your Android Device

    nnnn

    Choosing the right charger for your Android device might seem simple, but with so many options out there, it can quickly get pretty confusing. The main thing to consider is whether the charger supports USB-C, which has become the standard for most Android phones. However, just having a USB-C cable isn’t enough. You’ll also want to make sure it supports fast charging and has the right power output for your specific device. Some chargers can provide a ton of power, while others might charge your phone slowly.

    nnnn
    how to choose best charger android
    (Image credit: Android Central)
    nnnn

    One key factor when picking the best charger is wattage. Many Android phones support fast charging, but you’ll need a charger that provides enough power for it to work. For example, some newer phones can handle up to 65W or more, while older models might max out around 18W. So, if your charger’s wattage is too low, you won’t get those fast charging speeds that USB-C is known for. Also, consider looking for chargers that support Power Delivery (PD) or Qualcomm Quick Charge. Both of these technologies will make sure your phone charges as quickly as possible.

    nnnn

    Another thing to keep in mind is compatibility. While USB-C is pretty universal, not all chargers are built the exact same. Some come with multiple ports, allowing you to charge your phone, tablet, and even your laptop at the same time. Others might offer additional features like overcharge protection or built-in safety mechanisms, which prevent your phone from overheating. These extra features can give you peace of mind and help you keep your device running smoothly in the long run.

    nnnn

    Here’s a breakdown of what to look for in a charger:

    nnnn
    FeatureWhat to Look For
    WattageMatch your phone’s fast charging capability (e.g., 18W, 30W, 65W)
    Fast Charging TechnologySupports Power Delivery (PD) or Qualcomm Quick Charge
    PortsMultiple USB-C ports if you need to charge several devices
    Safety FeaturesOvercharge protection, heat control
    Brand ReliabilityChoose trusted brands like Anker, Samsung, or Aukey
    nnnn

    To sum it up, the best charger for your Android device should support USB-C, have enough wattage to take advantage of fast charging, and ideally include extra safety features to protect your phone. Whether you’re after a single-port charger for travel or a multi-port one for home use. You’ll have to make sure it’s equipped with the latest fast-charging technology to keep your phone powered up and ready to go.

    n
    nnnnnnnn
    n

    FAQ’s

    nnnnnnnnnnnnn
    n
  • is a 5000 mAh portable good?

    n

    This post will help you find out if a 5000 mAh portable charger is good for your needs. To make sure that you’re not overpaying for mAh’s that you don’t need, because portable chargers are expensive.

    nnnn

    Dear Arun

    nnnn

    As you know portable chargers are expensive, so it’s important to find the right one. You don’t want to be overpaying for more capacity that you don’t really need at the end of the day.

    nnnn

    And maybe a 5,000 mAh portable charger will be in the sweet spot for you. So this article will go over when this portable charger is right for your circumstances.

    nnnn

    Why you should get a 5,000 mAh portable charger

    nnnn

    So let’s get into the pros of 5,000 mAh portable chargers first, to get a better understanding if they’re right for you. If the following pros matter a lot to you, then a 5,000 mAh might be the best pick for you.

    nnnn

    First of all, they’re very compact, which makes sense for the less capacity. However, I have seen a lot of 10,000 mAh portable chargers that are also tiny and are not that pricy. So this wouldn’t be my main reason for settling on a 5,000 mAh portable charger.

    nnnn

    Also both 5,000 mAh portable chargers and 10,000 mAh portable chargers can charge at the same speed. So charging speed is also need a key advantage of 5,000 mAh portable chargers.

    nnnn

    But an actual key advantage of 5,000 mAh is there cost, being a lot less pricy than it’s higher capacity counterparts. You can find them for as cheap as 10$ these days!

    nnnn

    Apart from that, if you’re a person that doesn’t really need a lot of capacity. Say you only want to use it for occasional top-ups, then a 5,000 mAh portable charger is going to be sufficient.

    nnnn

    Why you shouldn’t get a 5,000 mAh portable charger

    nnnn

    Now that we’ve talked about the pros, lets talk about the cons. The things that make a 5,000 mAh portable charger not worth it for you.

    nnnn

    Let’s start of with the obvious, which is that they of course have a lot less capacity then other portable chargers. For occasional top-ups, it’s great. However, for anything more then that, you’ll need a bit more capacity.

    nnnn

    Or if you have anything else to charge, it’s not going to cut it. A 5,000 mAh portable charger is for occasional top ups, not for regular use with multiple devices.

    nnnn

    How long does a 5,000 mAh portable charger last?

    nnnn

    n