Always wanted to play all the latest FPS games on your PC or laptop, but didn’t have a powerful enough GPU for it? Well, external GPUs or eGPUs might be the solution, but what are they and how do they work?
nnnn
An external GPU or eGPU for short is a device that allows you to connect a GPU externally to your PC, via Thunderbolt or USB-C. This will enhance your PC’s graphic performance, especially if your built-in GPU is not powerful enough. Some advantages of having an eGPU are: Future-Proofing: When your computer’s built-in graphics card becomes outdated, upgrading the eGPU is simple and doesn’t require replacing the entire system. Versatility: An eGPU can be used with multiple computers that have compatible ports, providing a flexible and convenient solution. Easy Installation: Setting up an eGPU is generally easy and requires minimal technical expertise. If you want to know more about these eGPUs, then keep reading because I’m going to tell you all about them.
nnnnnnnn
Why Woud I Need An External GPU or eGPU?
nnnnnnnn
An external GPU (eGPU) becomes essential when your computer’s internal graphics card struggles with demanding tasks such as gaming, virtual reality, or intensive software applications. By integrating an eGPU, you can significantly enhance your system’s graphics capabilities, resulting in smoother gameplay, faster rendering times, and overall improved performance.
nnnn
For gamers, an eGPU enables playing the latest AAA titles at higher settings with improved frame rates and enhanced visual effects. It ensures a more immersive gaming experience and reduces lag, particularly crucial for competitive gaming and virtual reality environments where responsiveness is paramount.
nnnn
Professionals in fields like graphic design, video editing, and 3D modeling benefit from an eGPU’s ability to accelerate rendering processes and handle complex graphical tasks more efficiently. This means reduced waiting times for rendering projects and increased productivity. Additionally, an eGPU future-proofs your setup by allowing easy upgrades as technology advances, ensuring your system remains capable of handling future software demands without the need for a complete system overhaul.
nnnn
Moreover, eGPUs offer versatility by being compatible with multiple computers, making them a cost-effective solution for enhancing graphics performance across different devices. Setting up an eGPU is straightforward, often requiring just a few simple steps with user-friendly interfaces and plug-and-play functionality. This ease of installation means you can quickly start enjoying enhanced graphics performance without extensive technical expertise, making eGPUs accessible and beneficial for a wide range of users.
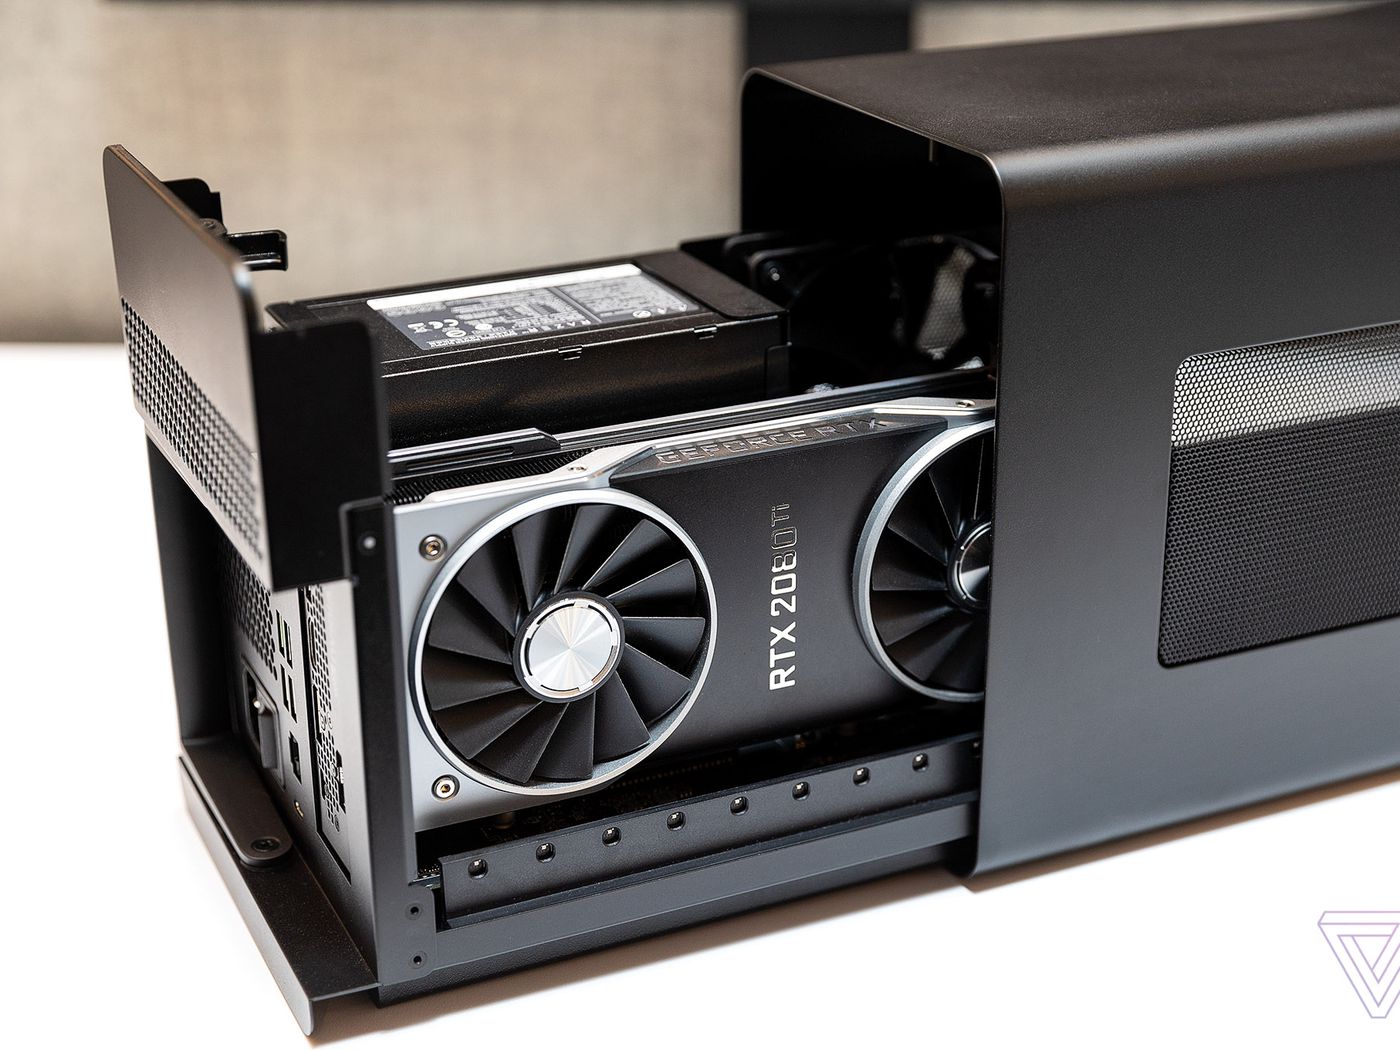
nnnn(Image credit: Amelia Holowaty Krales / The Verge)nnnnnnnn
Are eGPU’s Compatible With Laptops?
nnnnnnnn
Now eGPUs are great and all, but are they also compatible with laptops? As with a laptop, you can’t quickly switch out parts and this could be very handy. So if your laptop is old and not able to play the newest AAA games then I have some good news for you. Because eGPUs are very compatible with laptops, all you need is a compatible Thunderbolt or USB-C port on your laptop. This allows you to boost your laptop’s graphic performance. Note that you will also need an external power supply to power the GPU, but as you only need to power the GPU you don’t need a big power supply so it won’t be that expensive. But it can be worth it, as it can make your computer up to 10x more capable of playing the latest AAA games even if you already have a pretty powerful laptop. So it’s worth looking into as it will improve the graphic performance of your laptop substantially and all you need is a USB-C/Thunderbolt port, a power supply, and a GPU. You probably won’t need a big power supply as it will only need to power the GPU, the amount of W can vary per GPU, and I would advise getting a good one with more than enough wattage for future proofing and just general stability of your GPU.
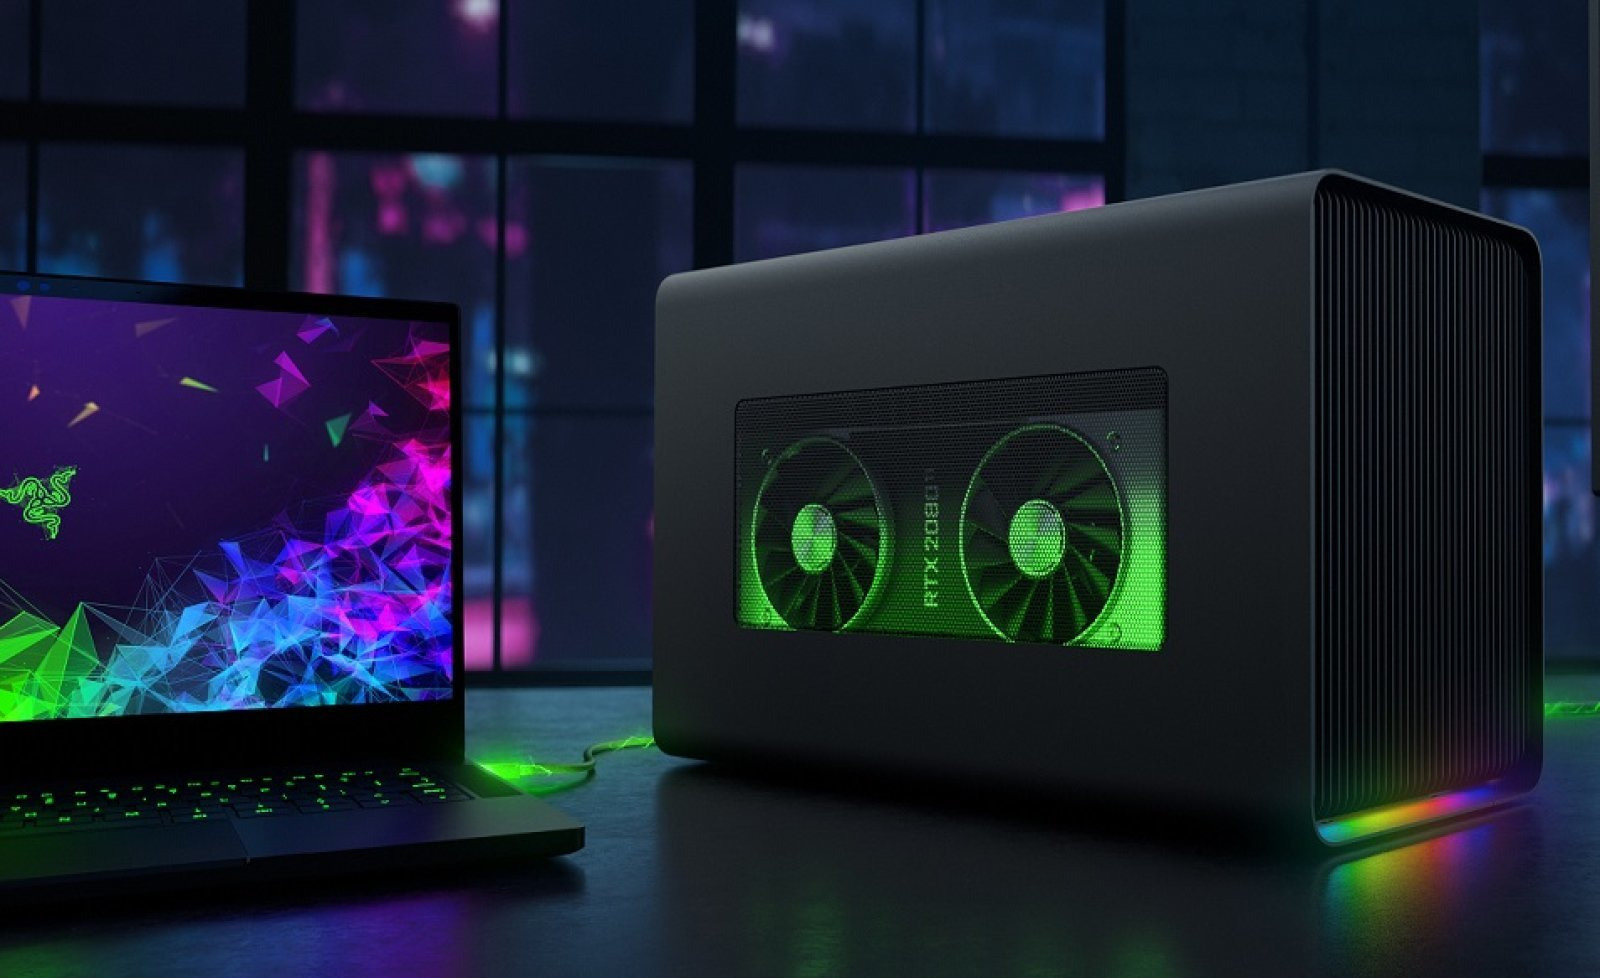
nnnn(Image credit: NVIDIA)nnnnnnnn
What Perfomance Boost Can You Expect?
nnnnnnnn
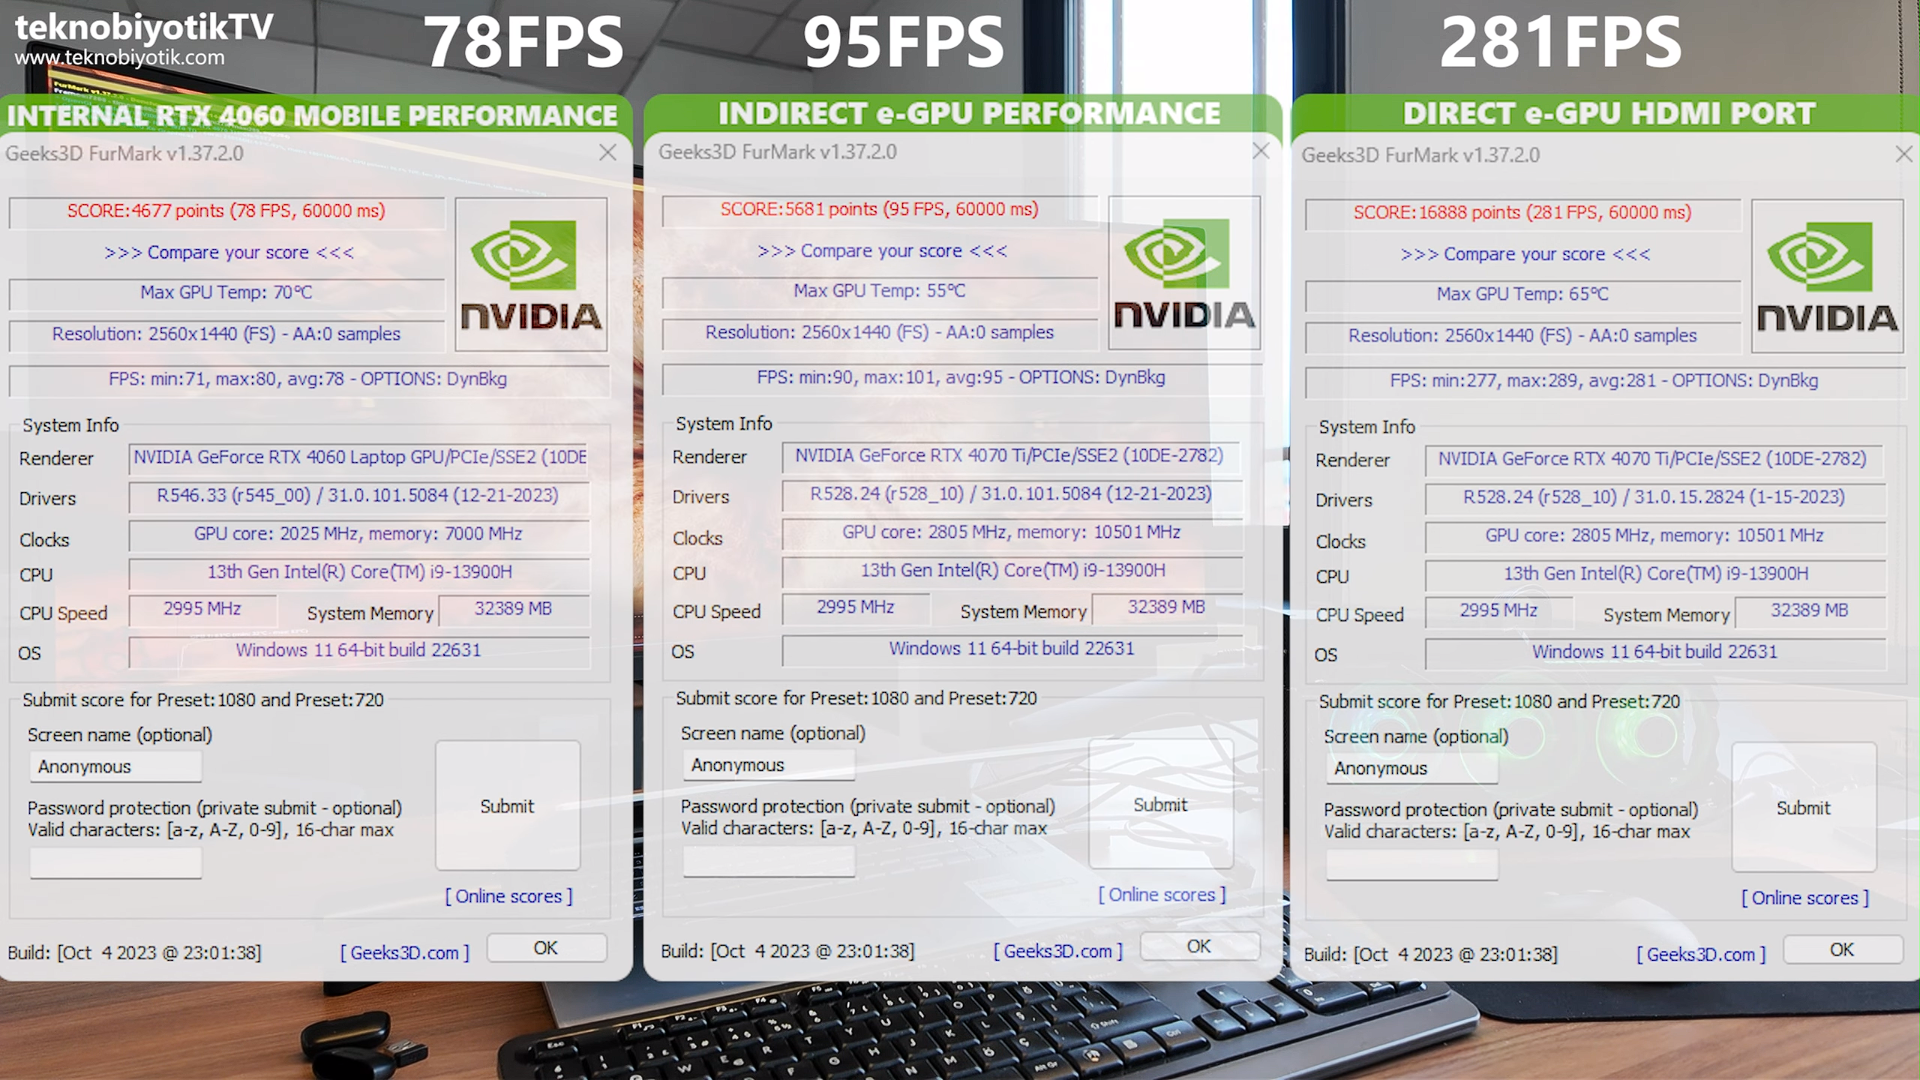
Overall, you’re going to get a huge performance boost if you get a good GPU. But even something like a RX 5600 XT, which you can get for only $179.99. Which is still not cheap, but it’s better than getting a whole new laptop for example. I did find some benchmarks for external GPU as shown below and as you can see there’s a major performance boost when using the eGPU. He is using the RTX 4070 which isn’t the cheapest GPU, but you can see that it’s already roughly 4x better than the laptop’s RTX 4060. This goes to show that even if you have a pretty good laptop, you can still get huge performance boosts when using an eGPU.
But, eGPUs are still pretty expensive as you also have to buy a case that costs a minimum of $100 and you also still have to get the dedicated power supply for the eGPU. So all-in-all you’re probably looking at something like $400 minimum together. This is why it’s probably not worth it if you already have a pretty decent laptop and you’re happy with the performance that you’re getting from it, or if you’re not playing the latest & most demanding AAA games.
eGPUs are great, but there are a few things worth mentioning when it comes to their downsides. So I created a list of the 4 most important downsides of an eGPU.
nnnn
n
eGPUs are expensive, as I mentioned before. eGPUs can start at a minimum of around $400 so they’re not cheap
nnnn
Technical Limits and Performance Problems, despite improvements, eGPUs have limitations. Thunderbolt 3 is slower than direct PCIe connections, causing bottlenecks and less performance. So, eGPUs might not always give the expected boost, especially in high-end gaming and professional use.
nnnn
Compatibility and Ease of Use, eGPUs often need specific hardware and software setups to work well, leading to compatibility issues. These challenges, along with the extra setup and maintenance, can affect the user experience.
n
nnnn
Conclusion
nnnnnnnn
In conclusion, eGPUs can be a great way to enhance your current laptop’s graphic performance, but it does come at a pretty steep price. So if you already have a pretty good laptop and you’re happy with its performance or you’re not playing the latest & most demanding AAA games, then I would stick with what you currently have as it’s probably not worth it. Considering that for a decent eGPU setup, you’re already paying a minimum of $400, I would consider if you need this or not, or you can even get a brand new laptop for that price.
I hope this blog post helped you with understanding what a external GPU (eGPU) is and if you should get one, and be shure to check out some of my other blog posts.
In a day and age where it feels like almost everyone is using wireless charging, it made me wonder if older smartphone models, like the iPhone 11 also have wireless charging.
nnnn
The short answer is yes, the iPhone 11 can charge wirelessly. All iPhones after the iPhone 8 have built-in wireless charging. So if you want to know more about wireless charging and how fast all the iPhones can charge wirelessly this blog post will discuss precisely that. Apart from that, I will leave some of my recommendations for wireless chargers if you’re interested. But first, what even is wireless charging?
nnnnnnnn
What Is Wireless Charging, And How Does It Work?
nnnnnnnn
I’m sure you’ve probably heard of wireless charging before, but for those who are uncertain about what it is, I’ll quickly explain it here. The basics of wireless charging are that in the case of a smartphone, there is a wireless charging coil in every smartphone that can charge wirelessly that is made to receive energy from a charging pad. The pad also has a coil that is designed to interact with the phone’s coil. However, studies have shown that wireless charging is way less efficient than wired charging, so that is something to think about when considering wireless charging.
nnnn
This loss in efficiency is because of two things, number 1 is that if the wireless charging pad and the wireless charging coil in your smartphone aren’t perfectly aligned it’s going to be less efficient. Now Apple’s Magsafe and the Qi2 standard offer a partial solution to this problem. To stop the misalignment of the phone and the charging pad MagSafe and Qi2 have made a set of magnetic coils in the charger which line up with the opposite magnets in the back of your phone. This makes for a perfect alignment and maximum efficiency when transferring energy from your charging pad to your smartphone. But even with Magsafe, 36% more energy is lost when compared to wireless charging and the battery also becomes way warmer even in this best-case scenario of wireless charging.
nnnn
So that is something to keep in mind when deciding if your going to start charging wirelessly, however, if you still prefer this over the hassle of always needing a cable then continue reading as I’ll mention a few of my recommendations for wireless charging down below.
nnnnnnnn
How Fast Does Each iPhone Charge Wirelessely
nnnnnnnn
After a bunch of research, I made a table with every iPhone since the iPhone 8 (because any iPhone before that didn’t have wireless charging). So it’s easy for you to go over and see how long it will take to charge your iPhone wirelessly.
nnnn
iPhone 8: 3.5+ hours
iPhone X: 3.5+ hours
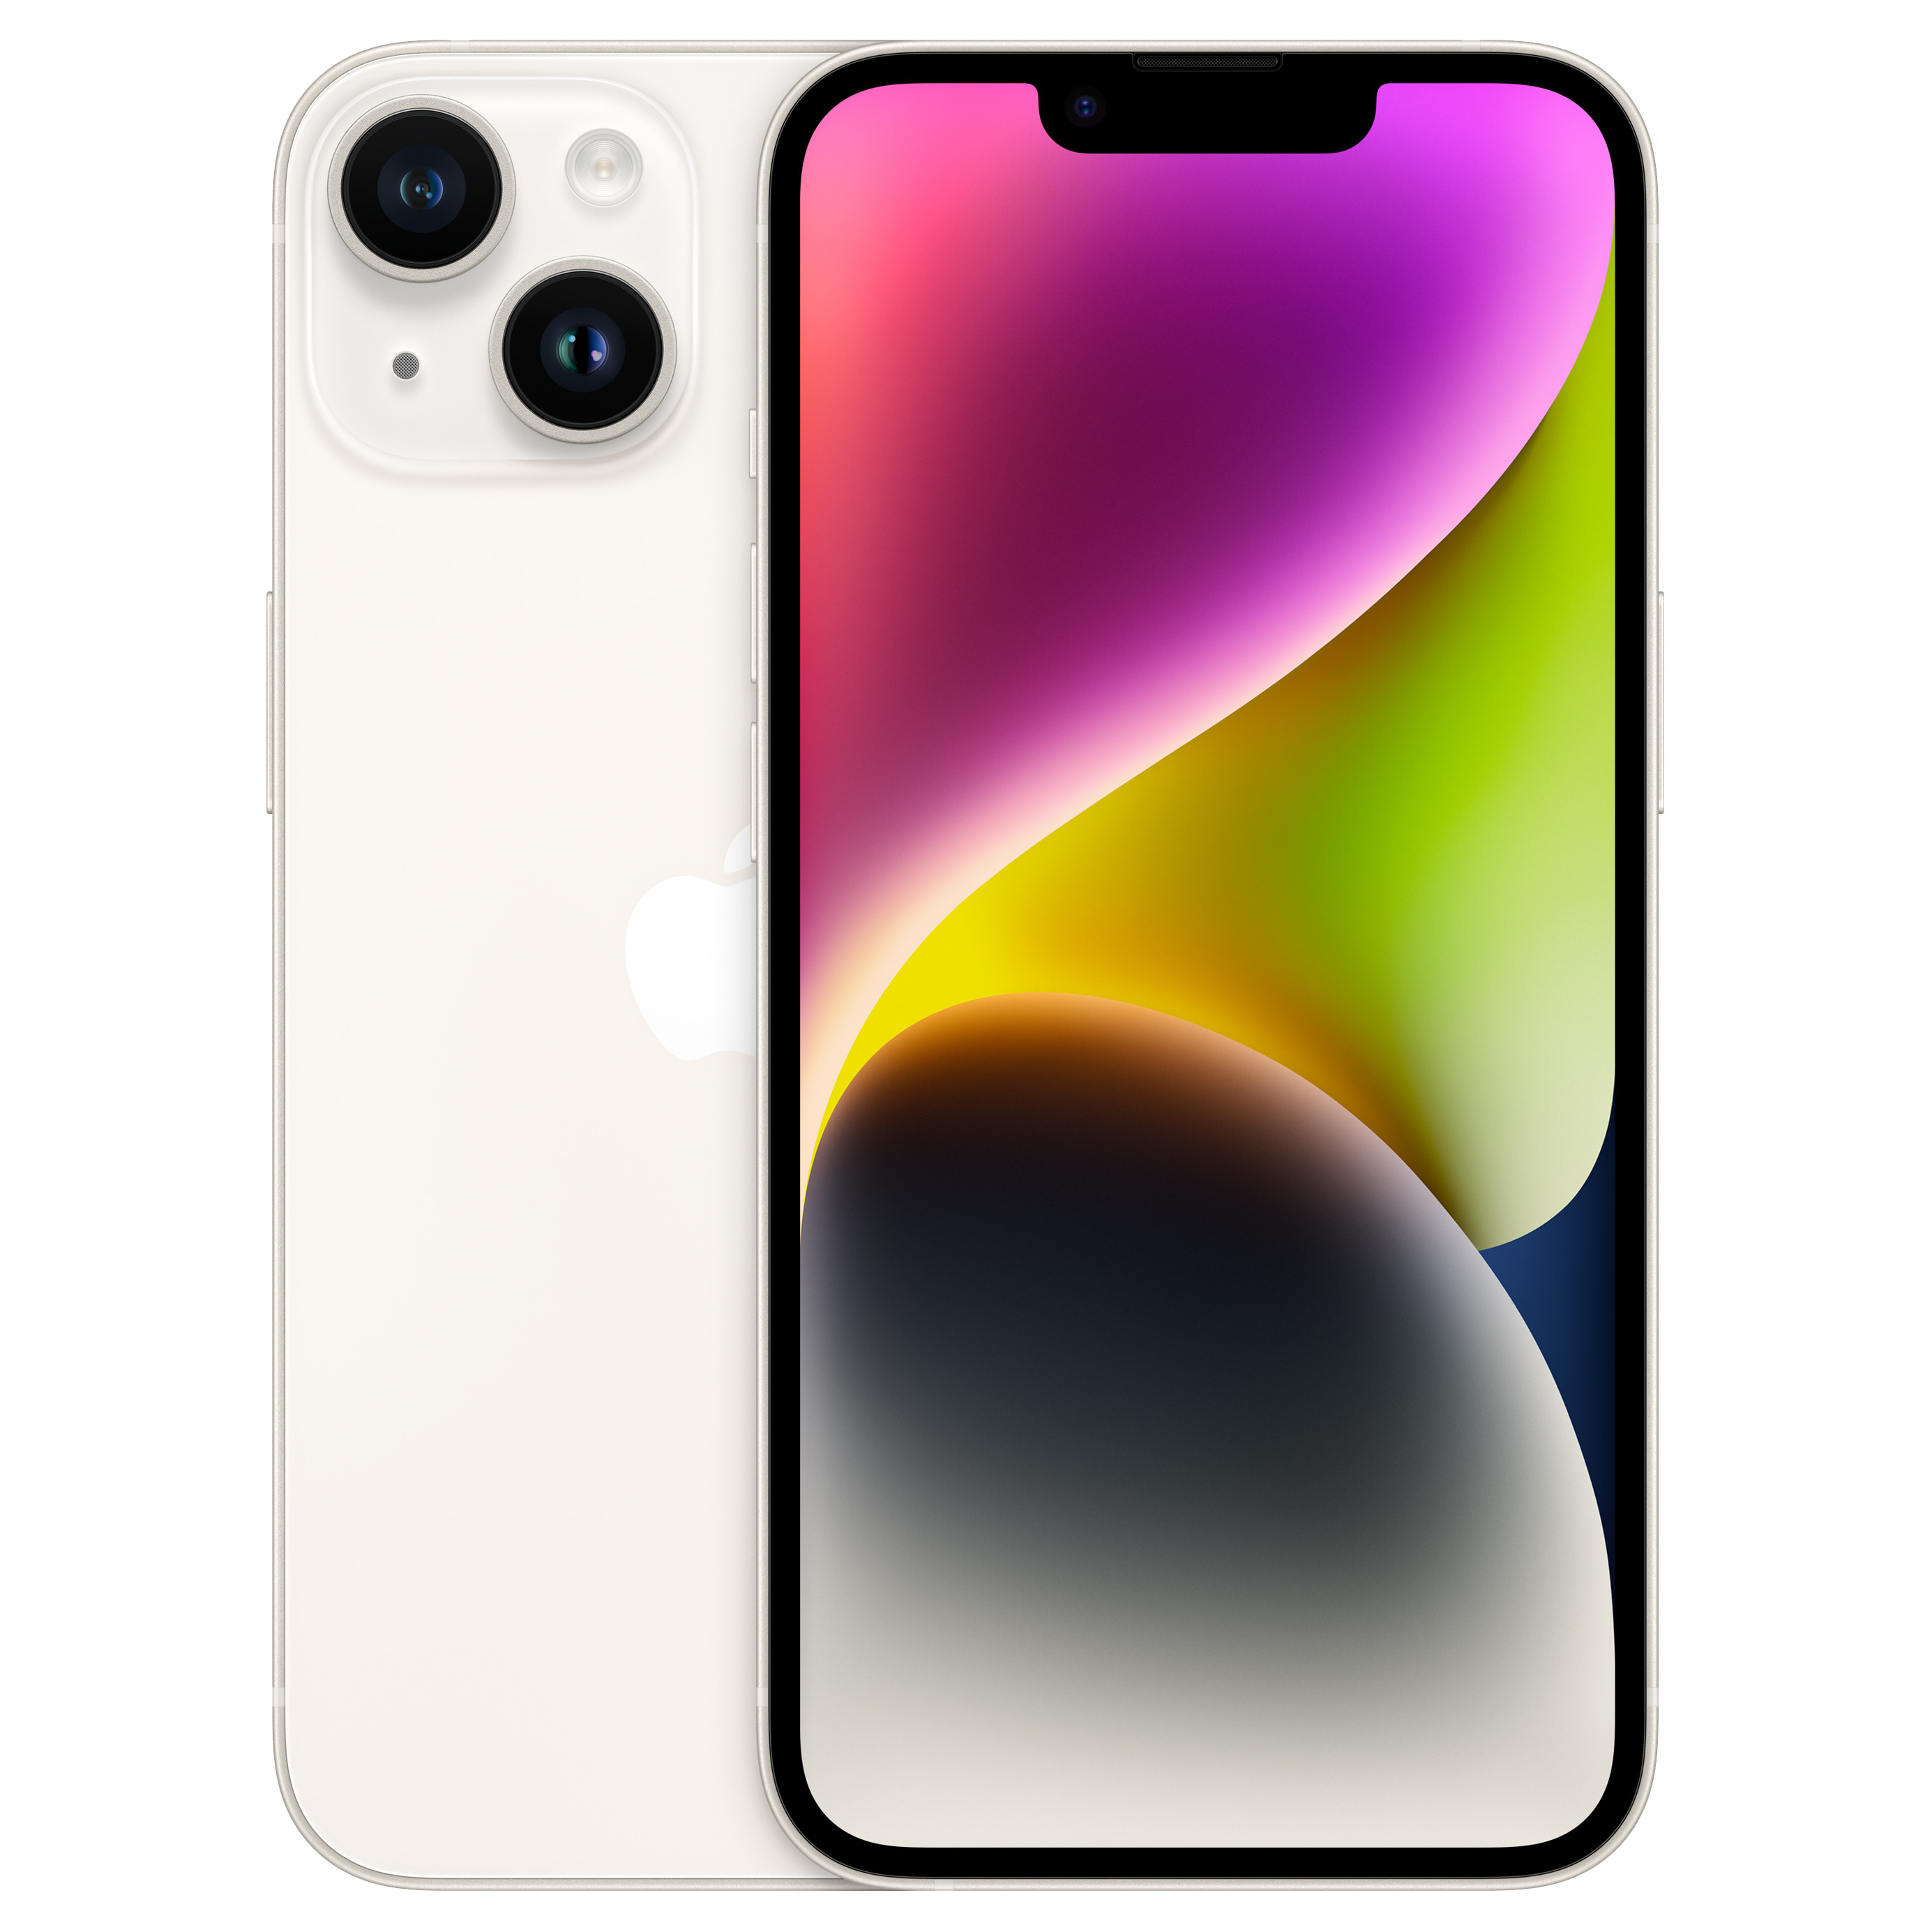
iPhone 11: 3.5+ hours
iPhone 12: 2+ hours
iPhone 13: 2+ hours
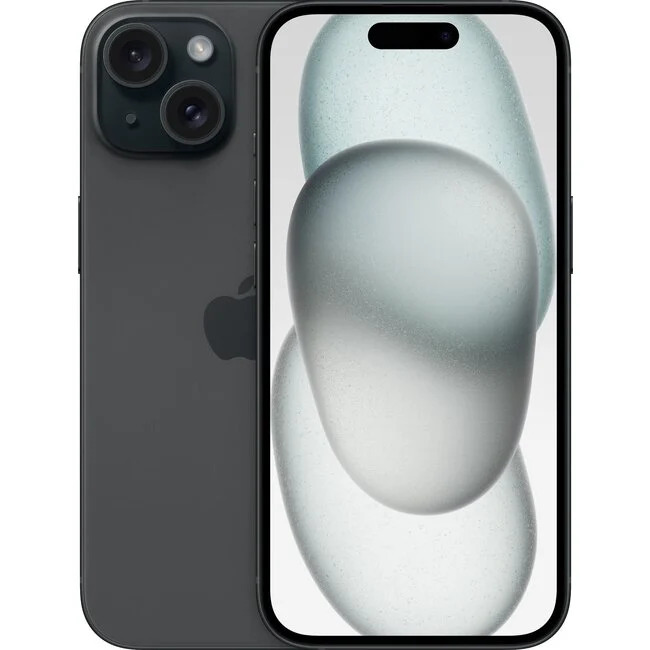
iPhone 14: 2+ hours
iPhone 15: 2+ hours
nnnnHow Fast Does Each iPhone Charge Wirelessely Tablen
Iphone model:
Charging time (using Magsafe on the models later than iPhone 12 because that gives 15W of wireless charging compared to 7.5W
iPhone 8
3.5+ hours
iPhone X
3.5+ hours
iPhone 11
3.5+ hours
iPhone 12
2+ hours
iPhone 13
2+ hours
iPhone 14
2+ hours
iPhone 15
2+ hours
nnnnn
Now the later models (after iPhone 12) do support 15W wireless charging via MagSafe which is why they charge substantially faster. But if you don’t have a Magsafe charger, for example, the standard Qi wireless charger then you can only do 7.5W even on the later modes. It would probably also take more than 3 hours to fully charge them.
nnnnnnnn
My Recommendations For iPhone Wireless Chargers
nnnnnnnn
Here are some of my recommendations for wireless chargers if you’re interested in getting one for your iPhone. Note that you can only receive 7.5W of power from these chargers when using an iPhone 11 or older, however, if you own an iPhone 12 or newer you can wirelessly charge up to 15W
nnnnn
Anker MagGo Powerbank, if you want to know more about it, click here where I tell you all about it in my latest Tech For Teenagers post.
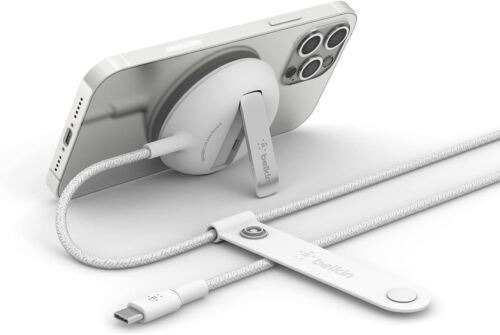
2. Belkin 15W MagSafe Wireless Charger Pad, This wireless charging pad is capable of fast charging the iPhone 15 and other compatible devices. While it doesn’t include a wall adapter, it features a long power cable, MagSafe support, and an integrated stand.
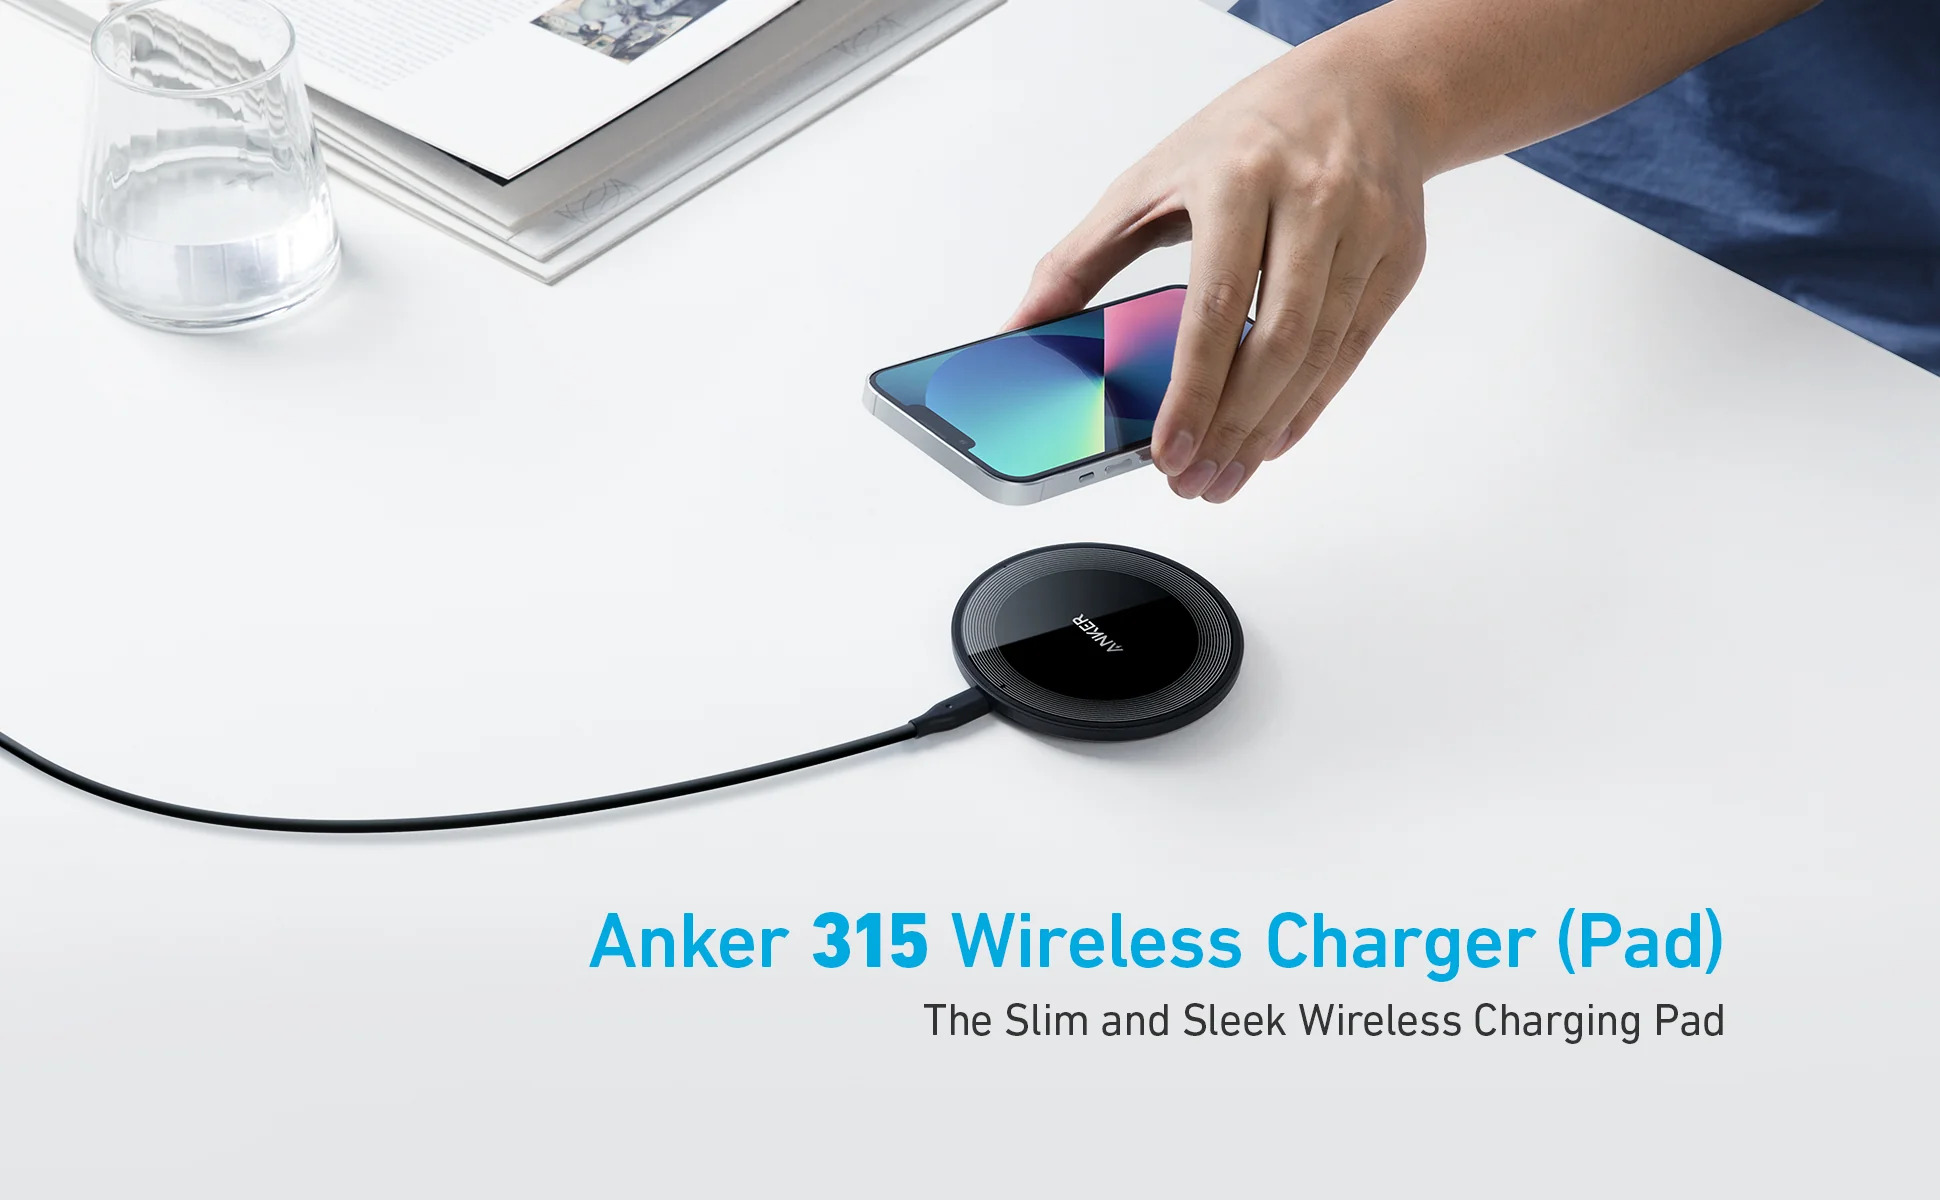
3. Anker 315 Wireless Charger, Anker’s budget-friendly 315 Wireless Charger offers up to 10-watt charging for Android phones and 7.5-watt for iPhones. It features a sleek, slim design with a grippy surface, and includes a USB-C cable, but requires a separate power adapter for optimal performance.
Yes, the Xbox series X/S controllers are backwards compatible with the Xbox One. Youshould be able to connect your Xbox series X/S controller normally via either USB or the pairing system which I’ll explain how to do later. You’re also able to connect any Xbox One controller to the Xbox series X/S, all those controllers are backwards and forwards compatible with each other which is great to see from Microsoft and definitely something I would hope to see on Playstations one day.
nnnn
So in this post, I’ll explain how you can connect both your Xbox series X/S controllers with Xbox One and vice versa. I’m going to make it as quick and easy to understand as possible so, at the end of this post, you’re going to know exactly how to do this and get started immediately.
nnnnnnnn
How To Connect Xbox Series X/S Controller To Xbox One
nnnnnnnn
Connecting your Xbox series X/S controller to your Xbox One is super simple and like connecting any other controller to your Xbox one, but still I’ll explain exactly how to do this in only 4 simple steps. Note that I’m explaining how to connect your controller wirelessly, if you want to connect your controller via a wire all you should have to do is plug it in and it should work.
nnnnn
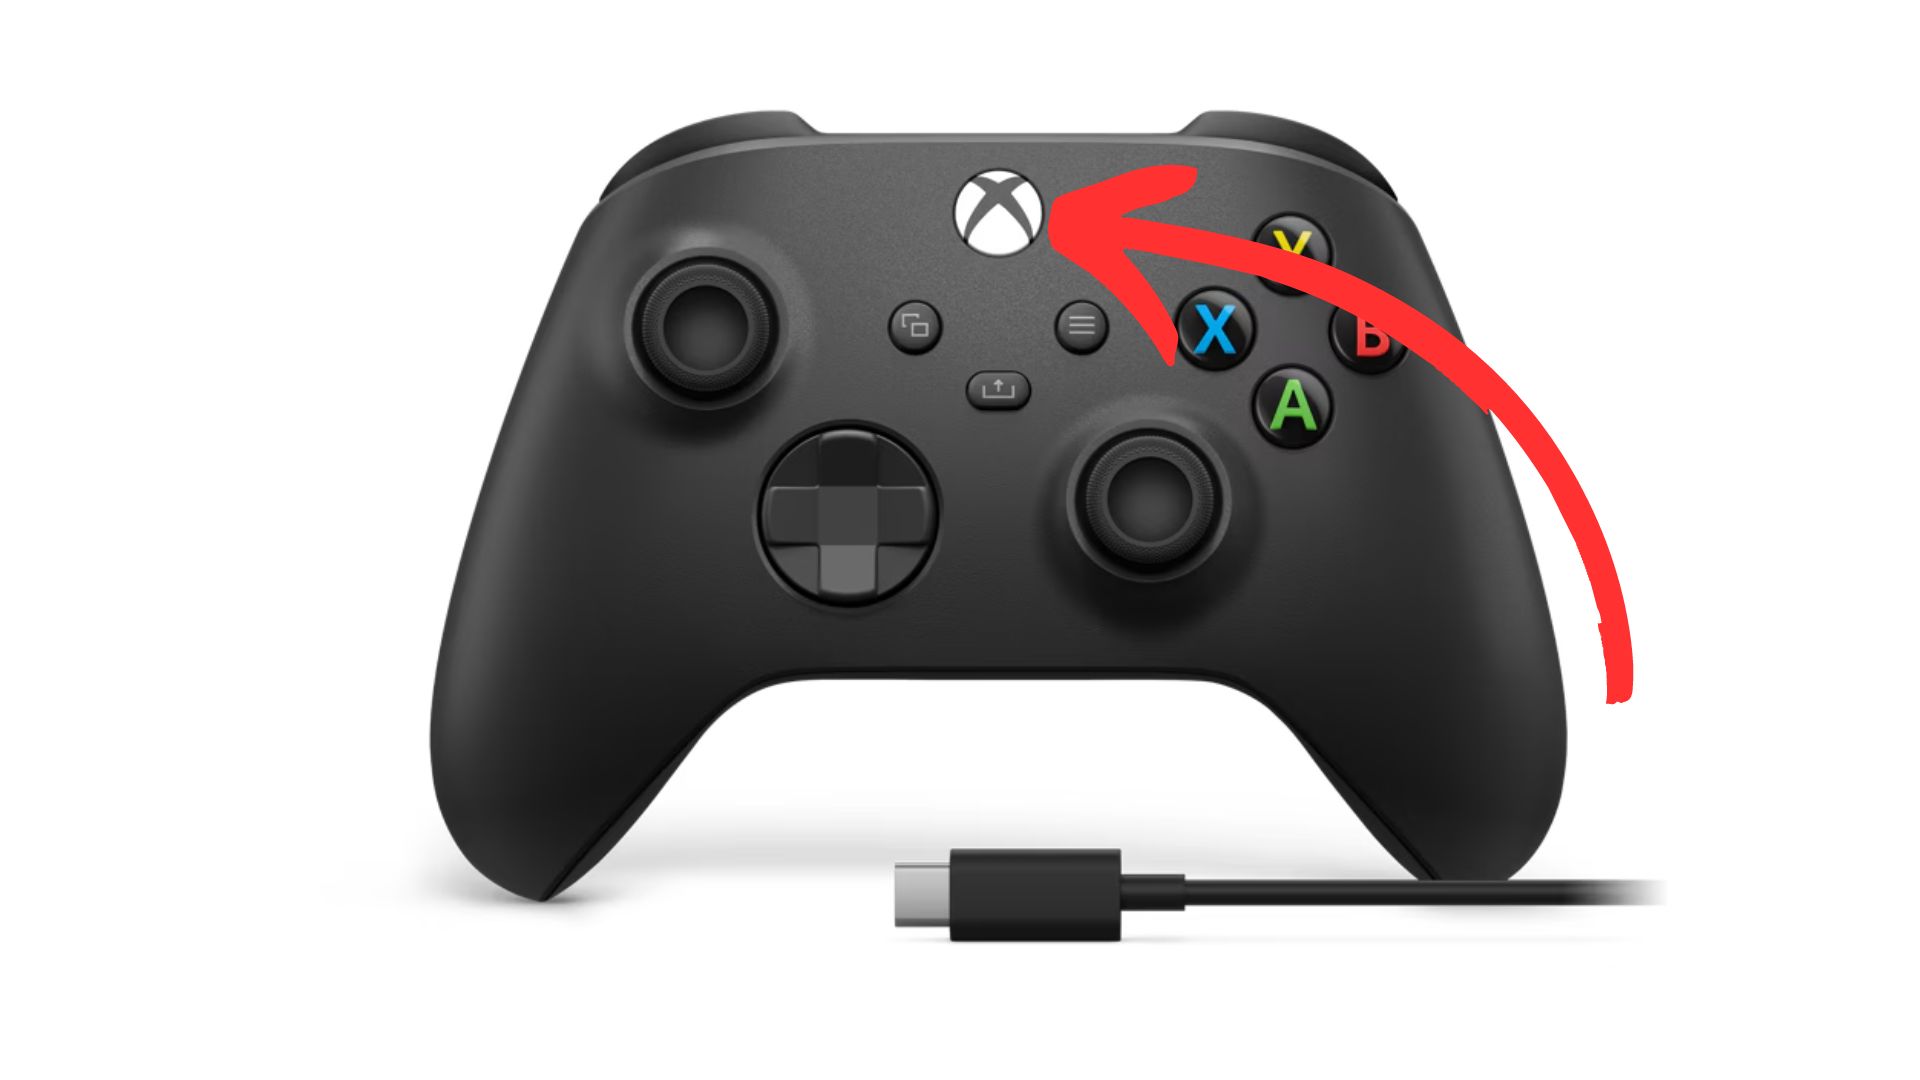
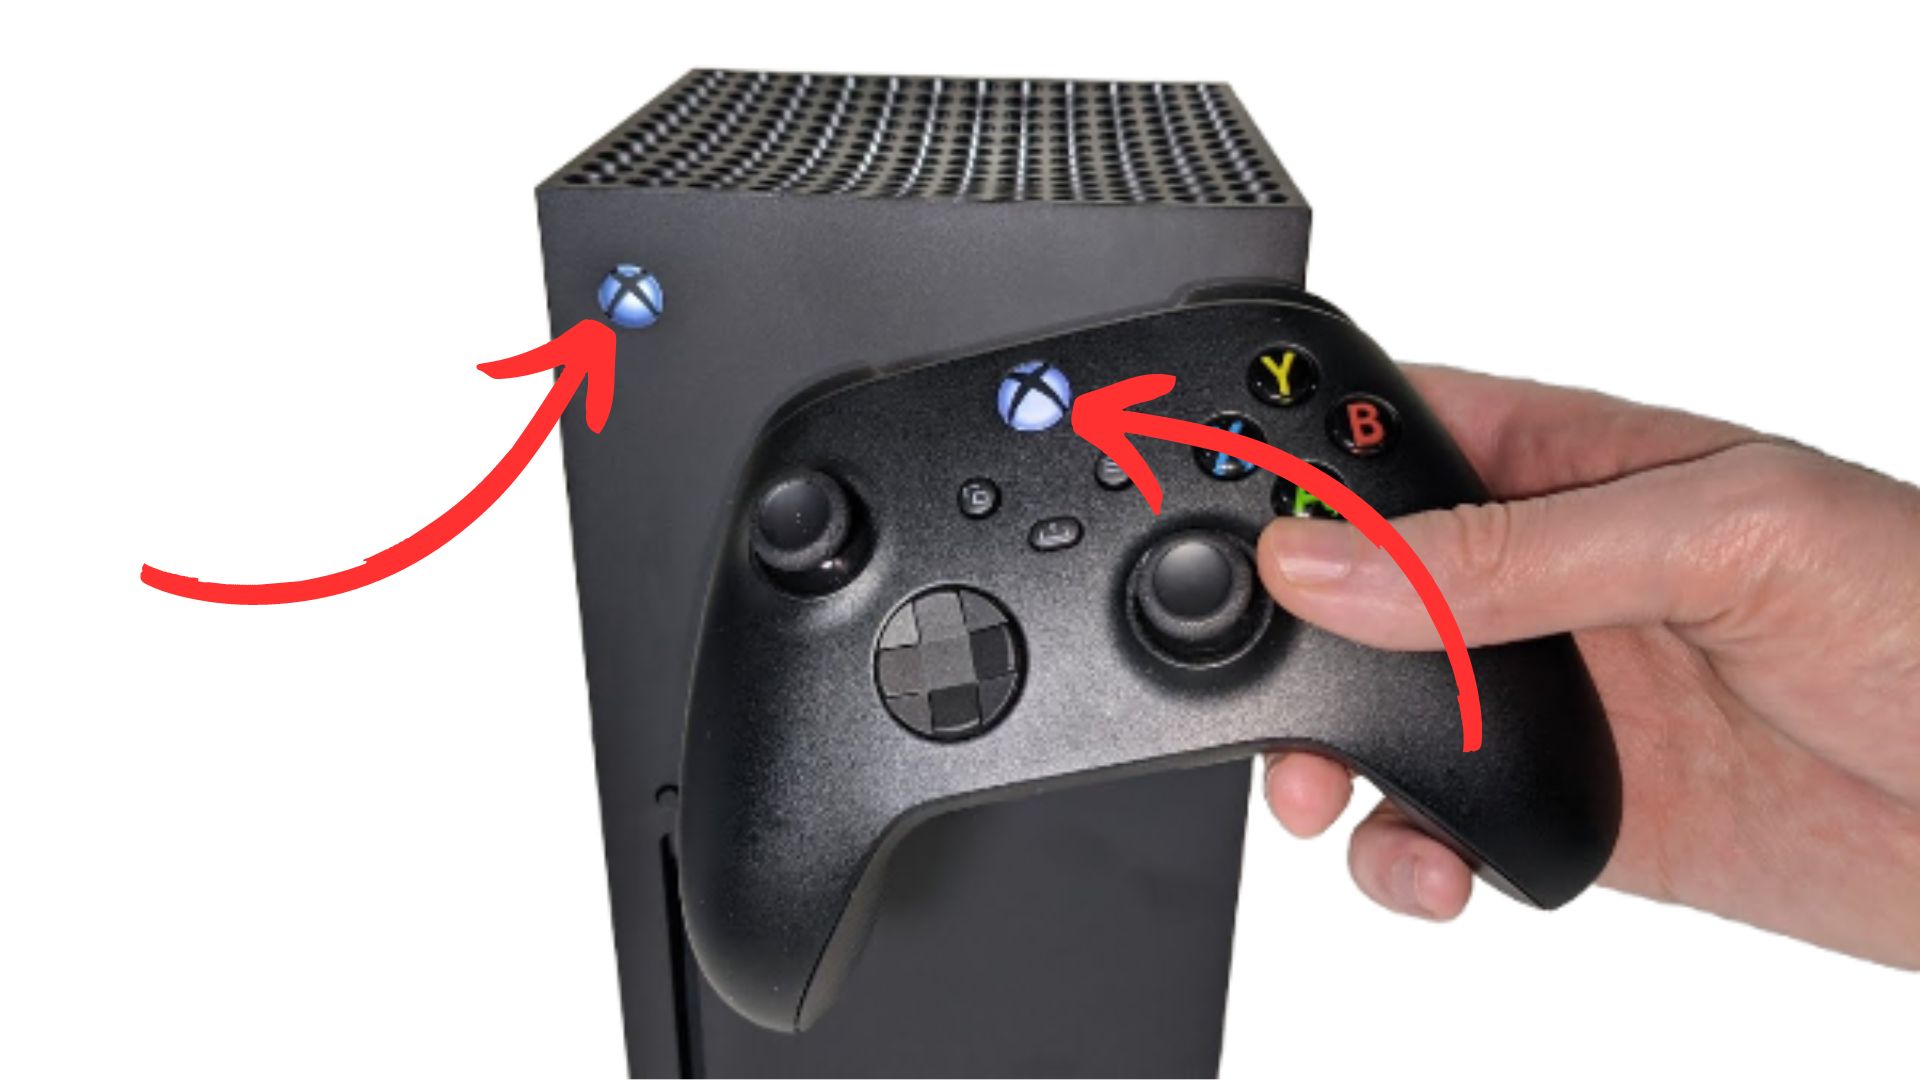
Turn your controller on, you can do this by pressing on the Xbox logo on the controller.
nnnnnnnnn
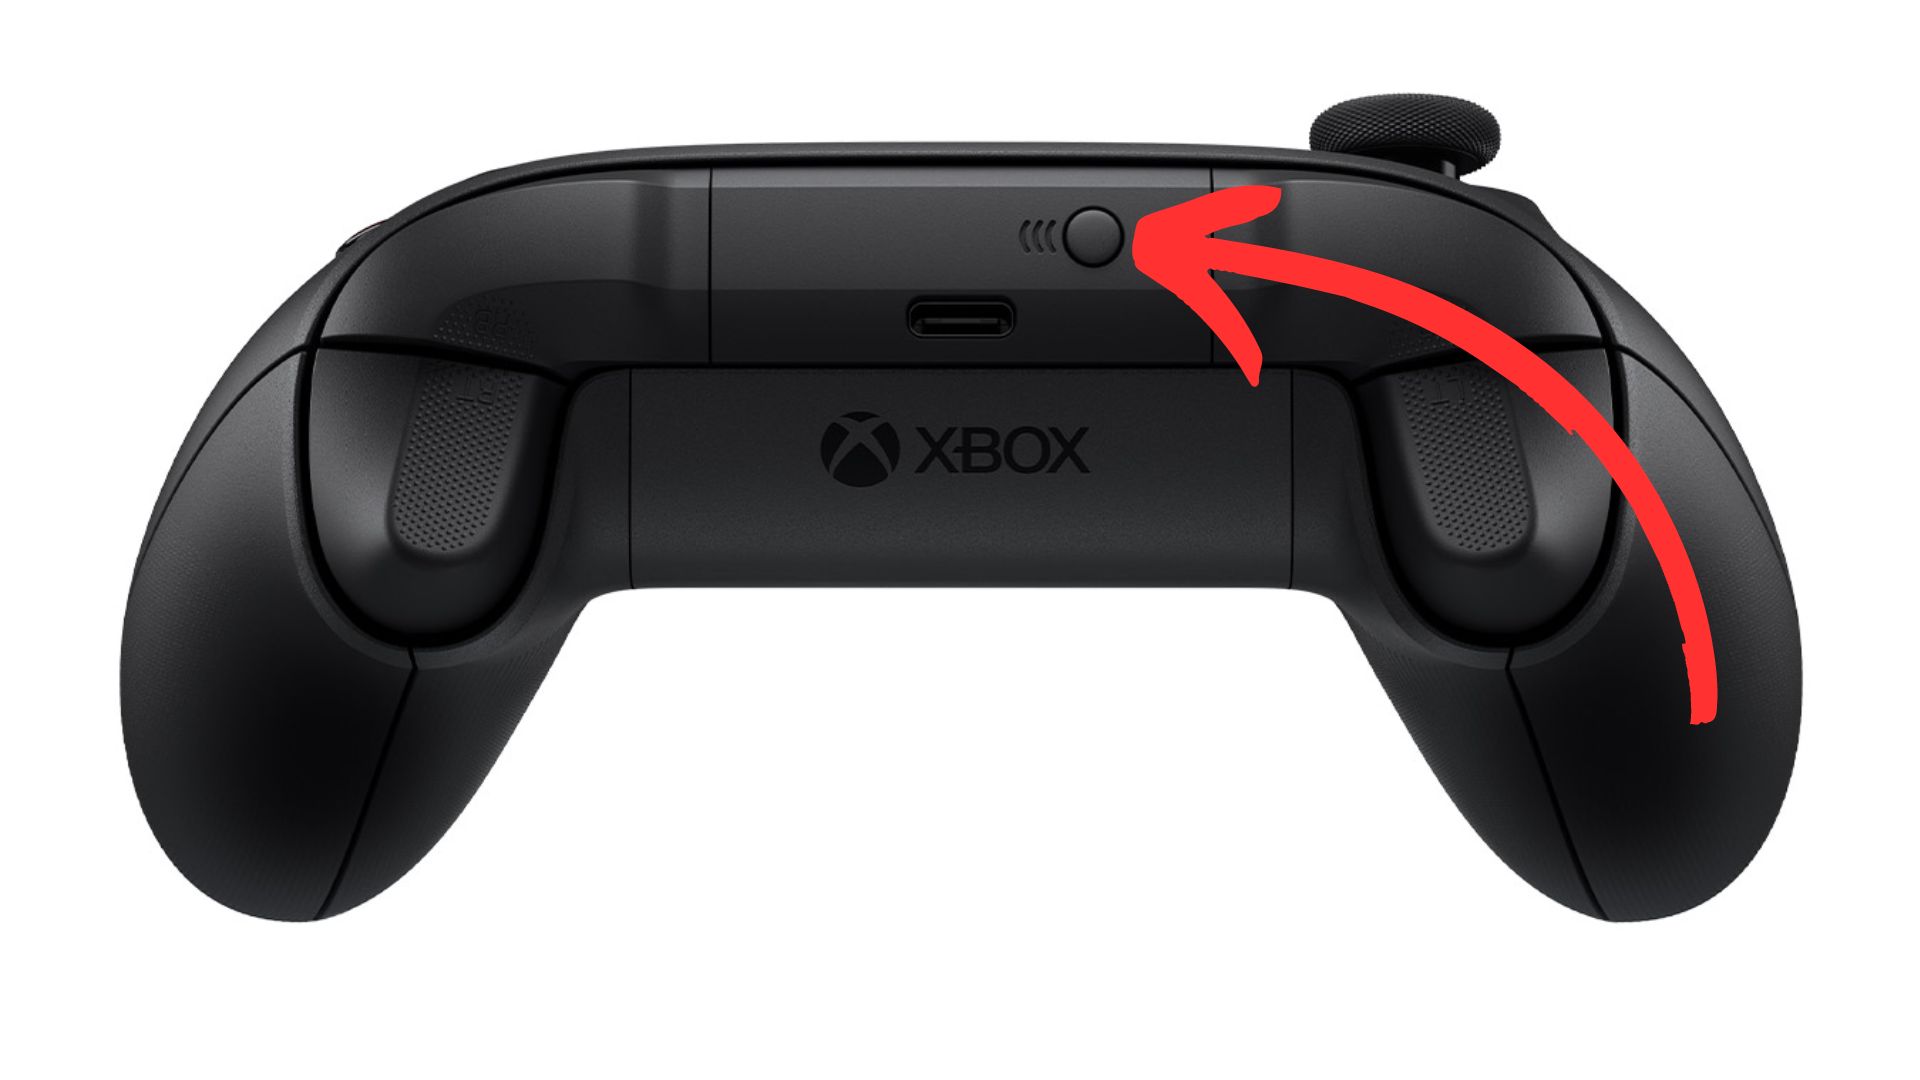
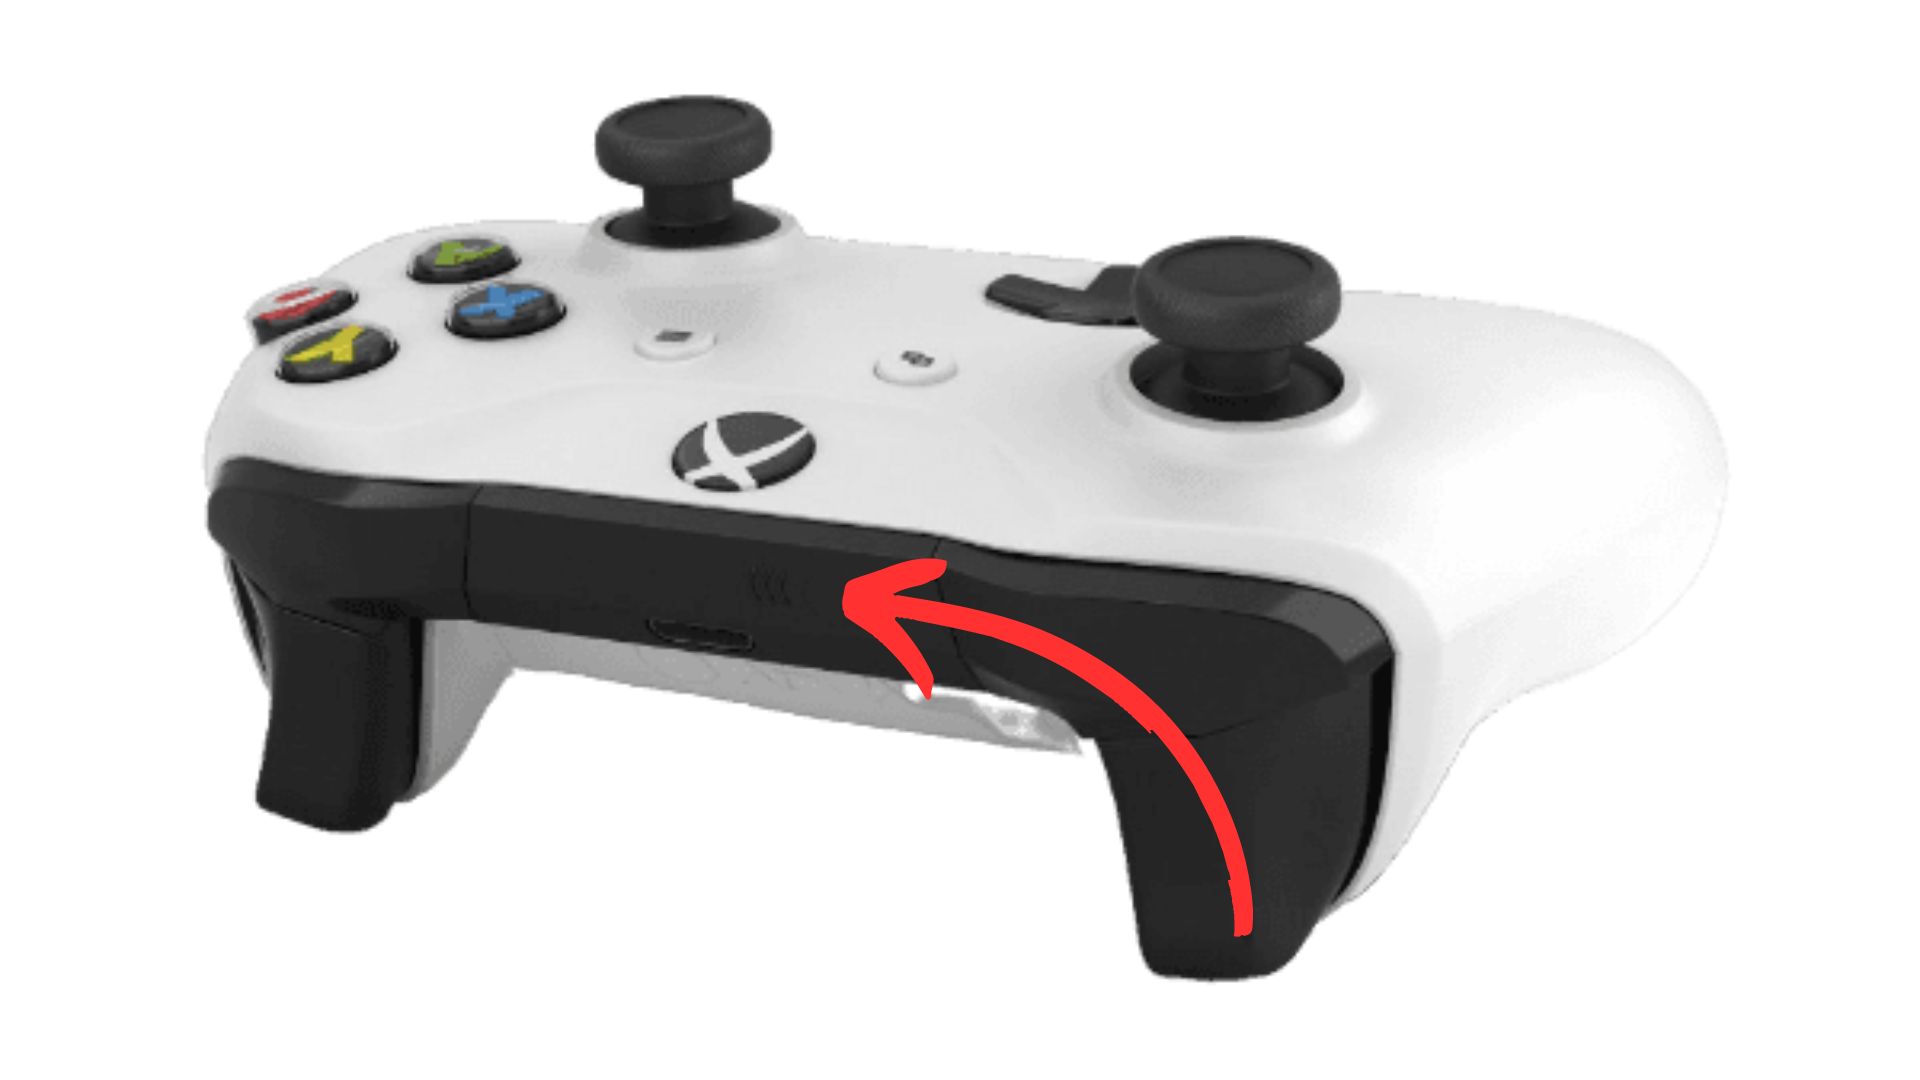
2. Sync your controller, do this by pressing on the ”sync” button at the top of your controller.
nnnnnnnn
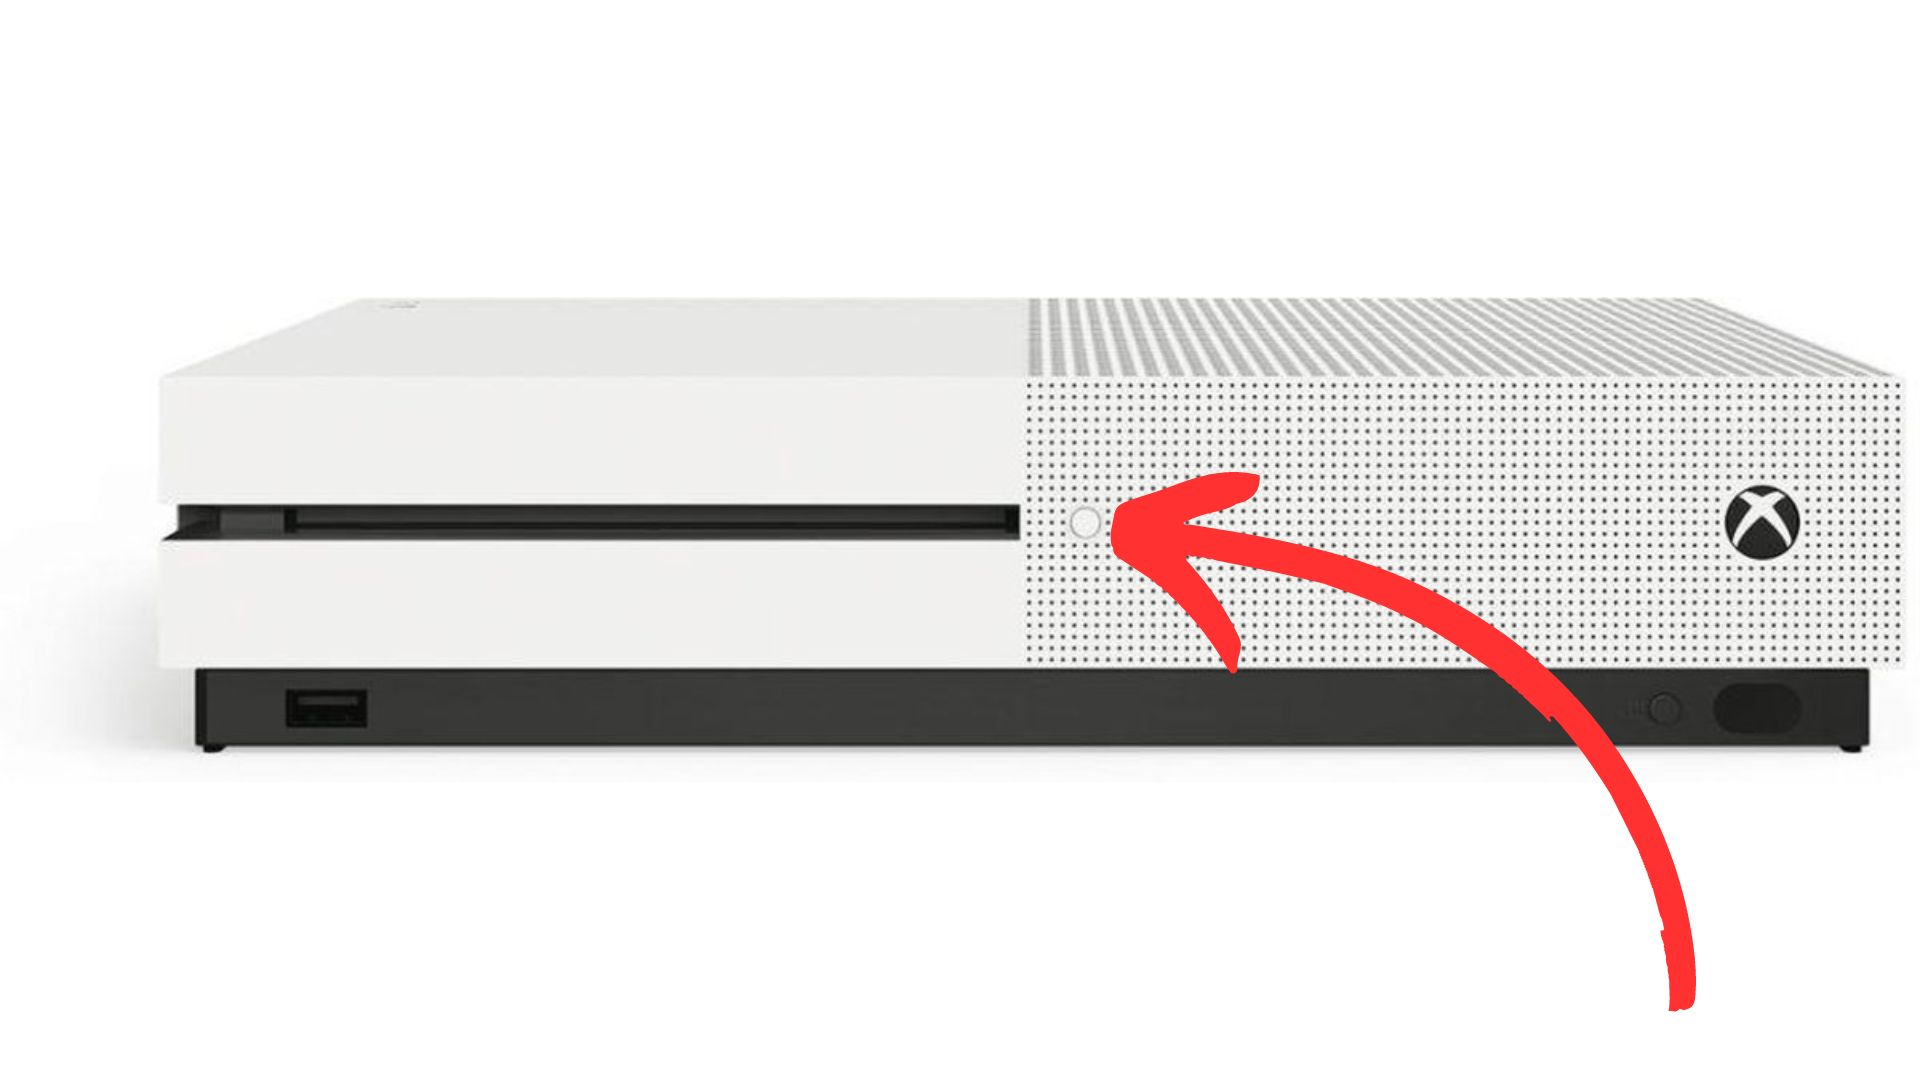
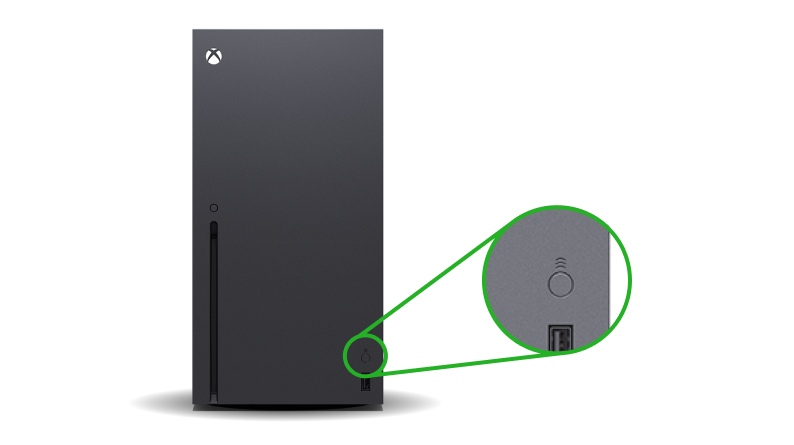
3. Sync your Xbox, go over to your xbox one and press on the ”sync” button.
nnnnnnnn
4. Wait until the light on your controller and Xbox have stopped flashing, once both these lights have turned white and stopped flashing they should be paired and you’re ready to play!
nnnnnnnnnnnn
How To Connect Xbox One Controller To Xbox Series S/X
nnnnnnnn
Connecting you’re Xbox One controller to your Xbox Series S/X is pretty much the same as I just explained, but I’ll still make a quick guide on how to do it. Again I’m showing you the wireless method, if for whatever reason you want to use your controller wired you just have to plug it in via USB and you should be good to go.
nnnnn
Turn your controller on, you can do this by pressing on the Xbox logo.
nnnnnnnnn
2. Sync your controller, do this by once again pressing the ”sync” button on the top of your controller.
nnnnnnnn
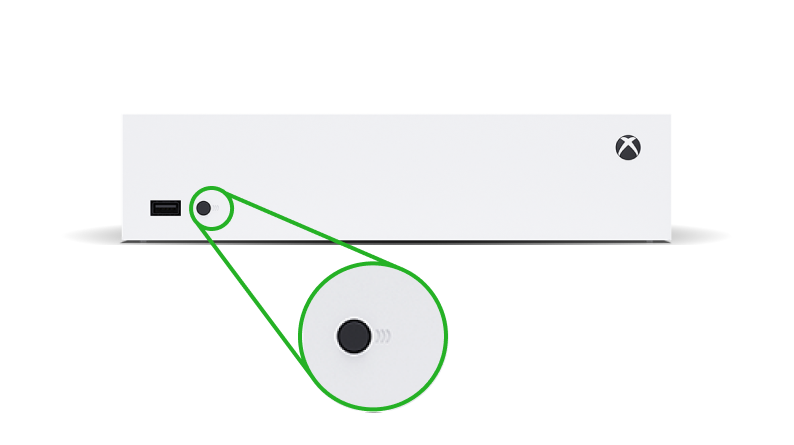
3. Sync your Xbox, to sync your Xbox series S/X you have to press on the ”sync” button as shown below.
nnnn
nnnnnn
nnnn
4. Wait until the light on your controller and Xbox have stopped flashing, once both these lights have turned white and stopped flashing they should be paired and you’re ready to play!
nnnnnnnn
I hope this blog helped you with connecting your Xbox series S/X controller to your Xbox one or vice versa, and be shure to check out some of my other blog posts.
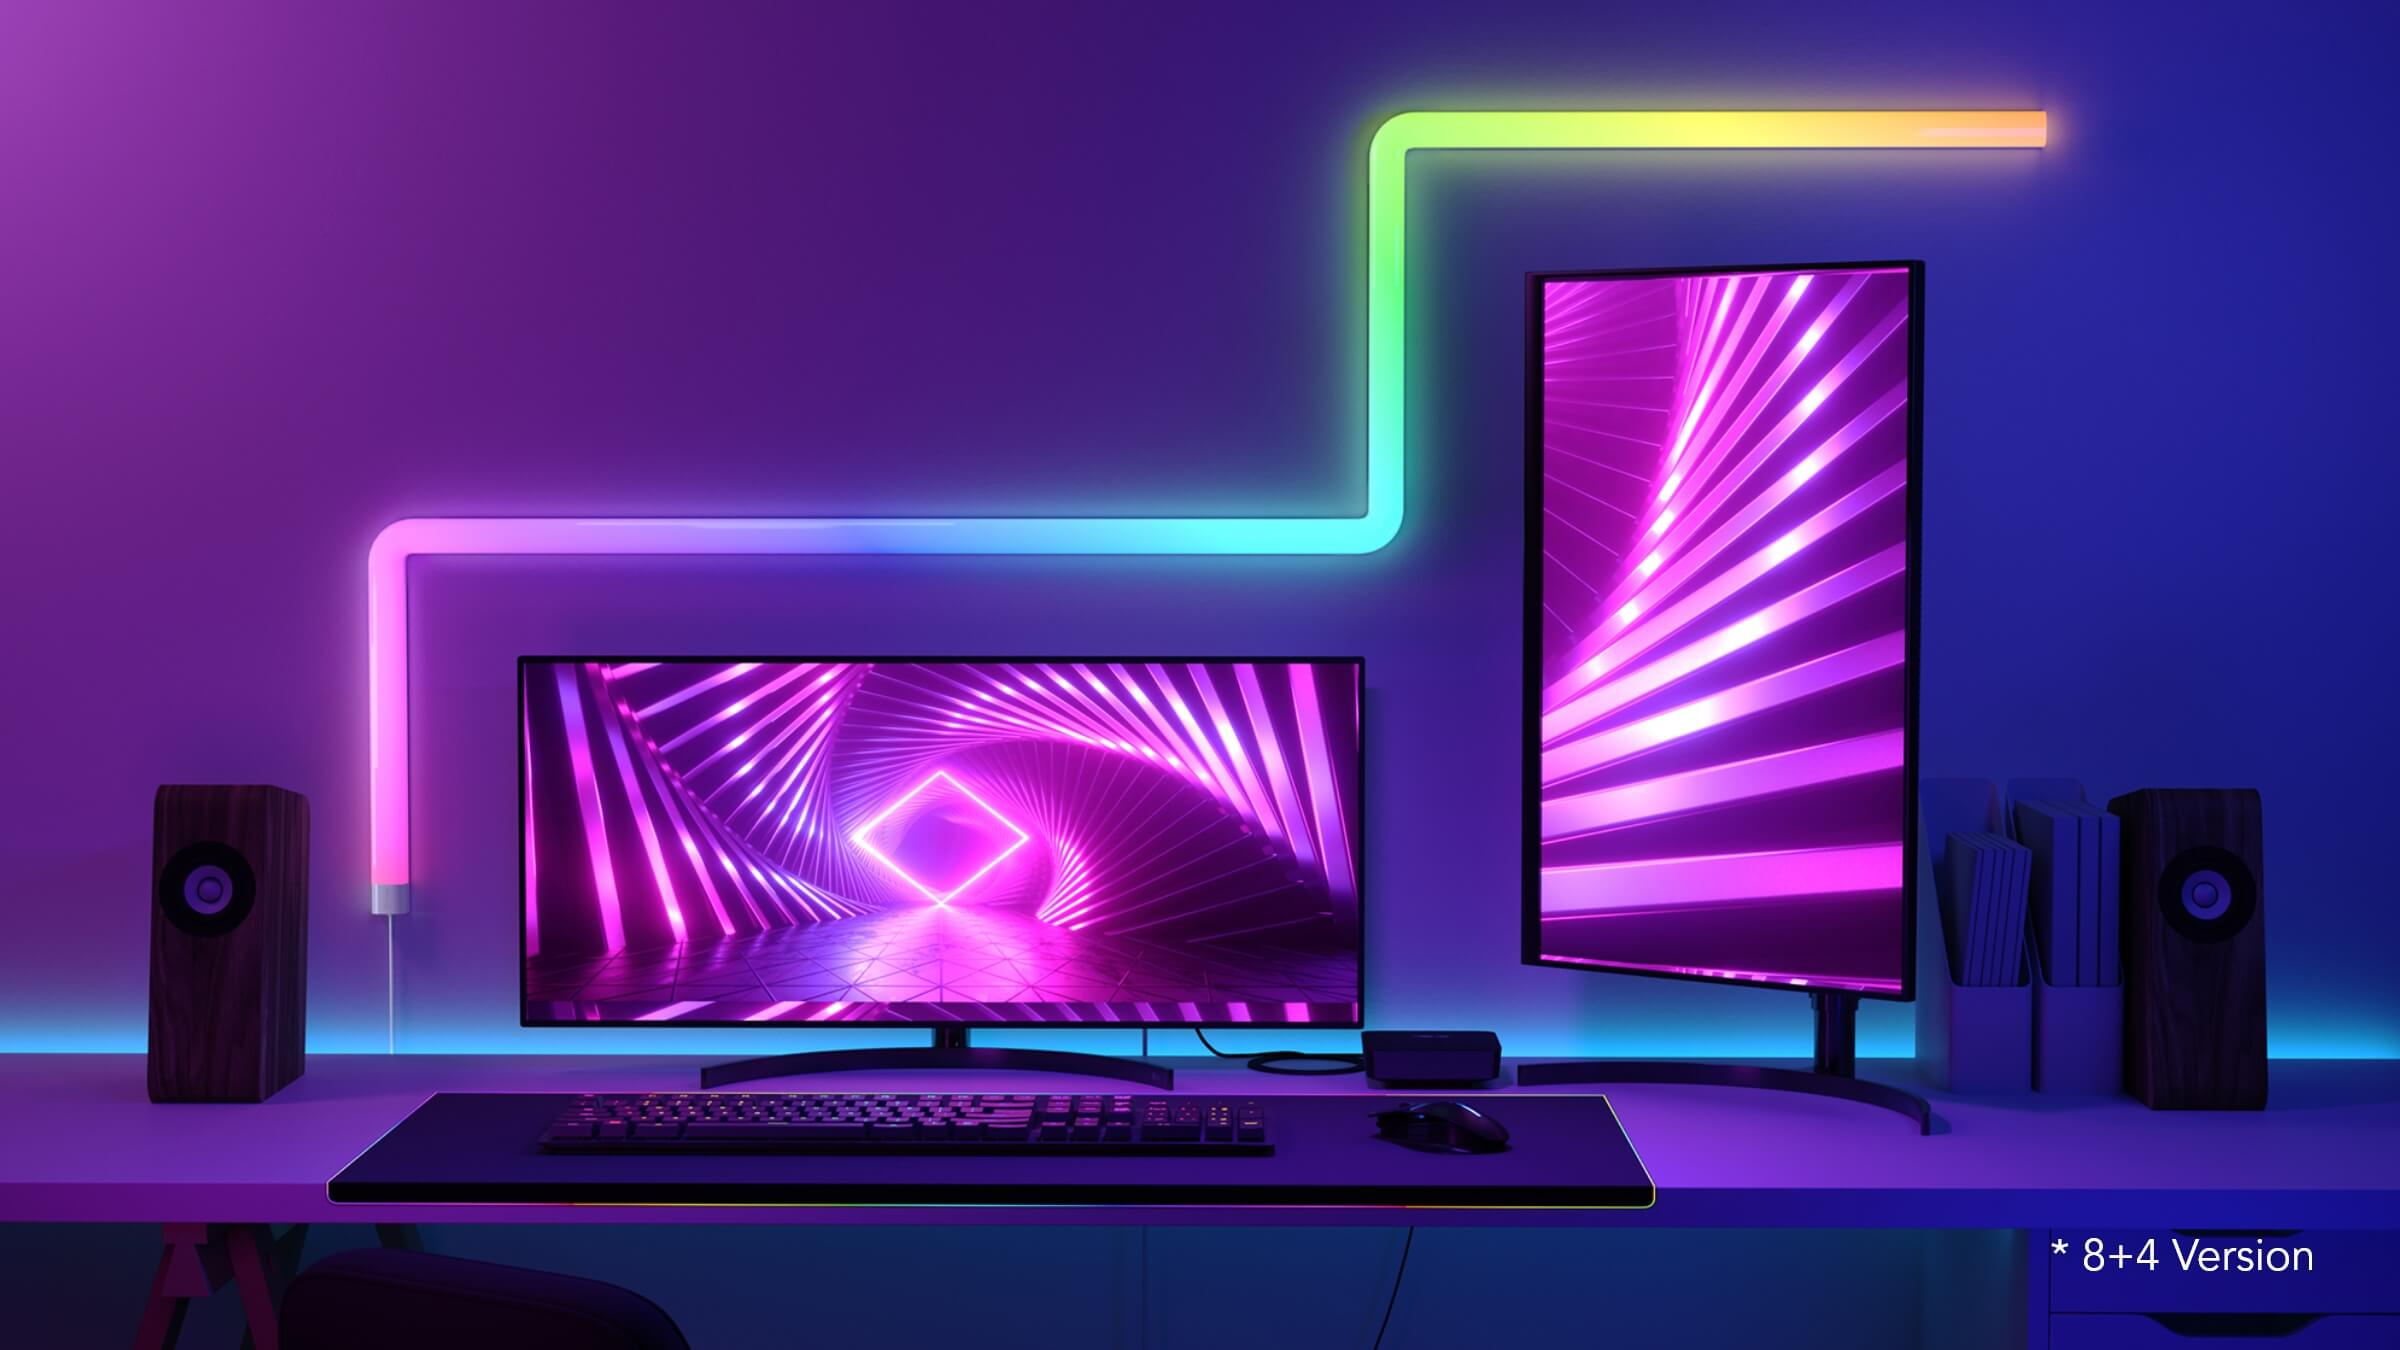
I was sitting here in my room when I realized that I want to have some more unique stuff in my setup. You don’t have to look far online to find hundreds or even thousands of gaming setups. So how can you and I make our gaming setups stand out? Well I did some research and I found the 4 best budget options to make your gaming setup stand out from the rest.
After you have prepared your setup with the best budget gaming chair, you’re going to need some cool tech products like the Govee Glide Wall Lights, or the RGB Monitor Light Bar, which will make your setup stand out from the rest. Today I’m going to go over the 4 best cool tech products for your setup. These will all be under $80, so that they’re affordable for all teens out there who want to make their setup stand out from the rest.
Great for adding that extra touch to your setup. These lights set the mood for an intense gaming sessions, while coming in a much more affordable price then the popular Nanoleaf lines. Overall, it’s a great addition to any setup. Read more.
This futuristic looking power bank by Anchor is a great way to add some functionality to your setup. The handy little screen and a stand to prop your phone up, make it one of my favourite power banks out there. Read more.
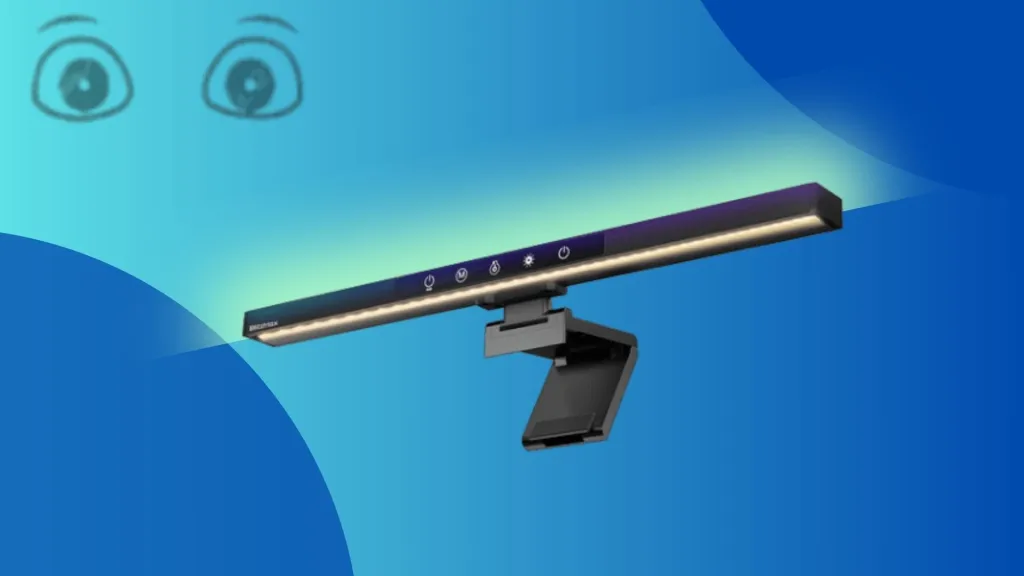
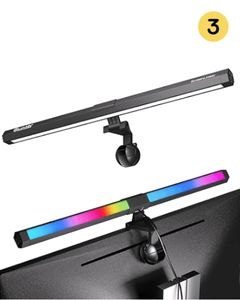
This RGB monitor lightbar is another great addition to gaming setup. It creates some light in front of your monitor while also shining some RGB at the back. I mean who doesn’t want more RGB in their setup? Read more.
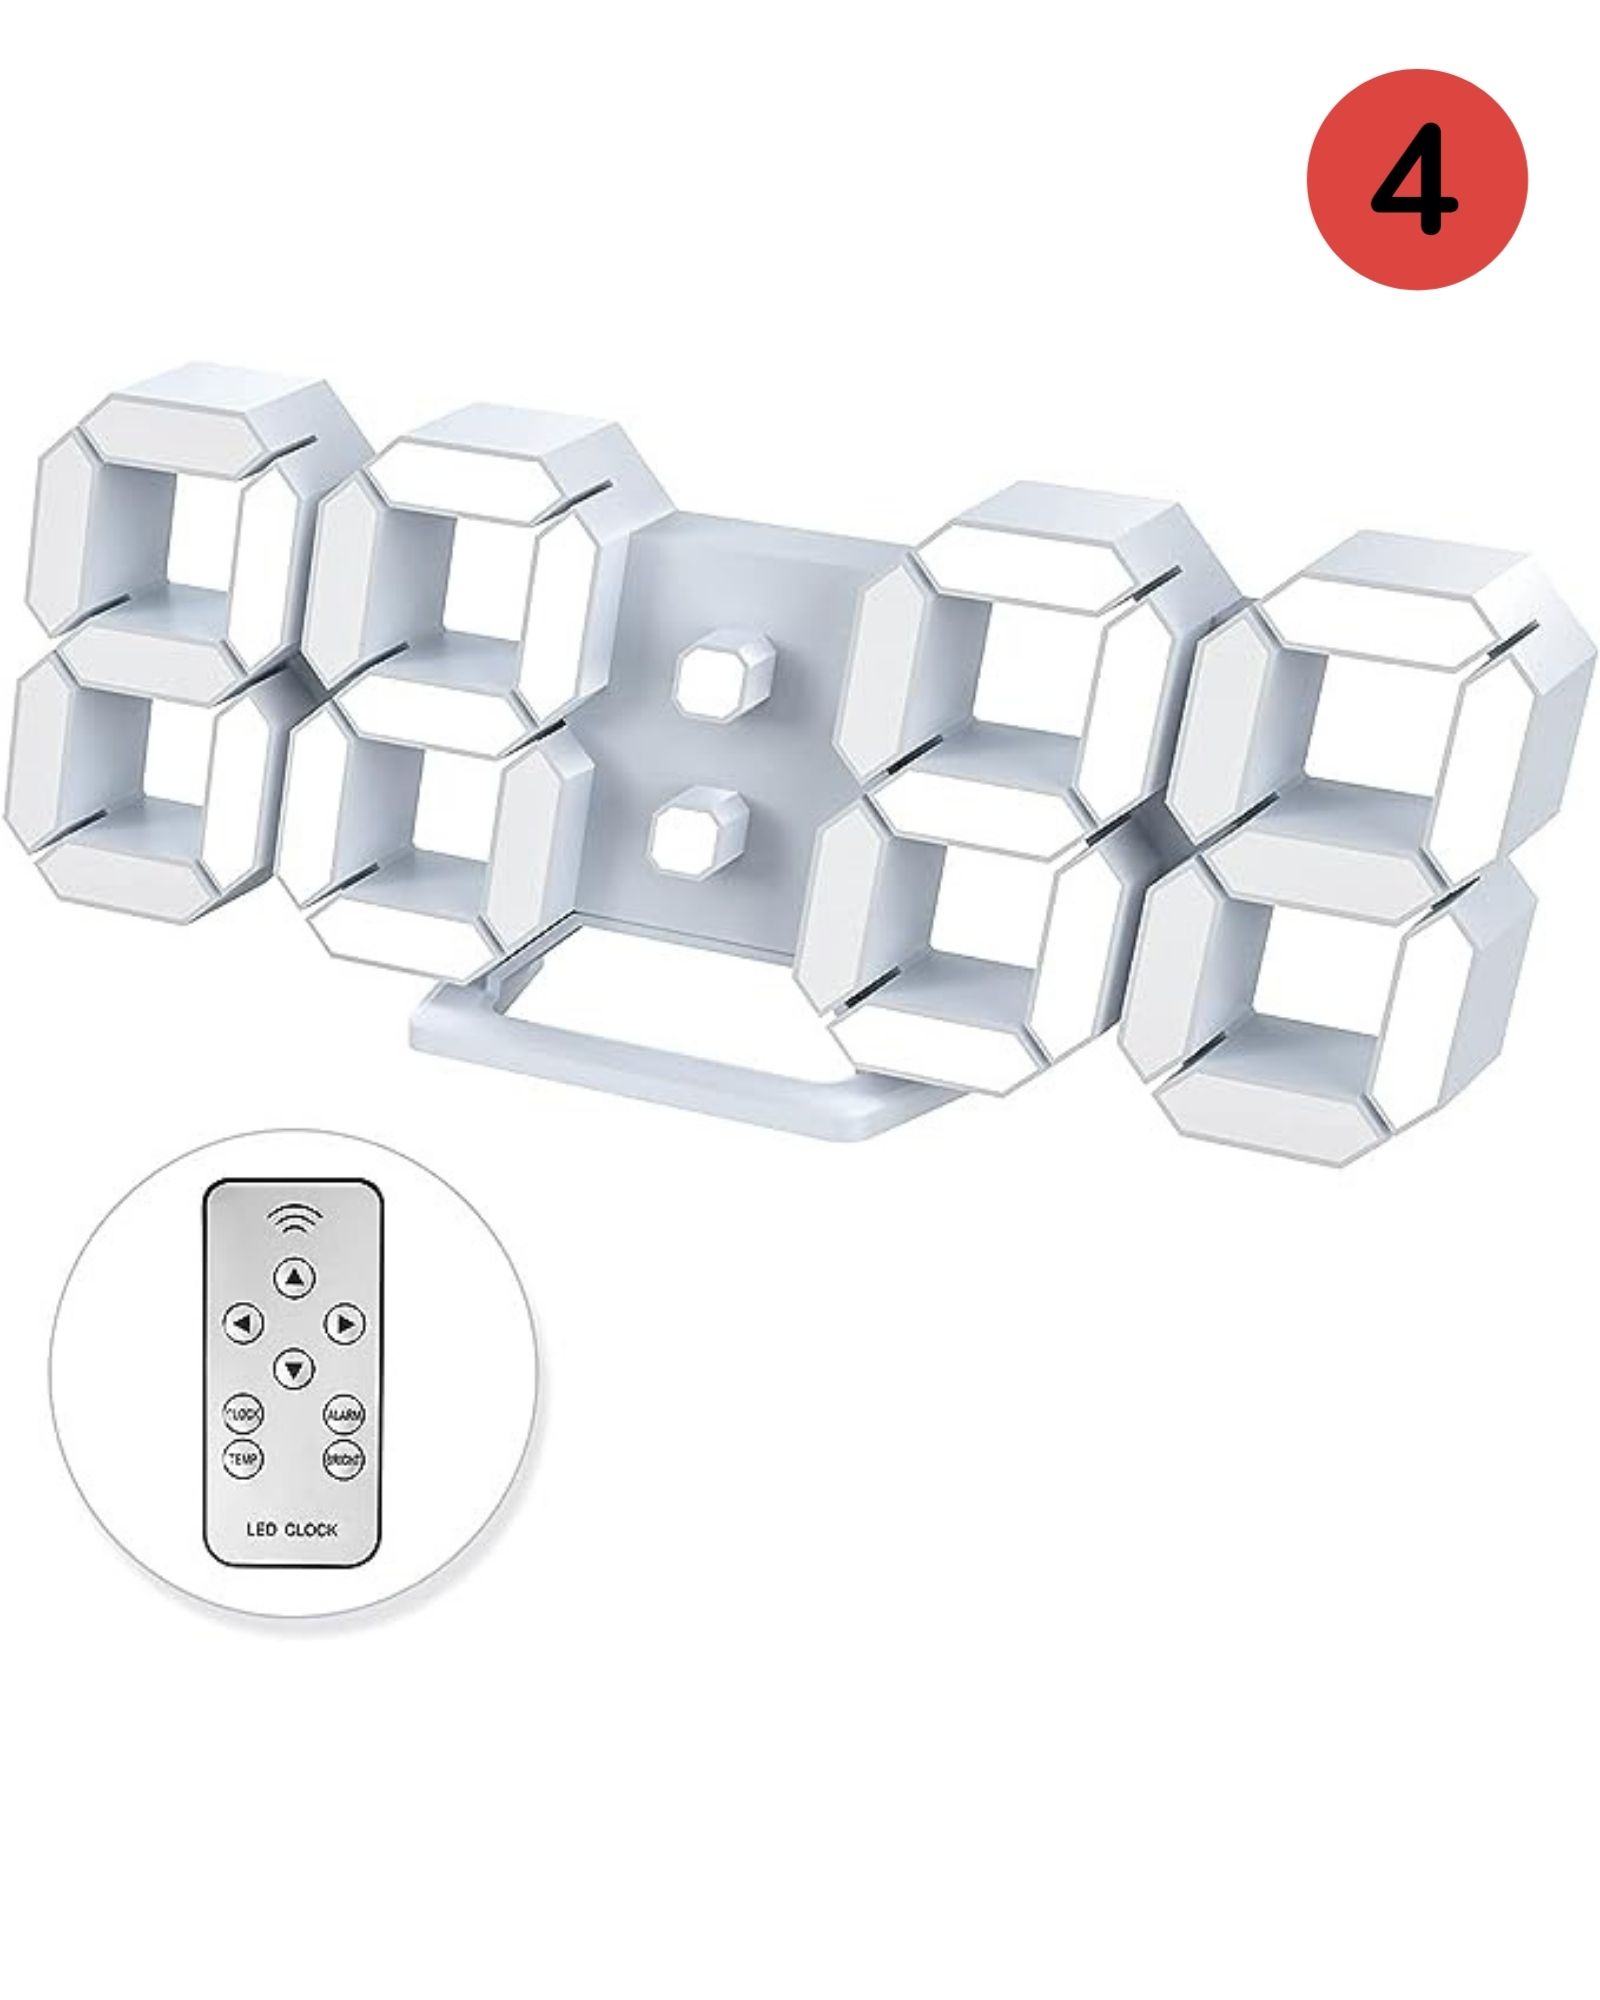
Last on my list is the Led Digital Clock. I’ve personally had this product for about a year and it has been great! I haven’t had any problems with it and it’s a great way to display the time while looking cool. Read more.
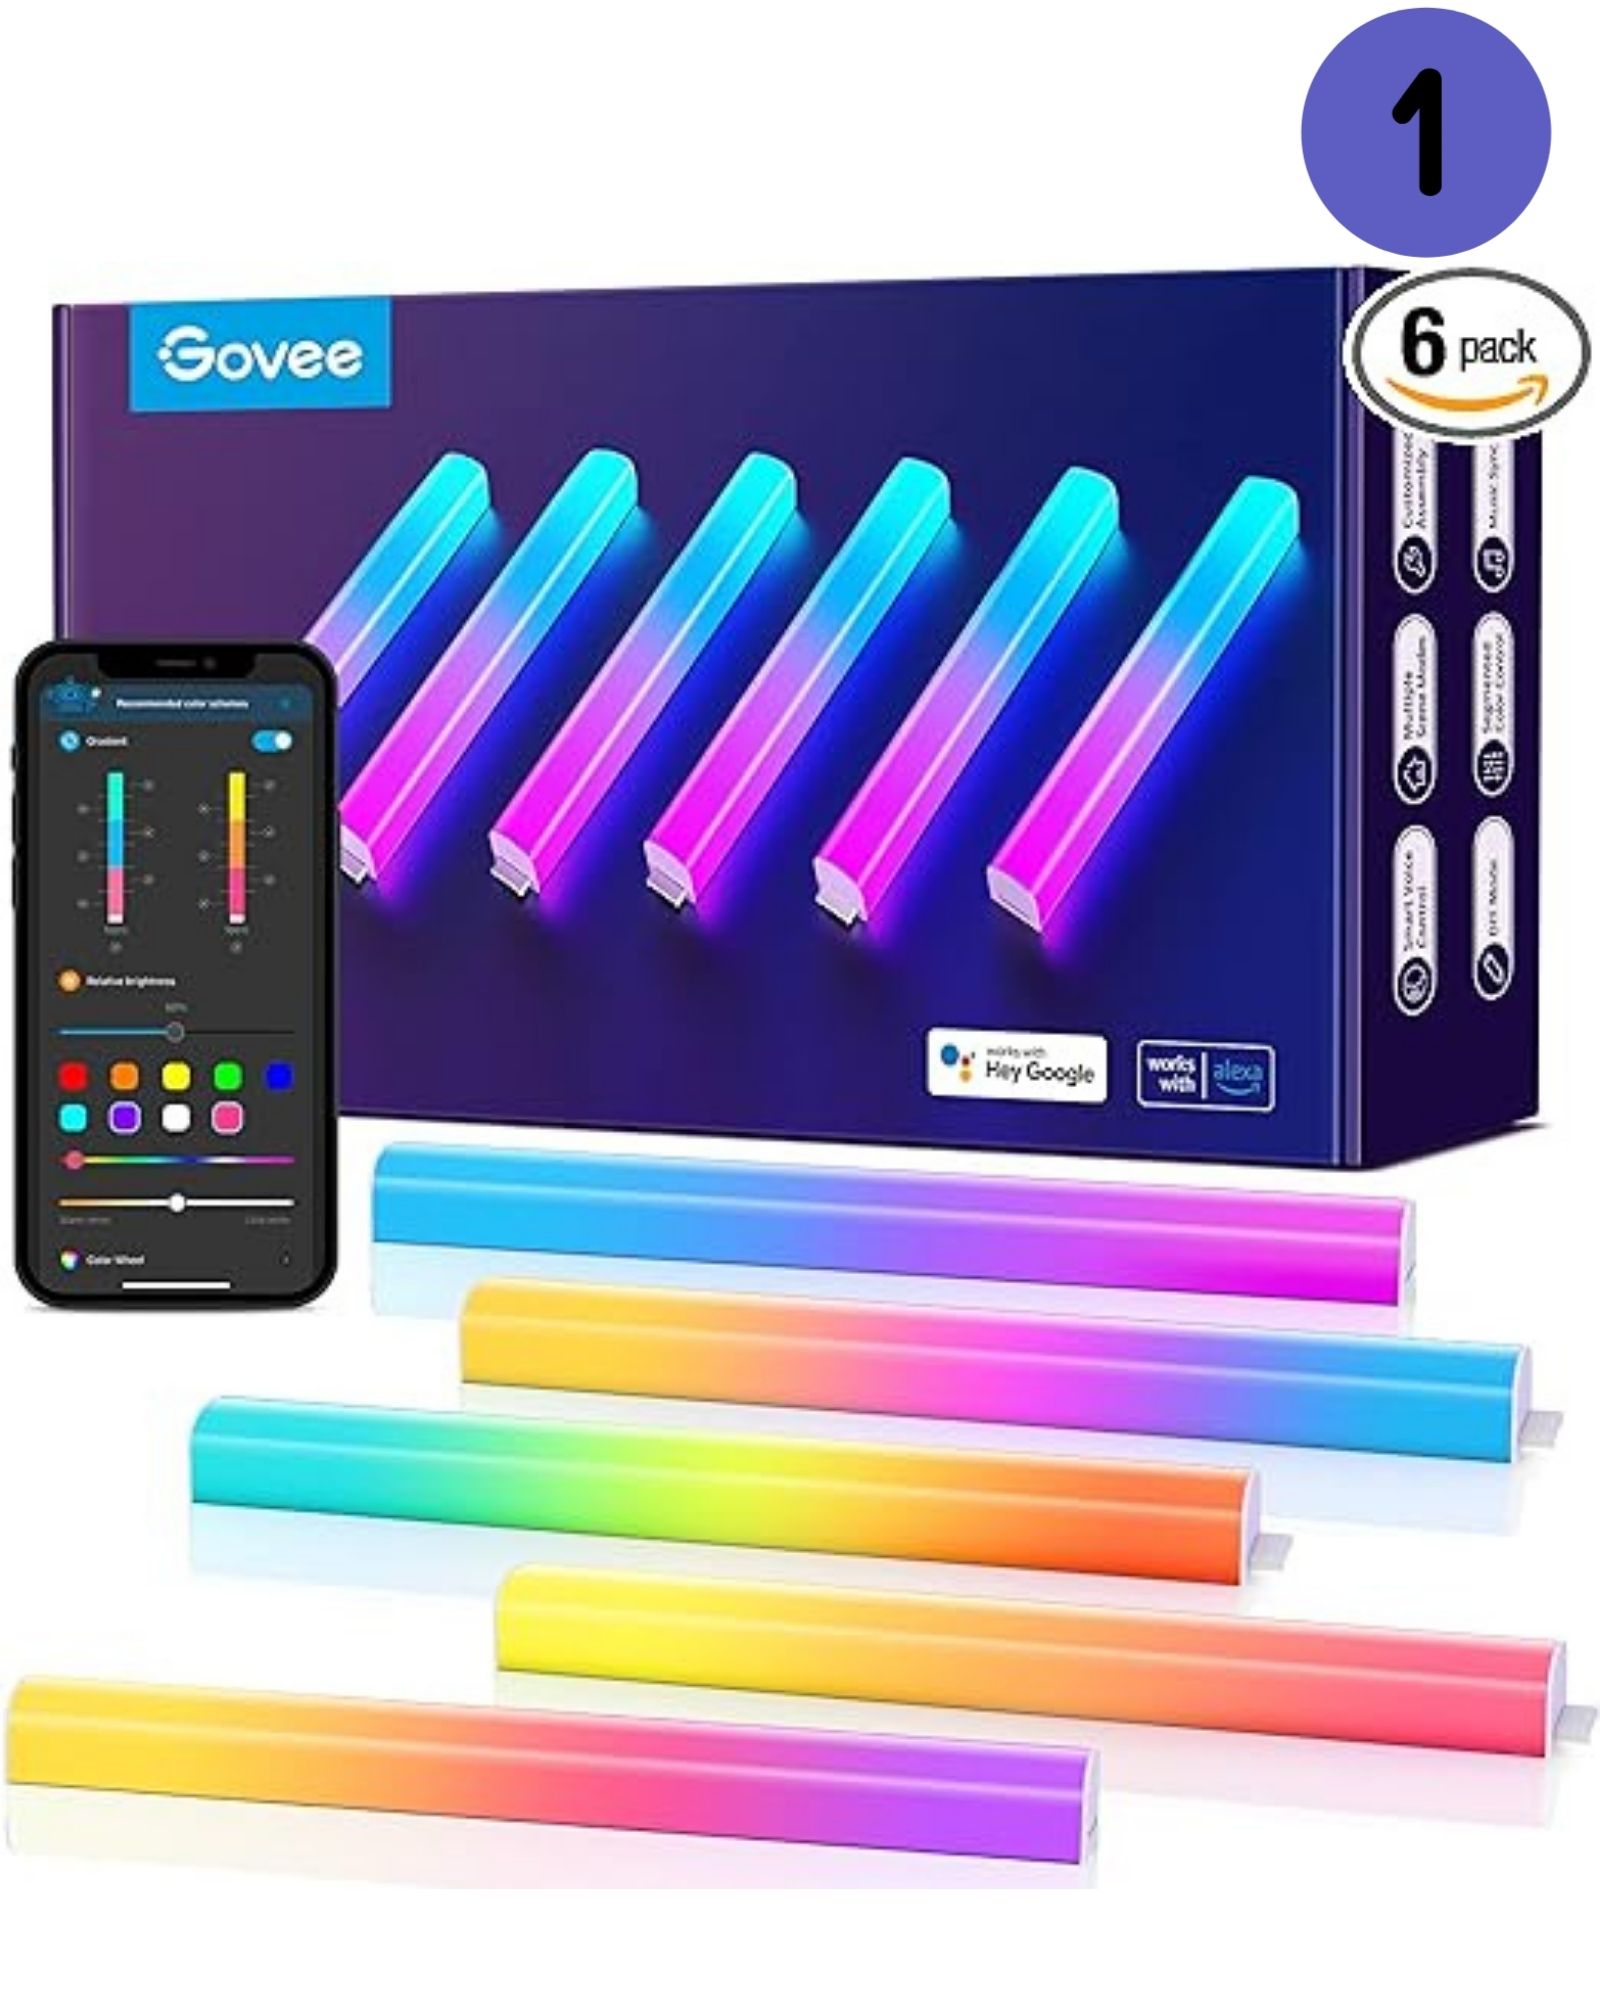
The Govee Glide wall lights are an amazing edition to any gaming setup and give your room a real gamer vibe. Now these are still expensive and the most expensive on this list, but if you look at the competition, like for example the Nanoleaf Lines, they are $200 on Amazon! So this is a good affordable way to get that wall light effect for under $80.
Now let’s talk about the installation process of the Govee Glide wall lights, because it’s super easy! You’ll find that in the package they include 6 14.8 inch segments, which together can make 2 lines or you can make one long line. However, this package doesn’t include any corners, just straight lines. You can get the one with corners in the more expensive packet at $130 on Amazon. Apart from that you’ll also find two pieces of pre-installed Velcro’s at the back of each segment, making it really easy to install and remove. After you’ve installed them, downlload the app and follow the instructions to easily connect them to your phone. And you’re done!
Another great thing about this product is how customizable it is, you literally have 3 different segments for each module which you can assign a color to. Apart from that they also offer more than 60 pre-installed animations or scenes to pick from. Personally I like the forest one the most because I feel like it gives the homiest vibe, but if you’re a big fan of RGB you also have the rainbow mode. If this isn’t enough for you they also have 11 upgraded music modes which makes the bars react to the music or any sound. They’re also compatible with both Amazon Alexa and Google Assistent, which is always nice to have.
To summarize, these are a great way to add RGB to your gaming setup, for a pretty affordable price compared to the competition. It’s very customizable and easy to set up, they’re of good quality and their compatible with Amazon Alex and Google Assistent. A few downsides I saw of these products, when researching, were that the adhesive isn’t good if you don’t have smooth walls and removing them from the wall can actually remove the adhesive from the tube. Moving them around is also not really possible because of the adhesives, you will probably need to buy a new bit of double sided tape every time you move or re-attach a tube. But all-in-all it’s a great product for any gamer looking to bring more of a gamer vibe to their setup. And I really recommend it if you’re on a tighter budget but still looking for a cool addition to your setup.
Next up on the list is the Anker MagGo powerbank, which might be the best powerbank out there right now. It is not only a great addition to your setup, but it also makes your life a lot easier. This fairly simple looking powerbank by Anker has some amazing features making it really worth the price. I’ll talk about the specs later, but my favorite thing about this powerbank definitely has to be the screen, so if you want to know why I think that, keep reading.
Specs wise this powerbank is really solid, it has a 10,000 mAh capacity, the wireless charge goes up to 15W and the wired charging up to 20W. Apart from that it’s a bit on the heavy side at around 250 grams and it’s also pretty thick, but that’s understandable since it has a 10,000 mAh capacity. However, my favorite thing about this product has to be the little display on the side of the powerbank. I think it’s a really handy feature and super cool and unique, as I have never really seen that on a powerbank before. It shows you exactly how full the powerbank is and an estimated time for how long it’s going to take until it’s completely full. I have found that it isn’t super precise, but the percentage it shows on the side is and it’s still handy to have.
Now some other cool things it can do are: firstly being able to charge your phone and the powerbank at the same time which is really handy; secondly it’s magsafe, so it’s really handy and sturdy to hold your phone. For people like me who use an android, you can also buy a magsafe case for your phone and it will basically do the same thing. I also like that when you charge the powerbank it will actually show you how long it thinks it will take until it’s fully charged, again this probably isn’t super precise but still nice to have.
So all-in-all I think the MagGo powerbank by Anker is a great product, especially considering it’s only $59.99. My favorite feature has to be the little display on the side, I like how it shows exactly how much percentage your powerbank has and how long it thinks it’s going to take until it’s full even though that is usually a pretty rough estimate. I also like that it’s magsafe and pretty fast, with a huge capacity of 10,000 mAh. I would say it’s definitely worth it, the only real downsides are that it’s pretty big and heavy and the time it shows until the powerbank is charged is not always precise, but I think these are minor things and overall it’s a great product.
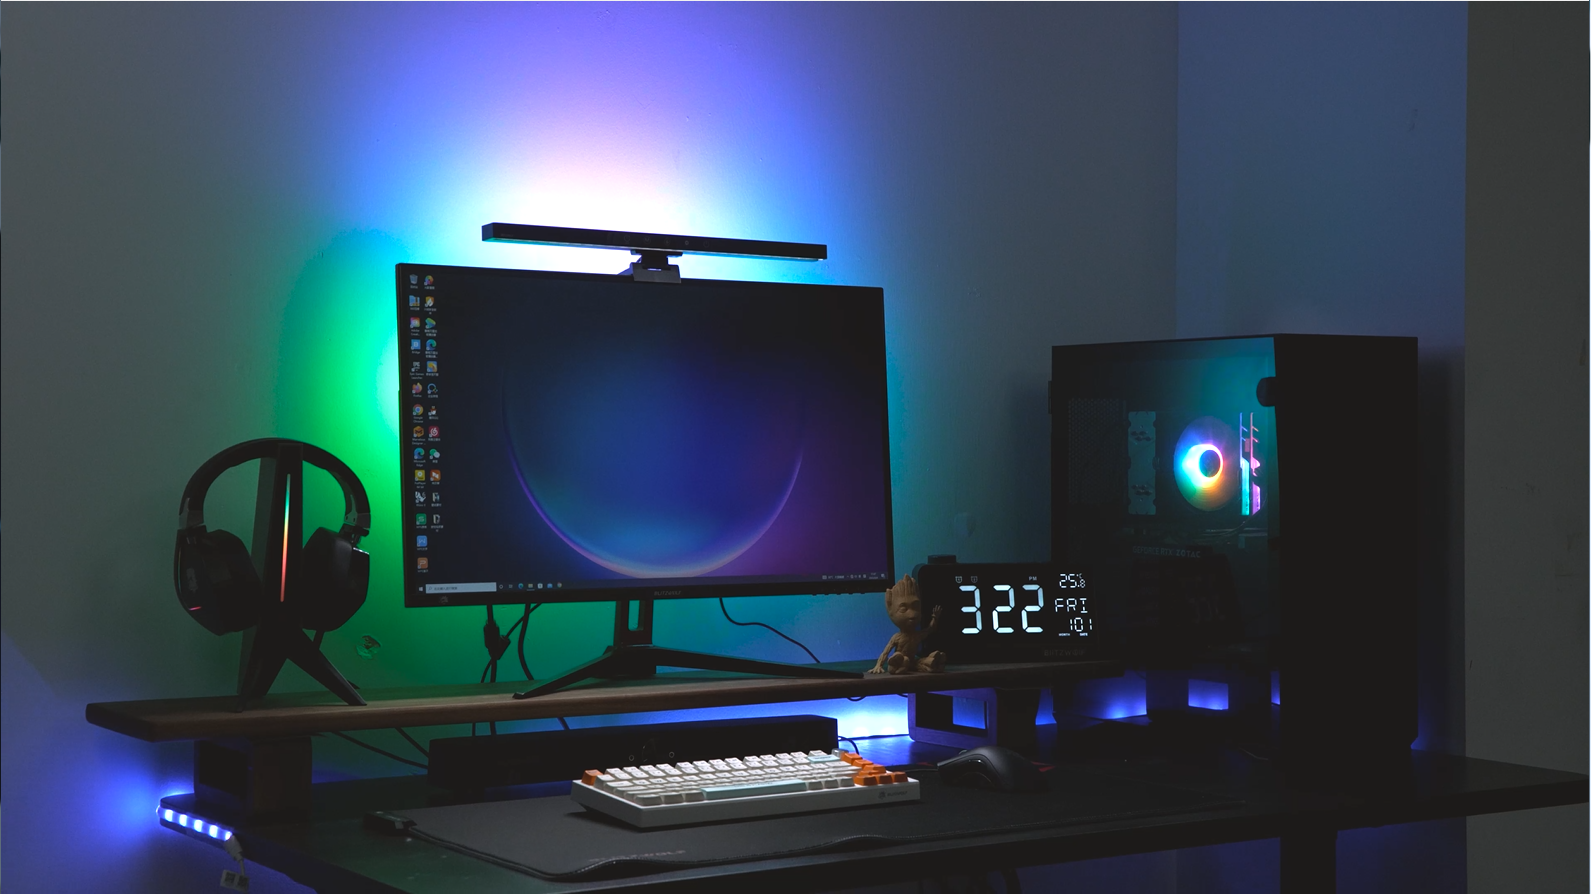
Now this is my second favorite on this list in terms of being cool and unique, it is the RGB monitor light bar by Quntis. At a glance this might look like a fairly simple product, but there are two reasons why I like this light bar so much. Firstly, it’s a 2-in-1 product, it’s both a light bar for your monitor, which helps reduce the strain on your eyes at night, and a cool RGB backlight at the same time. Now of course there are a few more things that I like about this one specifically, but I think these two reasons are the most important on why I would recommend this to someone.
There are a few reasons why I would recommend a monitor light bar and I’ll list a few here. First of all it can heavily reduce the eyestrain you’re currently experiencing, especially if you’re using your monitor a lot at night. The latest monitor light bars like this one ensure that there’s substantially less exposure to blue light, because we all know that to much exposure to blue light can cause future health issues. There’s also no screen glare when using a monitor light bar, because it doesn’t shine directly on your monitor but actually shines on your desk, so you don’t need to worry about screen glare at all. It’s also pretty small so you don’t have to sacrifice valuable desk space.
Now that’s all great, but why am I recommending this one specifically. Well there are a few reasons for that. Firstly, it’s fairly cheap especially compared to some other monitor back lights out there, like the BenQ monitor light bar, which is $100 and basically the same without the RGB backlight. Secondly, it’s also very easy to switch between colors and brightnesses. Just 1 click on the button on the left side marked with a W, switches through the 3 different white modes which are: warm white (3000K), natural white (4000K) or true white (6500K). K stands for ”degrees of Kelvin” and basically it lets us know what the look and feel of the light will be. If you double click on the same button you can cycle between the 3 different brightness modes which are: 100%, 50% and 25%. On the right side you will find the same button now marked with RGB instead of a W, and this is basically to control what color or mode you want the RGB lights to be. So you can switch between the 15 different modes with just one press. These modes are split up into 3 categories which are: monochrome, which is first a slow transition between all the colors or there are 7 static light choices; dual-color gradient gives you 6 choices of 2 colors in a wave transition; and lastly there is the multicolor gradient, which cycles through all of the available colors in a nice transition. If you press any of the 2 buttons for more then 2 seconds and it will turn off and one press to turn them back on.
So that was a lot of information but basically I like and recommend this product because it reduces eyestrain, doesn’t sacrifice any valuable desk space and it produces zero glare on your monitor. Apart from that I also like how easy it is to control and how many different gradients and brightnesses and modes there are to choose from. So all-in-all another great product which can also help reduce your eyestrain, which can lead to very serious future health issues. The only downsides are that it’s not made for curved screens or laptop so you’ll need a normal flat screen monitor and the 1.5 meter cable is fixed, so you can’t just attach a longer cable if you need one. But you can of course always get a cable extender so there is an easy work around for this problem.
The LED digital clock is a very popular but affordable addition to all good setups. Whatever your setup looks like 9 out of 10 times this clock will fit in. It’s such a simple design and adds to the functionality and looks of your setup. Now on Amazon you will find loads of these, but I recommend this one because, it’s super cheap and has some extra cool feature’s like being able to be remote controlled. However, it isn’t RGB so if you really want an RGB digital clock I would recommend this one here, because it’s pretty affordable and is well reviewed.
Features wise, this is everything you need and more. It’s got all the standard stuff like, temperature or dates, and an inbuilt alarm clock if you want to use it for that. But it also has other cool things like a remote control, which is really handy because I personally also have one which isn’t remote controlled and it’s such a pain to change the time because it’s mounted on the wall. Another handy feature is that the brightness automatically adjusts depending on the time of day, so you’re not blasted with light from your clock at 2 AM. As I said I also have a clock just like this but without a remote and I really think it adds a lot to my setup and it’s also handy as a clock.
There are two ways of installing this clock, the first and easiest way is to use the stand and just put it down wherever you want. The stand is included in the box and is really easy to set up. Secondly, you can mount it on your wall, personally I think this looks better but you will have to drill holes, so if you’re renting a place then this may not be possible. But if you aren’t it’s just a few easy holes and after that it’s pretty easy, in the box you will find an instruction manual on how to do both ways and some screws and plugs if you are planning to hang it on your wall. So pretty easy to set up and I would recommend hanging it on your wall if possible, because I personally think it looks best that way.
So, overall this is a great digital clock that will add to any setup out there, it’s easy to set up and it has some really handy features like a remote control. It might feel a bit cheap, but that’s normal around this price and if it’s on your wall then you probably won’t notice it as you mostly just see the lights. As I said it includes a very handy remote control where you can do a bunch of cool stuff like display the temperature, date or set an alarm for yourself. It also includes automatic adjustable brightness and a stand to prop it up wherever you want. I would personally recommend hanging it on your wall if possible, because I think that just looks way better and the screws and plugs come in the box so you won’t have to worry about them.
I was playing some games on my Playstation when suddenly my controller suffered from stick drift. So I looked in on how to fix controller stick drift and I’m going to show you exactly how to do so if you’re experiencing the same issue. Any links on parts you might need will be linked at the bottom of this blog post.
nnnn
One of the most annoying things that can happen to you while gaming is stick drift. So I did some research on how to fix this problem. I found that resetting your controller, cleaning your controller, pressing your analog sticks, and replacing your analog sticks are some good methods of fixing this annoying problem. So let’s look into how to do these things and what else you could do if these options don’t work.
nnnnnnnn
How To Reset Your Controller
nnnnnnnn
Resetting your controller is always worth trying when you’re experiencing issues like this. So I’m going to give a simple step-by-step guide on how to reset your PlayStation controller and then how to do the same with an Xbox controller. All you’ll need for this is a paperclip and a USB cable (to reconnect it with the PlayStation).
nnnnnnnn
How to reset Playstation controller:
nnnnn
Turn off your Playstation & disconnect the controller if plugged in via USB.
nnnnn
It’s very important that you unplug your controller and turn off & completely unplug your PS before resetting your controller for your safety & because it might not work otherwise.
nnnn
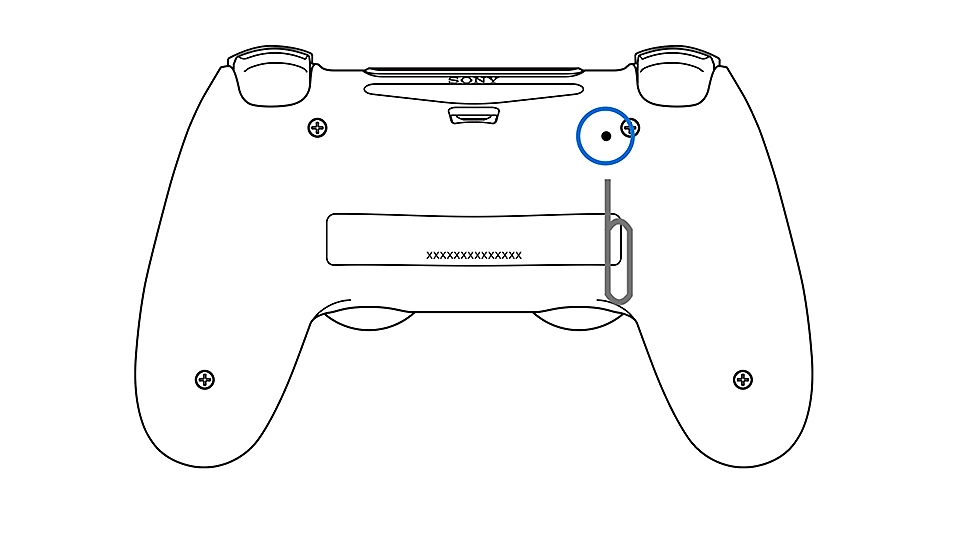
2. Locate the reset button on your PlayStation controller.
nnnn
The reset button on the PS4 & PS5 controllers is on the back, located in the little hole close to the top of the controller.
nnnn(Credit: Playstation)nnnn
3. Reset your controller.
nnnn
Reset your controller by going in the hole with a paperclip and pressing the button inside, once you’ve done this the Playstation controller should have reset.
nnnnnnnn
How to reset your Xbox controller:
nnnnn
Fully turn off your Xbox controller.
nnnnn
Turning off your Xbox controller is simple but varies between models. For an Xbox One controller, hold the sync button on the top for 10-15 seconds. For Xbox Series S/X controllers, hold the Xbox button in the middle for 10-15 seconds.
nnnn
2. Turn your controller back on.
nnnn
Turning the Xbox controller back on is the same for both the Xbox One controllers and the Xbox Series S/X controllers. All you have to do is press the Xbox button in the middle of the controller.
nnnn
3. Connect your controller to your console.
nnnn
Reconnect your console to your console by using a USB cable and the controller should have reset.
nnnnnnnn
Best Ways To Clean Your Controller
nnnnnnnn
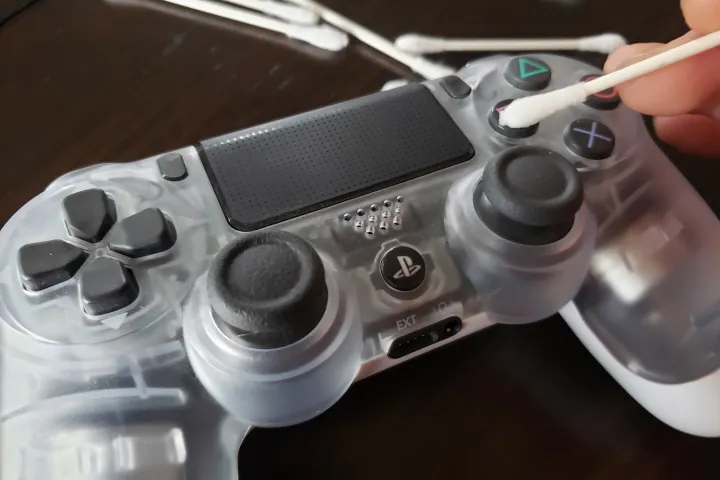
A dirty controller can be the cause of many issues of the controller, most commonly stick drift is caused by dirt in the controller. So I found some methods on how to best clean your controller when experiencing stick-drift and I’ll feature my 3 favorite and in my opinion best ways here.
nnnnnnnn
Alcohol wipes & canned air:
nnnnn
Unplug your controller to avoid damage. If it’s wireless, remove the batteries.
nnnn
Place paper towels on your desk to catch any dirt.
nnnn
Use a toothpick to scrape out gunk from the tiny nooks and crannies.
nnnn
Blow out any remaining debris with canned air, keeping the can upright to avoid spraying liquid.
nnnn
Wipe down the controller with alcohol wipes to remove grease and dirt. For wireless controllers, avoid using wipes inside the battery compartment. Alcohol wipes are preferred because they disinfect without leaving moisture or soap residue. If you don’t have alcohol wipes, use a lint-free cloth soaked in mild soapy water, wrung out well.
nnnn
Ensure everything is dry.
nnnnnnnnn(Image credit: Jacob Roach/Digital Trends)nnnn
Deep clean your controller:
nnnnn
Disassemble (Optional): For controllers like the Xbox One, use a screwdriver to remove the backplate and access the internals. Be careful with delicate clips or wires.
nnnn
Soak the Soft Parts: Remove rubber grips or buttons and soak them in warm soapy water for 15 minutes. Rinse thoroughly and let them air dry completely.
nnnn
Scrub the Shell: Use a soft toothbrush dipped in mild dish soap to scrub the controller shell, focusing on grips and around buttons. Rinse with a damp cloth and dry with a microfiber towel.
nnnn
Clean the Internals (Optional): If disassembled, use a dry toothpick to scrape out crevices. Blow through a plastic straw to remove dust or debris from the circuit board and buttons. Avoid excessive liquid or touching sensitive components.
nnnn
Reassemble and enjoy!
nnnnnnnnn
Replace the joystick module
nnnn
Now replacing the joystick model is a bit more advanced then the other 2 methods, but if everything else didn’t work for you then maybe it’s worth trying. This guide will only be for PlayStation 5 controllers.
nnnnn
Take your controller apart. First, turn off your PS5 controller. Use a flat tool to pry off the black cover, starting at the handle ends and working toward the middle. Pop off the R1 and L1 buttons with a screwdriver, then remove the screws on the back and open the controller. Gently disconnect the battery, microphone, and ribbon cables for the touchpad and buttons. Flip the motherboard back and remove additional screws to separate it from the black cradle. Finally, remove the silicone button holders, microphone ribbon cable, and the screws holding the touchpad to the faceplate.
nnnn
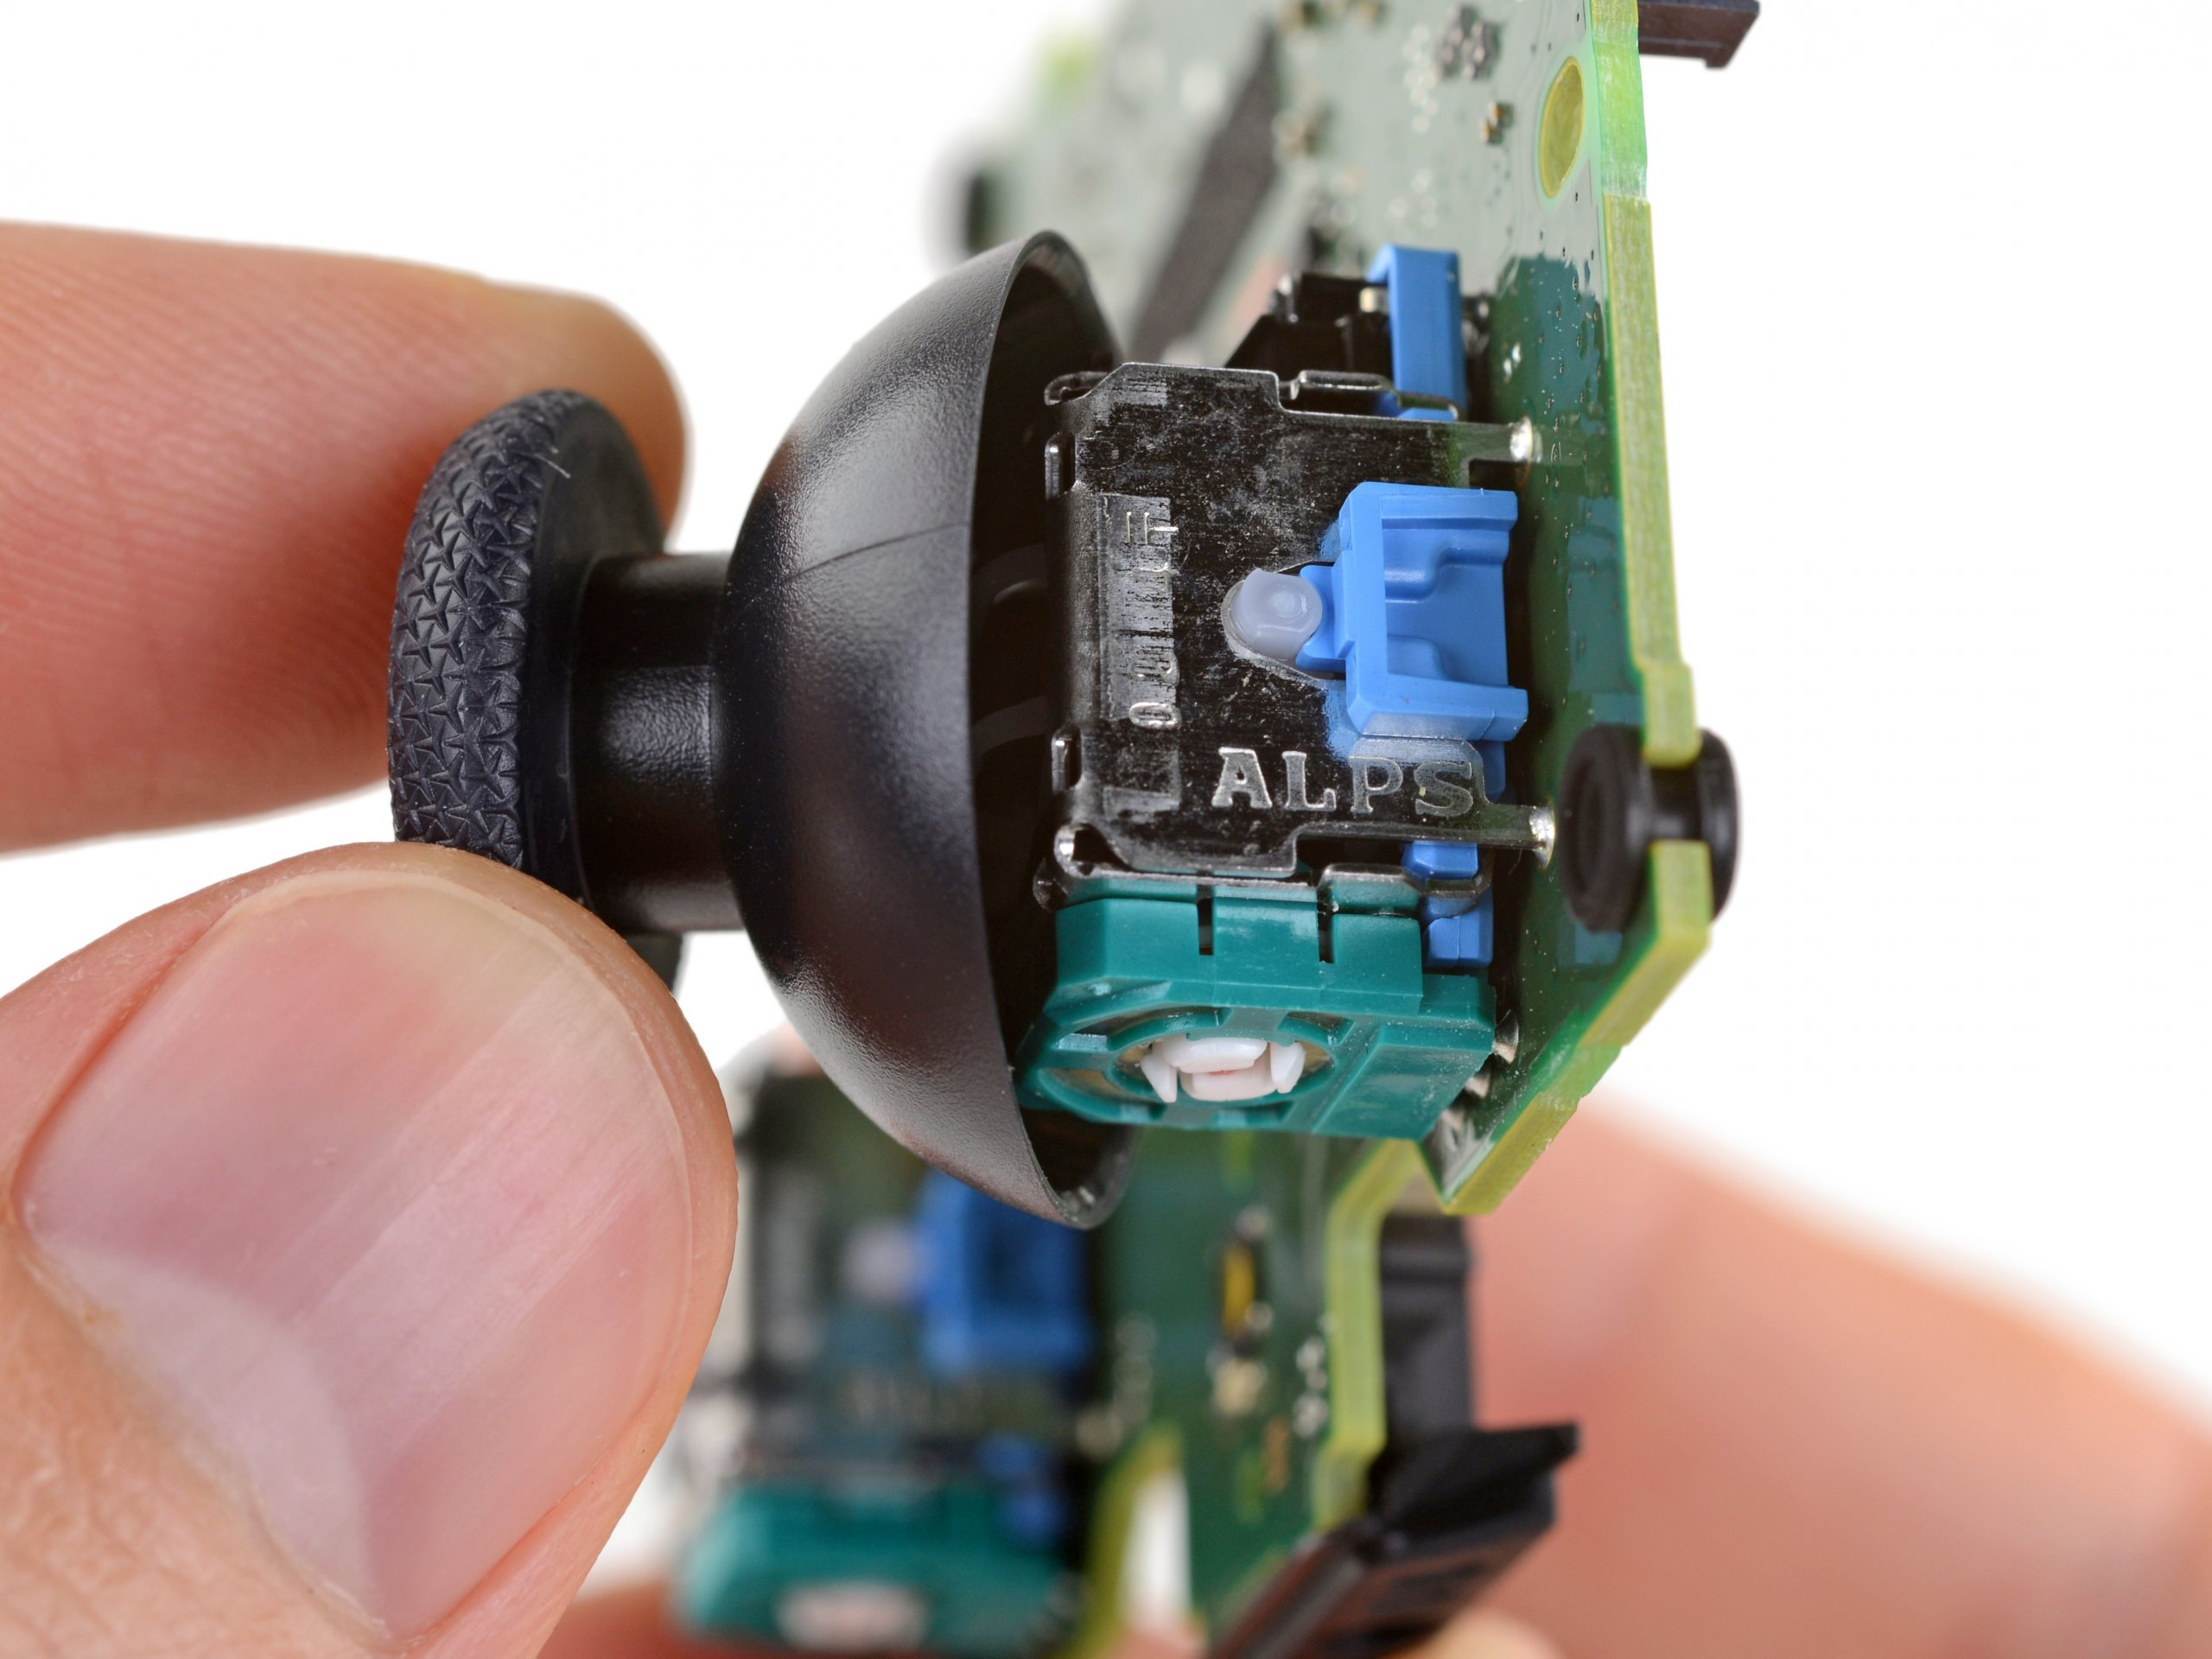
Take of the cap of the joystick that’s the issue, the joystick should just pop straight of when you pull it gently.
nnnn
Clean the potentiometers. Clean the potentiometers by applying a small amount of isopropyl alcohol (90% or higher) to a cotton swab and carefully reaching into the small openings. Move the joystick around to distribute the alcohol and remove any dirt or debris, then allow the alcohol to evaporate completely.
nnnn
If it there’s still stick drift, replace the wipers. Carefully remove the joystick module from the circuit board and gently pry open the potentiometer casing, noting the internal arrangement. Extract the old wipers carefully, then place the new wipers into the casing in the same orientation, ensuring proper contact. Snap the potentiometer casing back together and reattach the joystick module to the circuit board.
nnnn
Reassemble your controller. Reassemble the controller by reconnecting the battery and ribbon cables. Secure the back cover with screws and snap the black cover back into place.
nnnnn(Image credit: ifixit)nnnnnnnn
How To Replace Your Analog Sticks
nnnnnnnn
Replacing your analog sticks is again a different process on Playstation and Xbox so I’ll make two simple guides showing you exactly how to do it on both your Xbox- and your PlayStation controller.
nnnnnnnn
How to replace your analog stick on a playstation controller:
nnnnn
Turn Off and Disconnect: Power off your PlayStation controller and disconnect it from any device or power source.
nnnn
Remove the Faceplate: Use a small flat tool to carefully pry off the faceplate of the controller. Start at the edges and work your way around to release it.
nnnn
Unscrew and Open: Use a screwdriver to remove the screws holding the controller together. Open the controller carefully, noting any delicate clips or connections.
nnnn
Disconnect Components: Gently disconnect the ribbon cables that connect the face buttons and touchpad to the motherboard. Set these components aside.
nnnn
Remove Analog Sticks: Locate the analog sticks on the controller’s circuit board. Carefully lift and wiggle the sticks to detach them from their sockets. Take note of their orientation for reassembly.
nnnn
Install New Analog Sticks: Place the new analog sticks into the sockets on the circuit board, aligning them correctly with the controller’s casing.
nnnn
Reassemble the Controller: Reconnect the ribbon cables for the face buttons and touchpad. Close the controller carefully, ensuring all clips are securely fastened. Screw the controller back together. Snap the faceplate back into place.
nnnn
Test the Controller: Power on the controller and test the analog sticks to ensure they are responsive and function correctly.
nnnnnnnnn
How to replace your analog stick on a Xbox controller:
nnnnn
Turn Off and Prepare: Turn off your Xbox controller and ensure it is disconnected from any power source.
nnnn
Remove Battery and Cover: If applicable, remove the battery pack or batteries from the controller. Use a screwdriver to remove any screws securing the back cover.
nnnn
Open the Controller: Carefully pry open the controller using a flat tool, starting at the seams. Take note of any delicate clips or wires inside.
nnnn
Disconnect Components: Gently disconnect any ribbon cables or wires connected to the circuit board to access the analog sticks.
nnnn
Remove Old Analog Sticks: Use a screwdriver to unscrew the analog sticks from their mounts. Carefully lift them out of their sockets, noting their orientation for replacement.
nnnn
Install New Analog Sticks: Place the new analog sticks into the sockets, ensuring they align correctly with the controller’s orientation markers.
nnnn
Reassemble the Controller: Reconnect any disconnected cables or wires. Close the controller by snapping the halves back together. Secure the back cover with screws and reinstall the battery pack or batteries.
nnnn
Test the Controller: Turn on the controller and test the analog sticks to ensure they are functioning properly.
nnnnn(Image credit: Jeremy Laukkonen/lifewire)nnnnnnnn
What Else You Could Do To Fix This Issue
nnnnnnnn
If you’ve tried everything in this post already and your problem still isn’t fixed I would recommend seeing if these two things will fix your problem.
nnnnnnnn
#1 Adjust deadzone and sensitivity
nnnn
Adjusting your deadzone and sensitivity settings in-game can effectively mitigate stick drift issues on controllers. Deadzone adjustments allow you to define a threshold around the analog stick’s center position, ignoring minor input variations that can cause unintended movement. By setting a larger deadzone, you can prevent the controller from registering small, unintended movements as inputs. Additionally, fine-tuning sensitivity settings can help reduce the overall responsiveness of the analog sticks, making it less likely for minor stick drift to affect gameplay. These adjustments not only enhance precision but also extend the longevity of your controller by minimizing wear caused by constant recalibration.
nnnnnnnn
#2 File a warranty claim
nnnn
By utilizing the warranty, you can have the controller repaired or replaced at no additional cost, ensuring optimal performance and longevity. Addressing stick drift early can prevent further damage to the controller and ensure continued enjoyment of gaming sessions without the frustration of inaccurate input responses.
nnnnnnnn
I hope this blog posts helped you with fixing your controller stick drift issue and be sure to check out some of my other blog posts.
nnnnnnnn
Links
nnnnnnnn
These are some links to products you might need when trying out some of these methods. Do note that these links are Amazon affiliate links, if you want to learn more about Amazon affiliate links click here.
Installing your CPU or Central Processing Unit might seem daunting at first. But in this post, I’m going to show you that it’s simple. Everything you need to install your CPU includes: a screwdriver, thermal paste, and of course a motherboard to install it in, thermal paste is to keep your CPU cool and you can find it on Amazon for pretty cheap. I would also strongly recommend getting a cooler, this is most of the time included with your CPU but if it isn’t you should get one. CPU coolers come in all shapes and sizes, but if you have a normal processor the stock cooler will do just fine. Do know that if you’re getting a stock cooler you have to get it from the right brand, if you have an AMD processor then you should get an AMD cooler and if you have an Intel processor then you should get an Intel cooler.
nnnn
So in this post, I’ll explain how to install your CPU in only 5 simple steps, and all you need is a screwdriver and some thermal paste. The process of installing your CPU will also depend on what brand of CPU you’re using. So first I’m going to explain how to install your AMD CPU and then I’ll tell you how to install your Intel CPU. Then I’ll show you how to install the stock cooler as it’s pretty similar for both AMD and Intel
nnnnnnnn
How To Instal An AMD CPU
nnnnnnnn
I’m going to explain how to install your AMD CPU in only 5 steps, and I’m going to try to keep it as simple as possible.
nnnnnnnnn
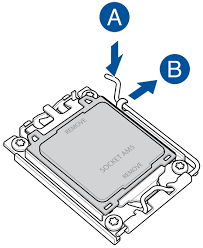
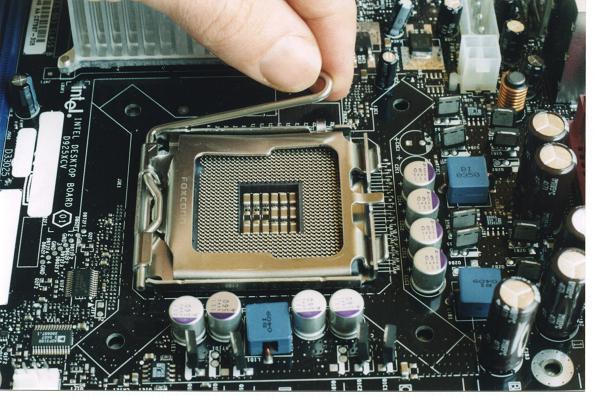
Get the socket ready.
nnnnn
Start by putting the retention arm on your CPU socket up by gently pressing it to the side and then up, as shown in the picture below.
nnnnImage credit: Asusnnnn
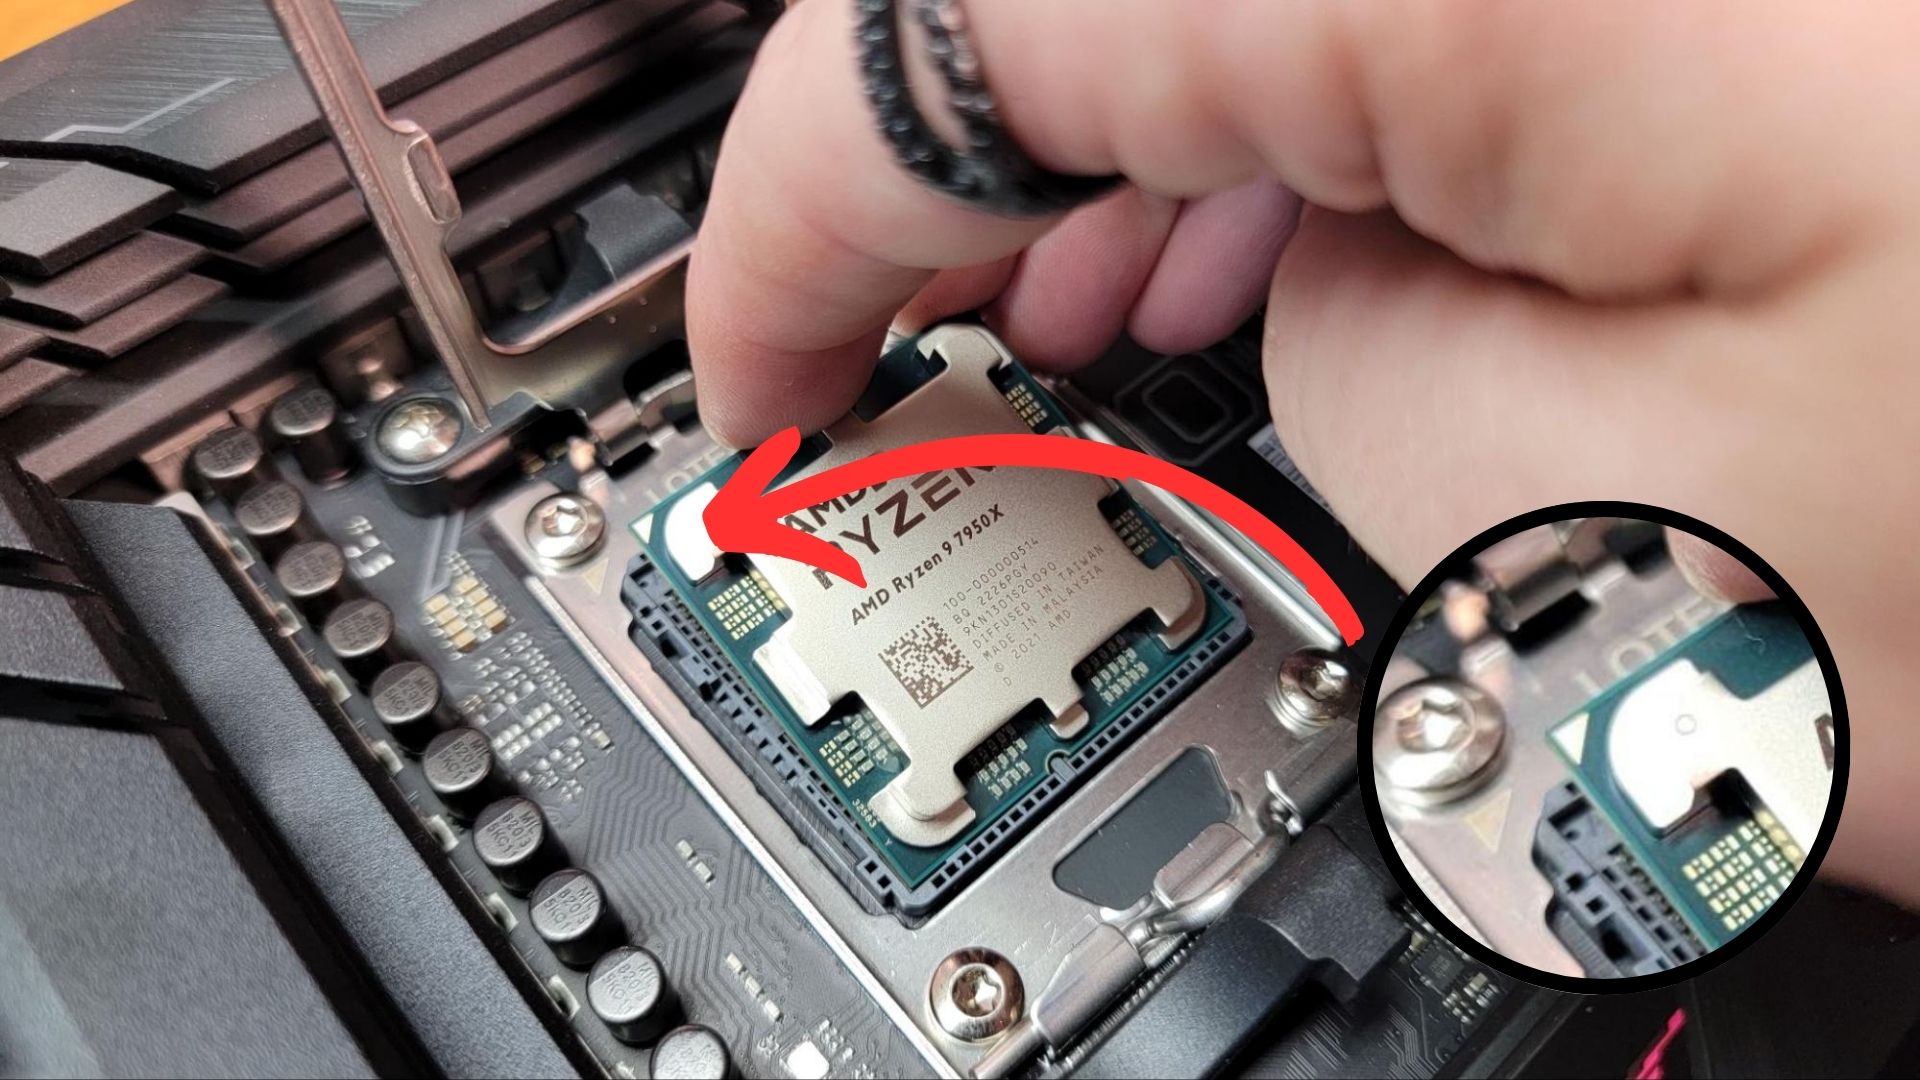
2. Putting the CPUin it’s socket.
nnnn
Gently put the CPU in the socket by letting it fall in the holes, you should see a golden arrow in one of the corners of the CPU make sure that it’s pointing in the same direction as the arrow on the socket. Note that you shouldn’t be using any force to do so and give it a gentle little wiggle once it is in to confirm the CPU is fully seated in its socket. Also, make sure to not touch any of the pins as they’re quite fragile. If it isn’t going in try repositioning it a couple of times and it should just fall in, as shown in the picture below.
nnnn(Image credit: Tom’s Hardware)nnnn
3. Fully installing the CPU.
nnnn
Put the retention arm down again and you’ve succesfully installed your CPU!
nnnn(Image credit: ifitjams)nnnnnnnn
How To Install An Intel CPU
nnnnnnnn
Installing an Intel CPU might seem similar but there are a few things you have to do differently than with an AMD CPU.
nnnnnnnnn
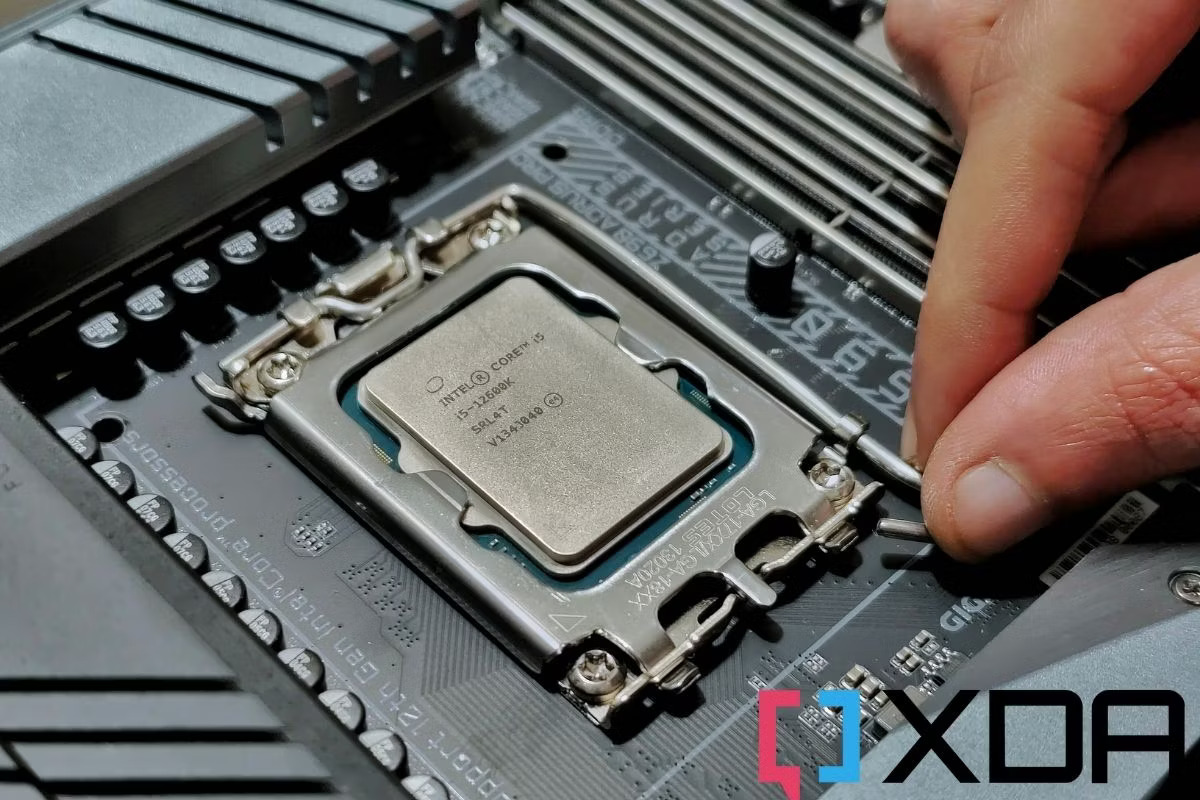
Get the socket ready.
nnnnn
Getting the socket ready is the same process as with the AMD socket, start by putting the retention arm on your CPU socket up by gently pressing it to the side and then up, as shown in the picture below. Now you will also have to flip the load plate up, the load plate will be unlocked once you have put the retention arm up. Also, make sure to not touch the pins once they’ve been exposed as they can be quite fragile.
nnnn(Image credit: Asus)nnnn
2. Putting the CPU in it’s socket.
nnnn
Putting the CPU in its socket is a bit different with Intel as the pins aren’t on the CPU but on the socket. Again be sure to not touch the bottom of the CPU, because your fingers can get oils or residue in there which isn’t what you want. Now as with the AMD CPU, there will be a golden arrow and another arrow printed on the loadplate and they should be pointing in the same direction. You want to go straight down and gently put it in its socket, be sure not to use any force or try and press it in as the CPU should just fall straight into the socket and give a gentle little wiggle to confirm it’s fully in.
nnnn(Image credit: 173.rtaf.mi)nnnn
3. Fully installing the CPU.
nnnn
Now if the CPU is fully seated you can put the loadplate back down over the CPU, and if you have a black protective cover on your loadplate it should just pop straight off. Then proceed to put the retention arm back down to its original spot, so fully down and beneath that notch. And that’s it, well done!
nnnn(Image credit: XDA)nnnnnnnn
How To Install The Stock Cooler
nnnnnnnn
Installing your CPU stock cooler is going to be pretty much the same on AMD and Intel, so I’m going to just make 1 guide for this. All you will need to install your CPU’s stock cooler is some thermal paste (which might already be pre-installed on your stock cooler) and a screwdriver.
nnnnnnnnn
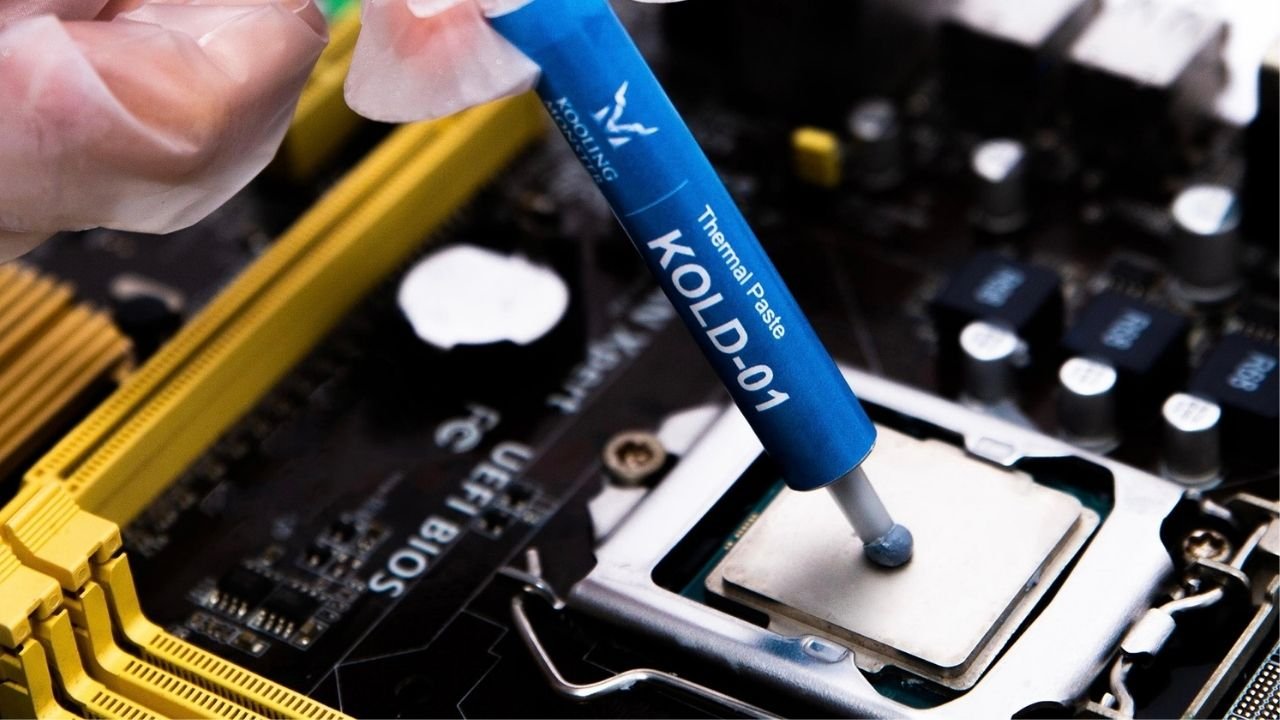
Applying some thermal paste.
nnnnn
Applying thermal paste is very important to ensure that your CPU isn’t overheating and that it’s working at its maximum potential. Applying the thermal paste is easy, note that if you bought a new CPU then there should already be thermal past pre-applied on the stock cooler. There are multiple ways of putting on thermal paste, my favorite is putting a dot of it on your CPU and it should automatically spread out if you have a spatula for your thermal paste which looks like this, you should spread it out with that and make sure everything is covered with a thin layer of thermal paste.
nnnn(Image credit: coolingmonster)nnnn
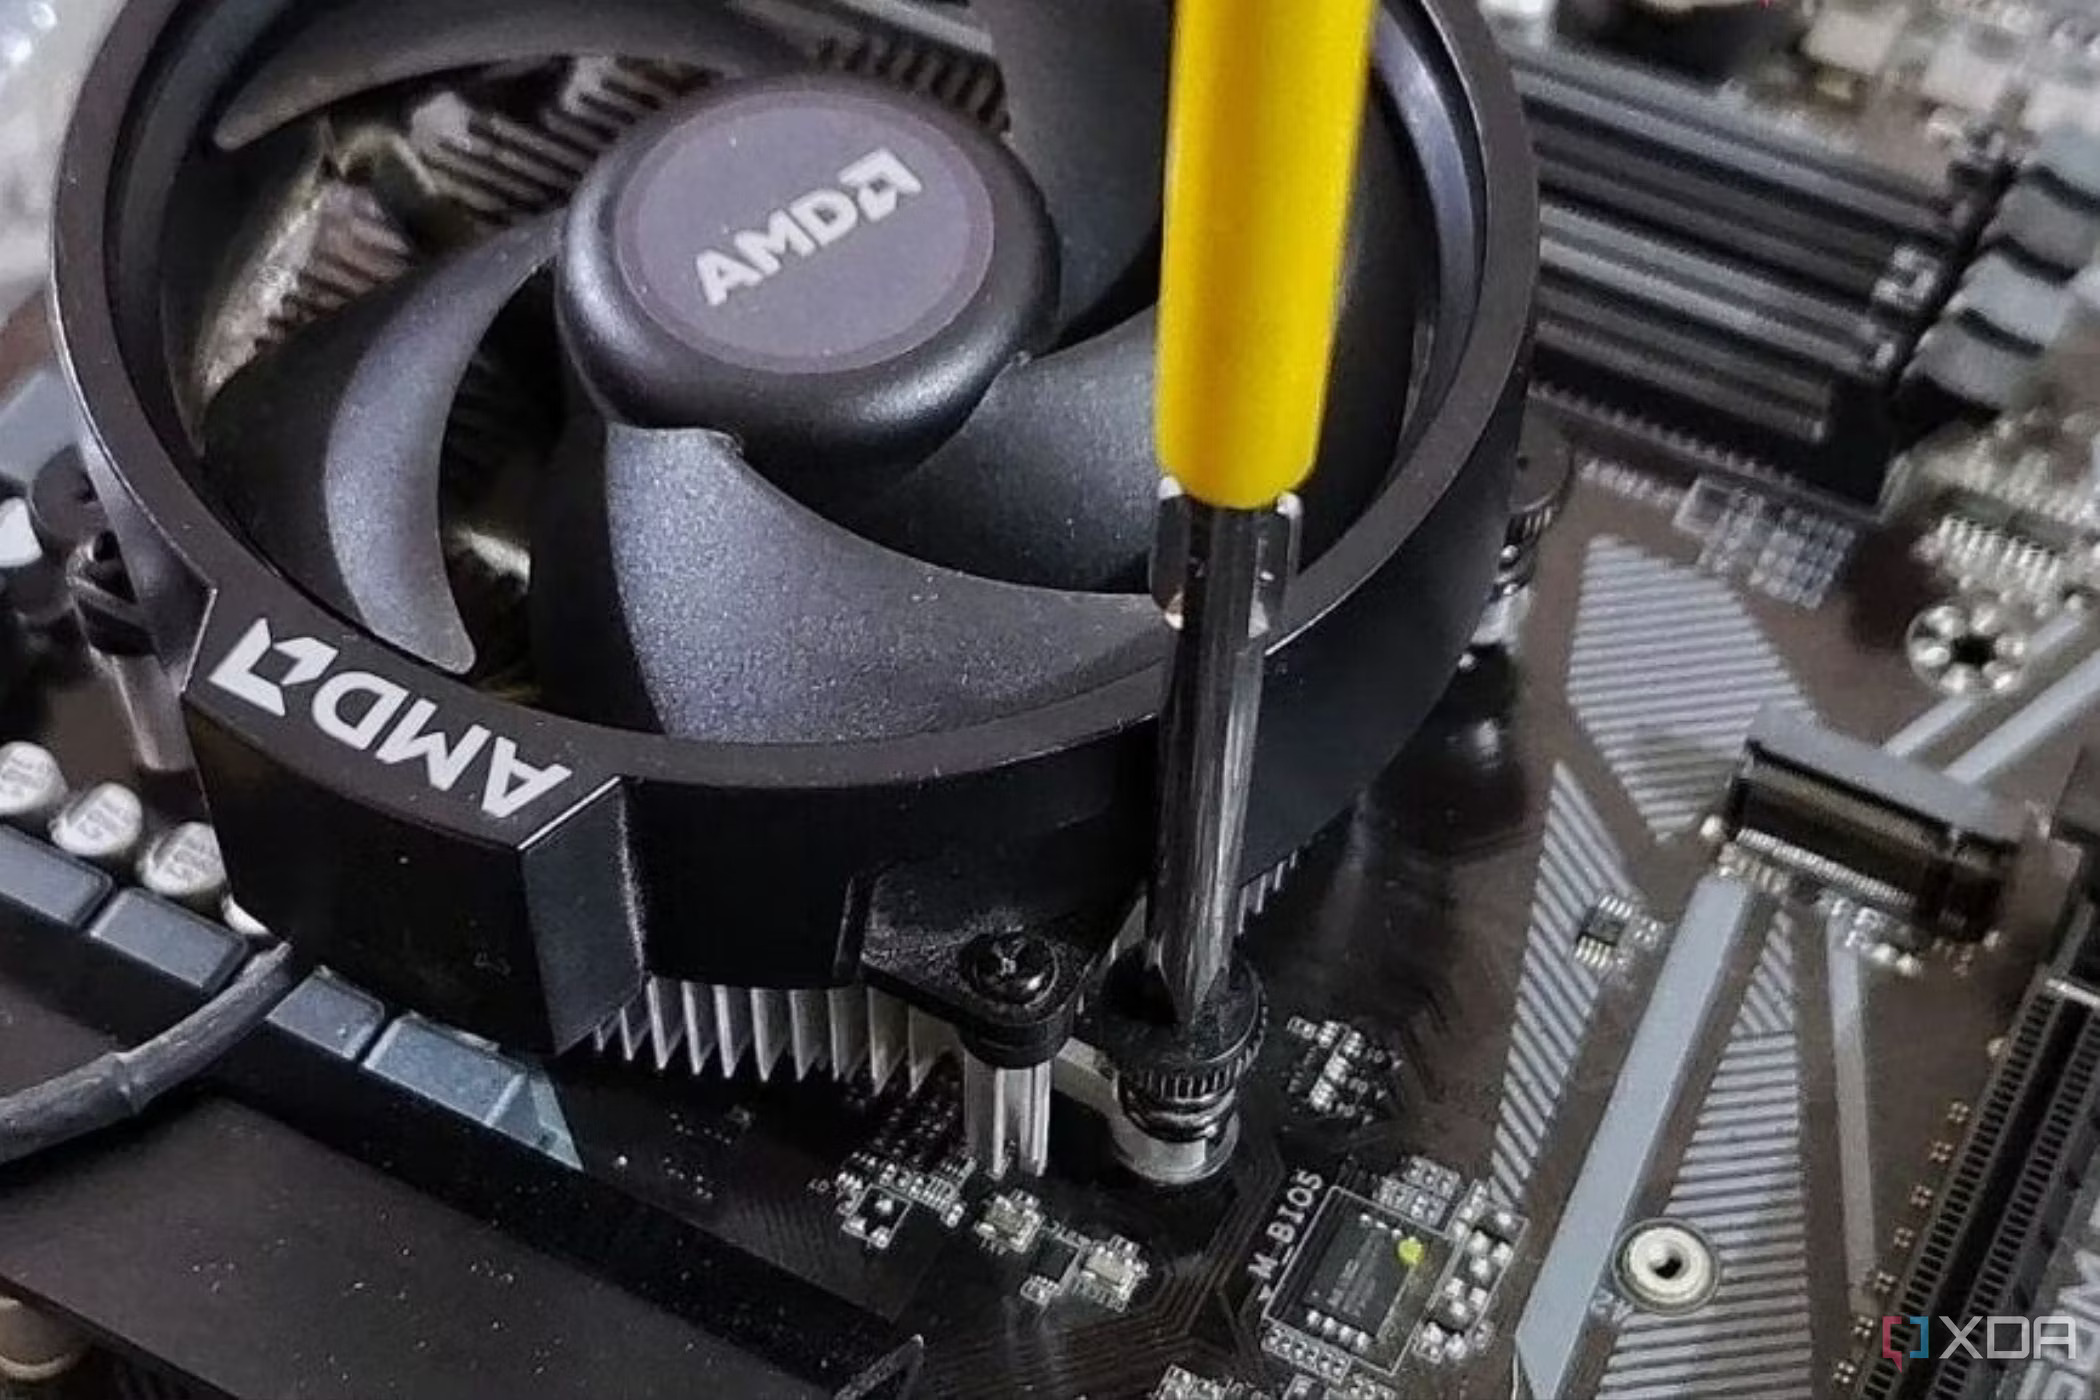
2. Putting the cooler on the CPU
nnnn
Now putting the cooler on the CPU might look complicated but it’s easy, all you need is a screwdriver. Firstly you want to locate the designated holes for the cooler on the motherboard, these will often be pretty big holes in all 4 corners around the CPU. Then you have to put the cooler on and screw it in, it’s that simple! You should do this in one go so the thermal paste stays intact so make sure you’re being careful when installing the cooler.
nnnn(Image credit: XDA)nnnn
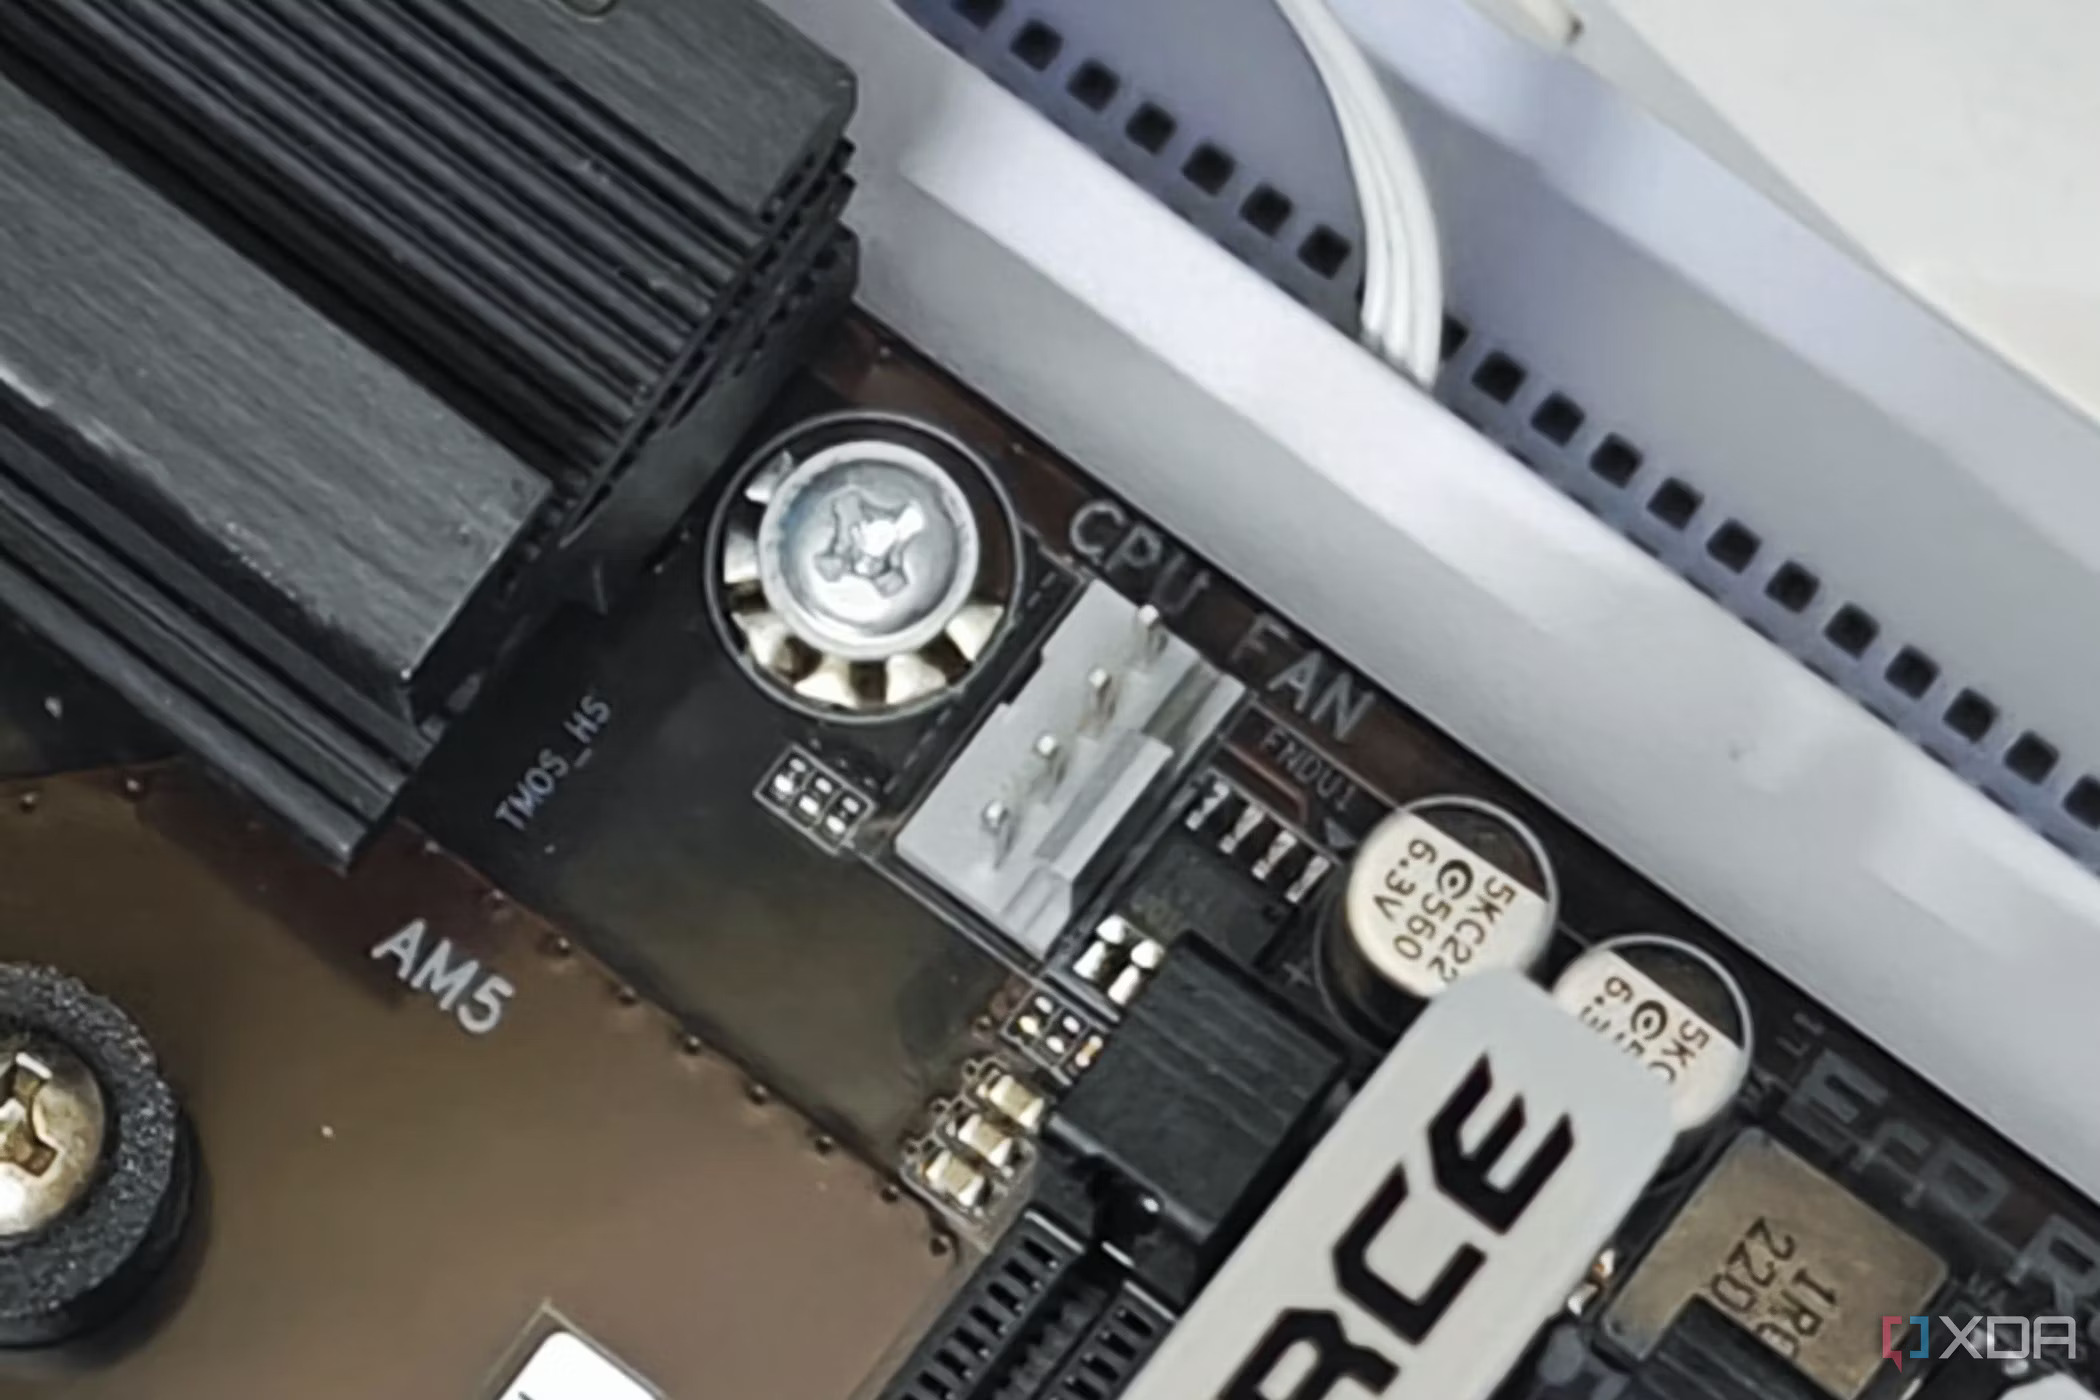
3. Connecting the cooler to the motherboard.
nnnn
Now for our last step, plugging the cooler into the motherboard. This is probably the easiest to do so I’ll make this nice and short. Locate the cable of your stock cooler, typically a black cable coming from the top (so where the logo is). Then you want to find the PWM header on the motherboard, this can be anywhere from the top to the sides of your motherboards but should say CPU_FAN above it. Plug it in and you should be good to go!
Always wanted to buy a smartwatch but are their prices holding you back? Well, today I’ll show you that it doesn’t have to be like that, because I’m going over the 3 best budget smartwatches for teens, all under $80! Read until the end to find out which is my favorite and why I think that one is the best. So if you’re not afraid of using another brand then Apple for your smartwatch and if you want good value for your money, then this is the post for you!
nnnn
I haven’t used any of these smartwatches so to make sure you can trust me, I will have my sources linked down below and I’ll explain how I came to these conclusions.
The CMF smartwatch is made to be a smartwatch that’s good at the fundamentals, that’s the aim of the company behind it, CMF stands for Colour, Material, and Finish. So does this product achieve its goal of simplicity and good quality?
nnnn
Well let’s start with the basics, it’s a 1.6-inch square display and it has very thick bezels which are also a bit uneven which is annoying. But it does look kind of similar to the Apple Watch so that’s a plus if you like the look of the Apple Watches. However it only has one button on the side, so no rotating knob. It charges with USB, so no wireless charging. But that doesn’t mean it’s bad, because this smartwatch wasn’t made to be shiny and have all these cool features. No, the aim was to keep it simple and I would say they achieved that. The outside and the inside are both basic and not distracting. It has the time displayed, notifications, a step counter, a heart rate sensor, a calorie counter, and sleep tracking. So nothing special but it’s good enough for 95% of people I’d say.
nnnn
Being simple and basic also has a lot of other advantages like really good battery life and barely any lag or anything because the apps are so light and it’s also using your phone for some of the stuff like music or voice controls. On their site, they say that it could last 13 days, but that’s a bit of a stretch however you will be able to go through a handful of days without having to think about the battery. So to summarize it has good battery life, and bearly any lag because the apps or all so simple and light, the design is simple but good and the interface is also very basic and not distracting. It’s also pretty cheap at only $69.99.
nnnn
Now let’s talk about the company because you might have heard of the company Nothing before, they’ve mostly made smartphones and earbuds and they were founded by Carl Pei, the co-founder of OnePlus. But did you know that they recently also started a sub-brand called CMF? Yes, on September 26 2023 Nothing decided to start CMF, a new sub-brand specialized in core product functionality (so mostly simple and non-distracting like the Nothing phones). CMF stands for Colour, Material, and Finish, what they mean by that is that they make good designs at an affordable price range. By now they’ve only made earbuds, this watch, and a charging dock, but I’m sure they will make more in the future as a lot of people like their products.
Pros✔️ -Very Light Weight (only 24 grams) -Good Battery Life -1.91 Inch Display -Very Affordable -Loads Of Games And 120 Sports Modes -Wireless Charging
Cons❌ -No Rotating Knob -Mic And Speaker Not Available In US
So on the outside, the Amazfit Bip 5 Unity looks pretty similar to the CMF smartwatch by Nothing, but that’s far from the truth. As the last smartwatch was all about good performance and basic apps, this smartwatch is made to give you the most amount of stuff for your money as possible. A few things that this watch can do that the CMF smartwatch can’t are wireless charging, on-device voice commands (the CMF smartwatch can also do this but it’s using your phone to do so), and over 70 mini apps and games. However, I wouldn’t say it’s better than the CMF watch just because of those things.
nnnn
Let’s start with the basics, it has a 300mAh battery which is 40 mAh less than the CMF smartwatch, it also has a 1.91-inch display which is again a bit smaller than the CMF’s 1.96-inch display. It does weigh twice as little as the CMF smartwatch at only 24 grams, so it’s a very lightweight smartwatch. It’s also the exact same price as the CMF smartwatch at 69.99. Apart from that it’s also got wireless charging which is always nice to have and 120 sports modes which I will get into later. So there are definitely a few things that this smartwatch is better at than the CMF watch and a few things that it’s worse at than the CMF watch, so it basically all boils down to personal preference.
nnnn
Now let’s talk about those 120 sports modes, because when I first heard there were so many I was just as surprised as you are. They don’t list all of the sports modes anywhere, but you can be assured that whatever sport you’re doing, there will be a mode for it. Another nice thing about the sports modes is that the watch automatically detects when you’re sporting and puts a sports mode on that it thinks best suits what you’re doing. Now it won’t choose from the 120 sport modes when it detects that you’re working out, but it will choose between the treadmill, outdoor running, elliptical, indoor walking, rowing machine, and walking.
nnnn
So to summarize, it’s got loads of cool features, decent battery life, a 1.91-inch display and it’s pretty lightweight at only 24 grams. It runs pretty smoothly and it’s really affordable at $69.99. If you are choosing between this smartwatch and the CMF smartwatch by Nothing then it mainly comes down to personal preference, do you want your smartwatch to have loads of cool features, or do you want just a solid smartwatch that’s really good at all the basic stuff on not really distracting?
Now onto our last smartwatch, the Xiaomi Mi Band 8. Note that this smartwatch is more focused on being a fitness tracker than on being an actual smartwatch, but it can still do both pretty well for its price. Let’s start with the design because it doesn’t look anything like the other smartwatches. it’s got a vertical 1.62-inch display, with a 60 Hz refresh rate which is super solid for its price. It’s nice and bright and it has an always-on display like the other smartwatches. Whether you like the design or not will mostly come down to personal preference, but one thing you will unfortunately notice is the bands because they aren’t great. Because of the new design, they can easily fall off and you might not even notice it because it’s so lightweight. So what I would advise you to do is get a strap with a buckle instead of the normal one so there is less chance of it falling off.
nnnn
Let’s talk about the specs, firstly as I said it’s got a vertical 1.62-inch display which is big enough but some people might not like that it’s vertical, and it has a 60 Hz refresh rate which is really good for a smartwatch at this price. Apart from that it’s got all the sensors you need except it doesn’t have GPS so you will have to bring your phone with you for GPS which is not handy if you’re going for long runs for example. This smartwatch has even more sports modes than the last one, everything from badminton to boxing, you will find it on the Mi Band 8. The battery is also fine with 190 mAh, which is way less than the previous smartwatches but it seems to be pretty efficient so it will easily last you a couple of days. Lastly, it’s also very lightweight which makes it very comfortable to wear at only 24 grams.
nnnn
Now for the UI, if you’ve ever used a Mi Band before it will look pretty similar. For anyone that hasn’t, it’s pretty similar to using an Apple Watch or any Wear OS-based smartwatch, with a few fewer functions but that’s expected at this price range. You can see all your notifications from your phone by swiping down and if you swipe up you open the app launcher. You can also configure all your widgets that you can find by swiping left or right. For the app launcher it’s all pretty basic stuff, everything you would need from your smartwatch. There are also plenty of watch faces you can install from your phone.
nnnn
So to summarize, it’s a decent OLED screen with a 60 Hz refresh rate which is surprisingly good for this price. It’s got all the sensors you need, except for GPS which is a bit of a letdown. The battery is good with 190 mAh, it will easily last you a few days. It’s also really lightweight at only 24 grams making it really comfortable to wear. The UI is also pretty good, you can customize the watch faces from your phone and you can also configure your widgets. You can see all your phone notifications by swiping down and open the app launcher by swiping up which has all the basic stuff you would need from a smartwatch.
My favorite has to be the CMF smartwatch by Nothing. It’s mostly the design, build quality, and the interface that I really like. It has everything you would need from a smartwatch this price and more. It’s not super distracting, it has good battery life and it’s just an all-around great budget smartwatch at only $69.99. If you liked this blog post, please consider sharing it and comment any ideas for a future blog post.
Are earbuds bad for your ears? That’s the question I’m going to be answering for you today! Firstly I’m going to explain if they’re bad and how bad they can be for your ears and then I’m going to give you 2 things you should focus on while using earbuds to prevent damage to your ears. Now I’m going to be talking about earbuds mostly, however it’s mostly the same for headphones. This isn’t any medical advice and if you’re having hearing problems then you should speak to your doctor about it. Also be sure to check out my blog post about the Jlab Go Air Pop Pro True Wireless Earbuds, if you’re looking for an affordable and good set of wireless earbuds.
Are Earbuds Bad For Your Ears And How Much Can They Damage Your Ears?
nnnnnnnn
Now I know you’ve probably all heard that earbuds can be really bad for your ears, but you probably don’t know exactly how bad they can be if you overuse them. Did you know that 17% of kids or already suffering from some type of hearing problem? So here’s a list of what can happen if you over-use your earbuds.
nnnnn
Hearing loss
nnnn
Tinnitus (ringing in your ears that may never goes away)
nnnn
Ear infection
nnnn
NIHL (noise-induced hearing loss)
nnnn
Dizzines
nnnn
Effects on the brain
nnnn
Hyperacusis (reduced tolerants to sound)
nnnnn
Now that doesn’t mean you should stop using your earbuds, it just means you have to be careful when using your earbuds. Now a way of being careful could be by using the 60-60 rule, so if you want to learn more about that then keep reading!
nnnnnnnnnnnn
60-60 Rule
nnnnnnnn
Now you might have heard of the 60-60 rule before, but for anyone that hasn’t heard of it, it stands for listening 60 minutes (per day) at 60 percent volume. It’s a very conservative rule, so if you follow that rule you’re definitely safe. But you could probably do more than that without any issues so it’s not like you have to follow it or otherwise you’ll suffer from hearing loss. So for example for people who are using earbuds 24/7 because they work at home, if you listen at a quiet enough level you will be perfectly fine. However there isn’t really a clear number or percentage for this so just be careful, try to keep it as low as reasonably possible, and reduce the background noise as much as possible so you don’t have to turn them up. That is we’re noise cancelation can be really useful, noise cancelation is basically that it cancels the noise around you and this is useful so you don’t have to turn the volume up because of the noise outside.
nnnnnnnn
How To Use Your Earbuds Safelly
nnnnnnnn
Now using your earbuds safely is very easy, you just have to be careful. If you’re listening on high volume with your earbuds every day, then maybe just put the volume down a bit. 60% is recommended but it’s not like if you go over it a bit then you’ll suffer from ear damage but it’s a good percentage to kepp in mind. So here’s a list of things you can do to ensure that your ears are safe while listening with earbuds. Also make sure to clean your earbuds and ears, as it could lead to infections.
nnnn
If you’re looking for affordable but good-quality earbuds, then I’ve got just the blog post for you. I tell you all the details of the Jlab Go Air Pop Pro True Wireless Earbuds, after a year of daily use.
nnnnnnnnn
Not to long, listening routinelly for hours at a time at even a medium volume can lead to damage to your ears. However it’s possible to listen 24/7 without having damage but you will have to keep the volume as low as reasonably possible.
nnnn
Not above 60%, 60% is a good number to avoid going over however it doesn’t hurt to keep it at 40% if reasonably possible.
nnnn
Keep your ears and earbuds clean, keeping them clean is very important to avoid infecting your ear.
nnnn
Reduce background noise as much as possible, reducing the background noise will help so you don’t have to turn your earbuds up because it’s so loud outside. Noise cancelation is really handy for this.
Are you suddenly unable to connect to your wifi? Well, worry no more, because I’m going to show you 4 of the easiest and most effective methods ways to fix this annoying problem. This is for people who: can’t see any wireless networks, can’t see their wireless icon, or are unable to connect to a wireless network that another device can connect to. So if you have any of those issues, this post is for you. Note that I’m using Windows 10 for this, but it shouldn’t be much different on Windows 11.
nnnn
Now before we start there are a few simple problems that might cause your problem so I’ll list those here first, so be sure you’re not making any of these simple mistakes before starting.
nnnnn
If your laptop has a wifi button make sure it’s pressed and enabled, not every laptop will have this but if you do make sure it’s enabled.
nnnn
Try restarting your computer and/or modem, this might fix your problem.
nnnn
Make sure you don’t have airplane mode on, whether you’re on a laptop or a smartphone this is a common issue and can be easily fixed by just turning it off.
nnnnn
If any of these fixes didn’t work you can try the other fixes I’m going to tell you about here, these fixes include: reseting yout network, checking your wifi adapter, troubleshoot on Windows and forgeting and reïnstalling your wireless networks.
nnnnnnnn
#1 Reset Your Network.
nnnnnnnn
Resetting your network is going to be very easy and I’ll explain how to do it in only 4 easy steps.
nnnnn
Open your settings by typing settings in the Windows search bar.
nnnnnnnnn
2. Once you’re in settings, go to network & internet.
nnnnnnnn
3. Scroll down to where it says network reset.
nnnnnnnn
4. Click on ”reset now” and follow the steps.
nnnnnnnnnnnn
#2 Check The Wifi Adapter
nnnnnnnn
Checking your Wi-Fi adapter will be a little bit more complicated, but I’m going to make it as easy to understand as possible.
nnnnn
Open your device manager by right clicking on the windows logo and selecting ”device manager”.
nnnnnnnnn
2. Select ”network adapters”
nnnnnnnn
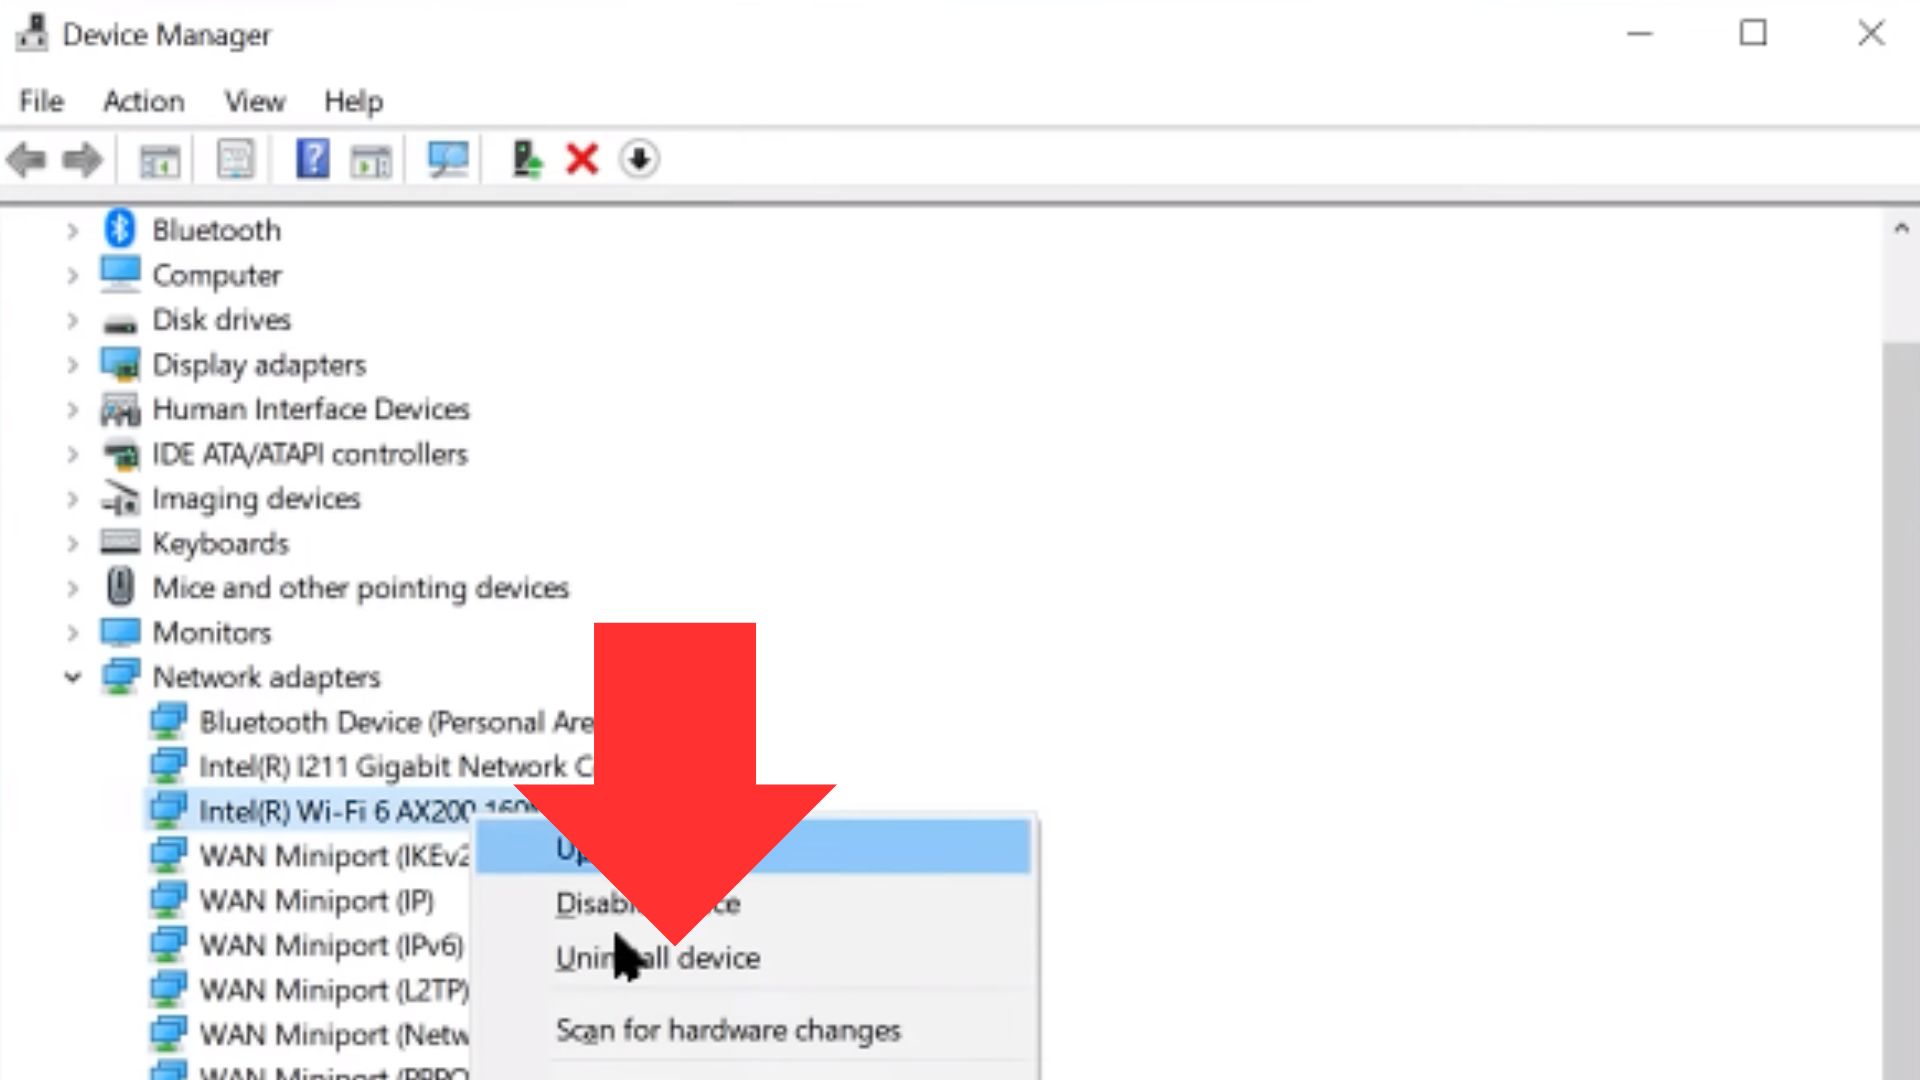
3. Next you want to select your Wifi Adapter, now for some it will say Wifi somewhere in the text, and for others (like me) not. If yours doesn’t say Wifi in the text select one that isn’t ethernet or a WAN and for example, for me, it says ”Intel(R) Dual Band Wireless-AC 7265”, but select anything along the lines of wireless or Wifi.
nnnnnnnn
4. Right-click on it and select ”uninstall device”, you mustn’t delete the driver software so keep that box unchecked.
nnnnnnnn
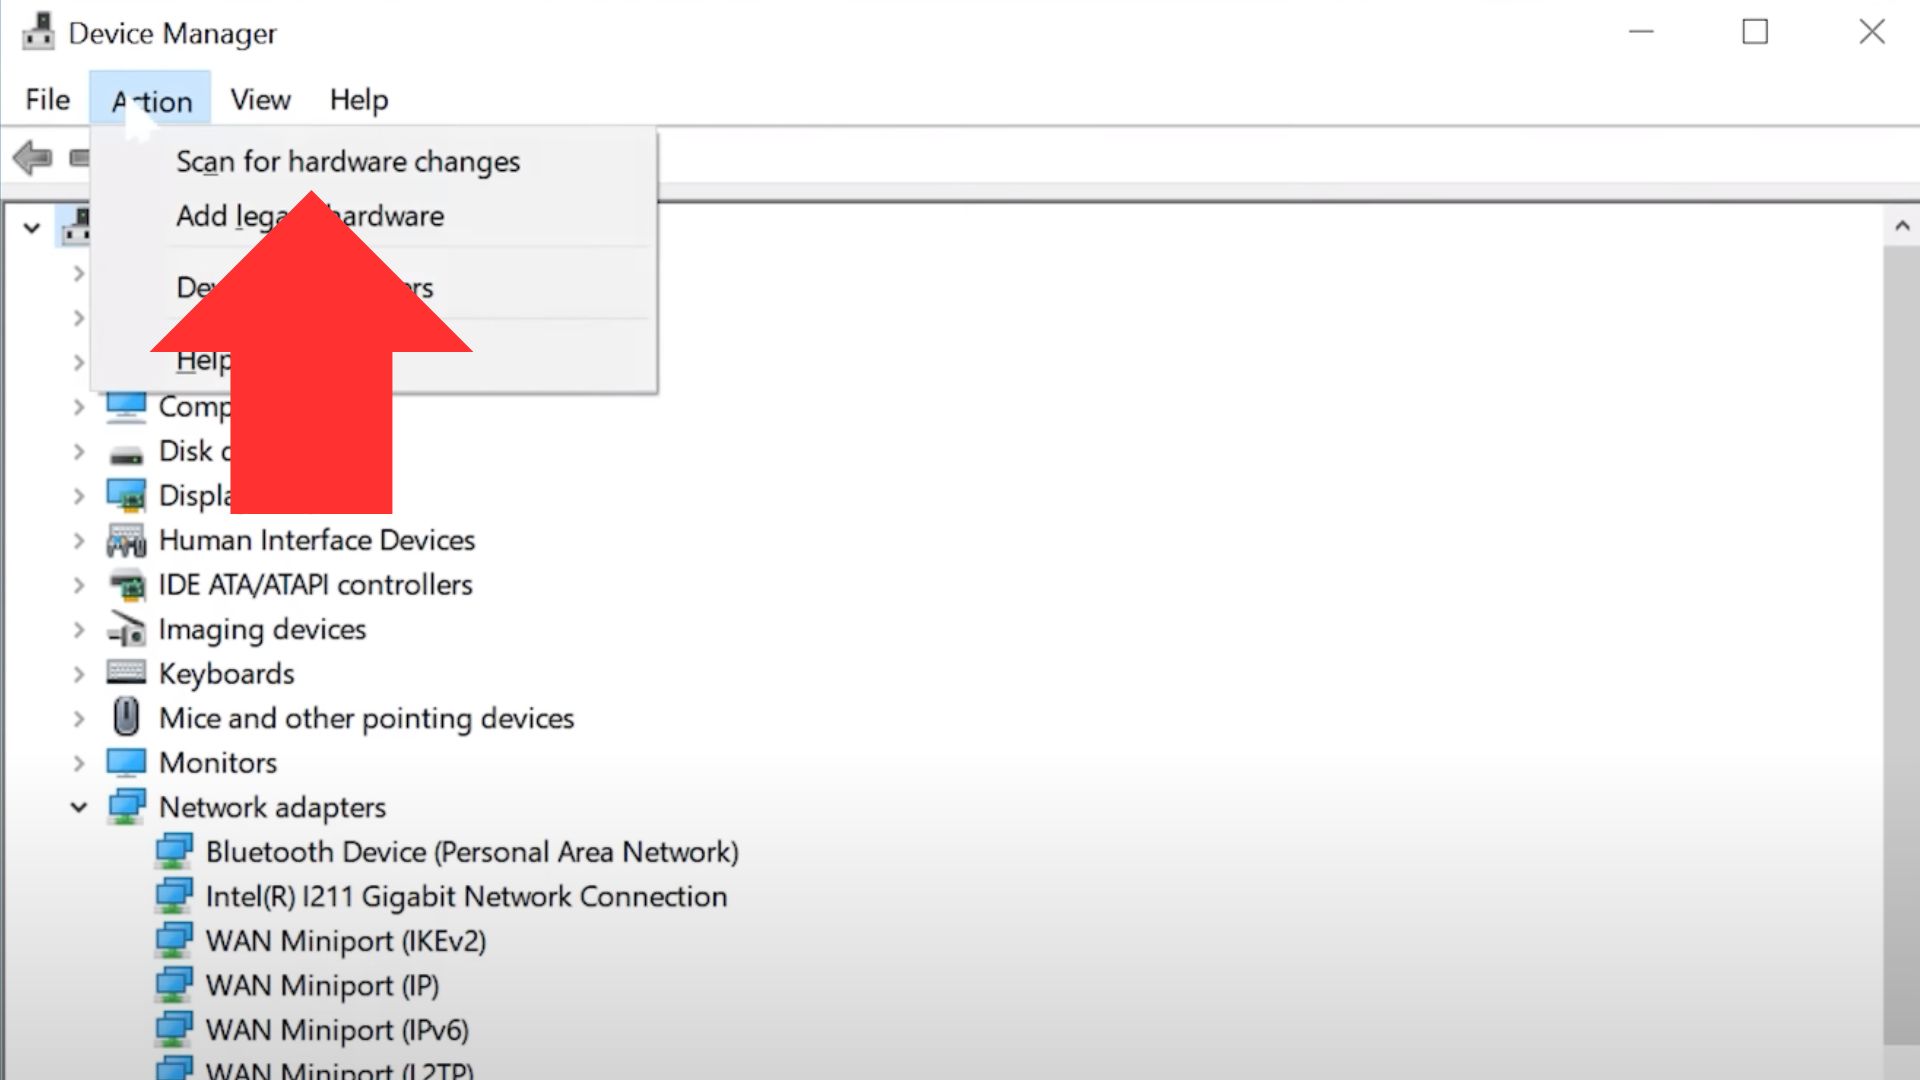
5. On the top of the screen click on ”actions” and then ”scan for hardware changes”
nnnnnnnn
6. After scanning for hardware changes you’ll see that the Wifi Adapter has popped up again because you still had the driver installed.
nnnnnnnn
7. See if this helped your problem and do note that you will have to reconnect to all of your networks and refill in your Wifi passwords. If it still hasn’t made a difference follow along just a few steps more to update your driver.
nnnn
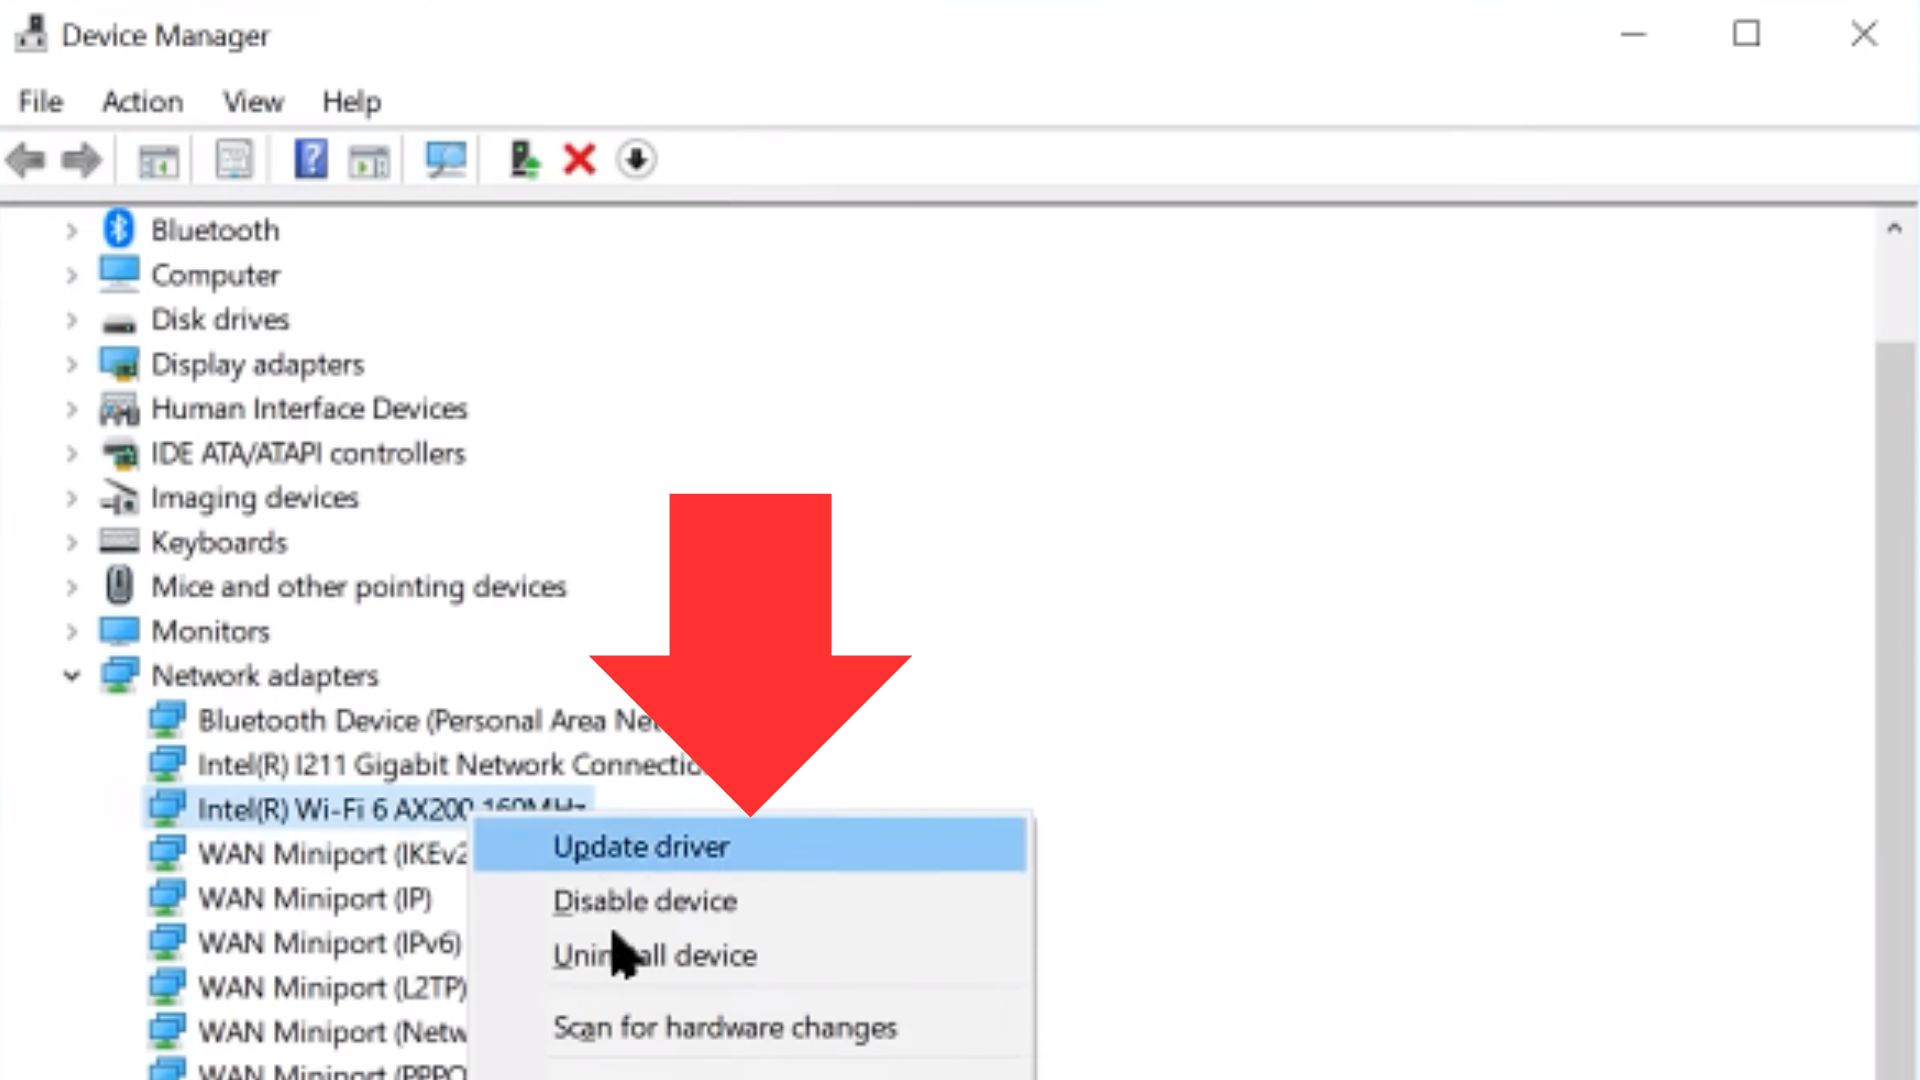
8. Click on your Wifi Adapter again and now press ”update driver”.
nnnnnnnn
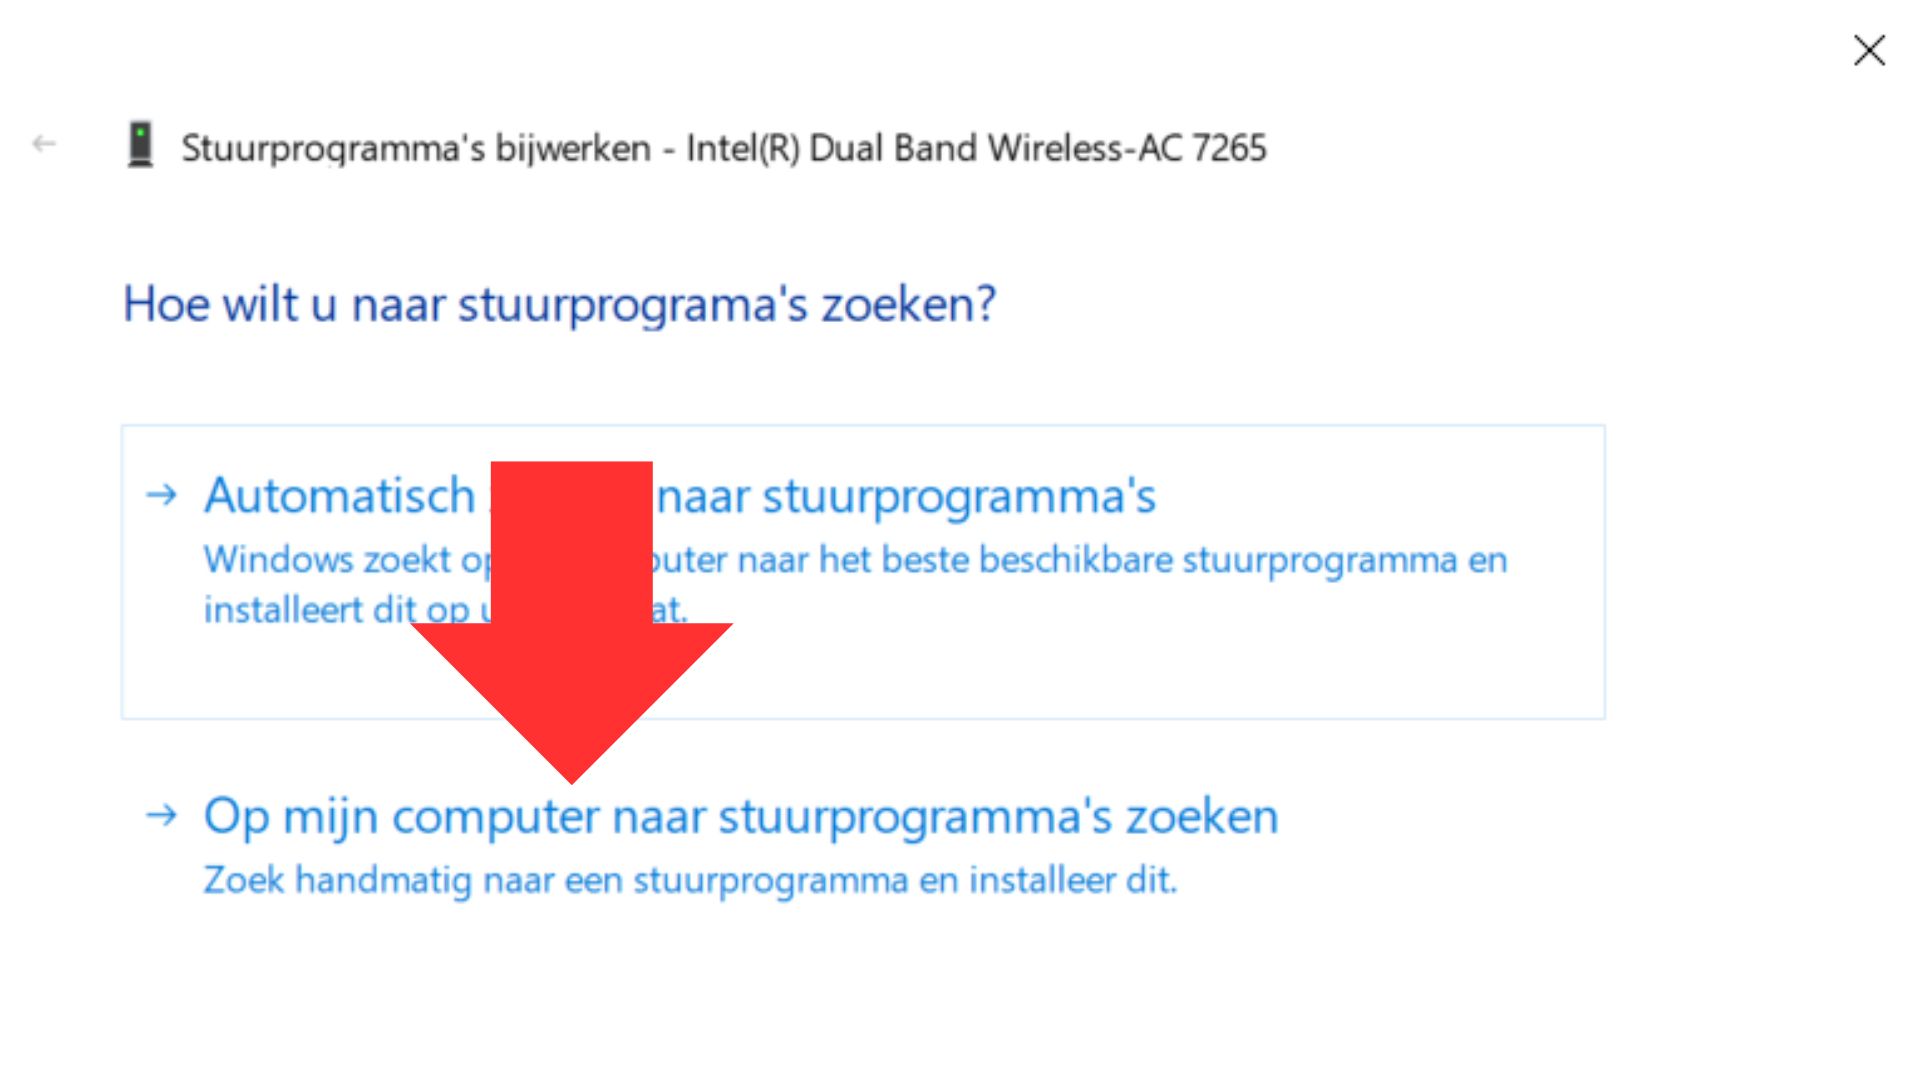
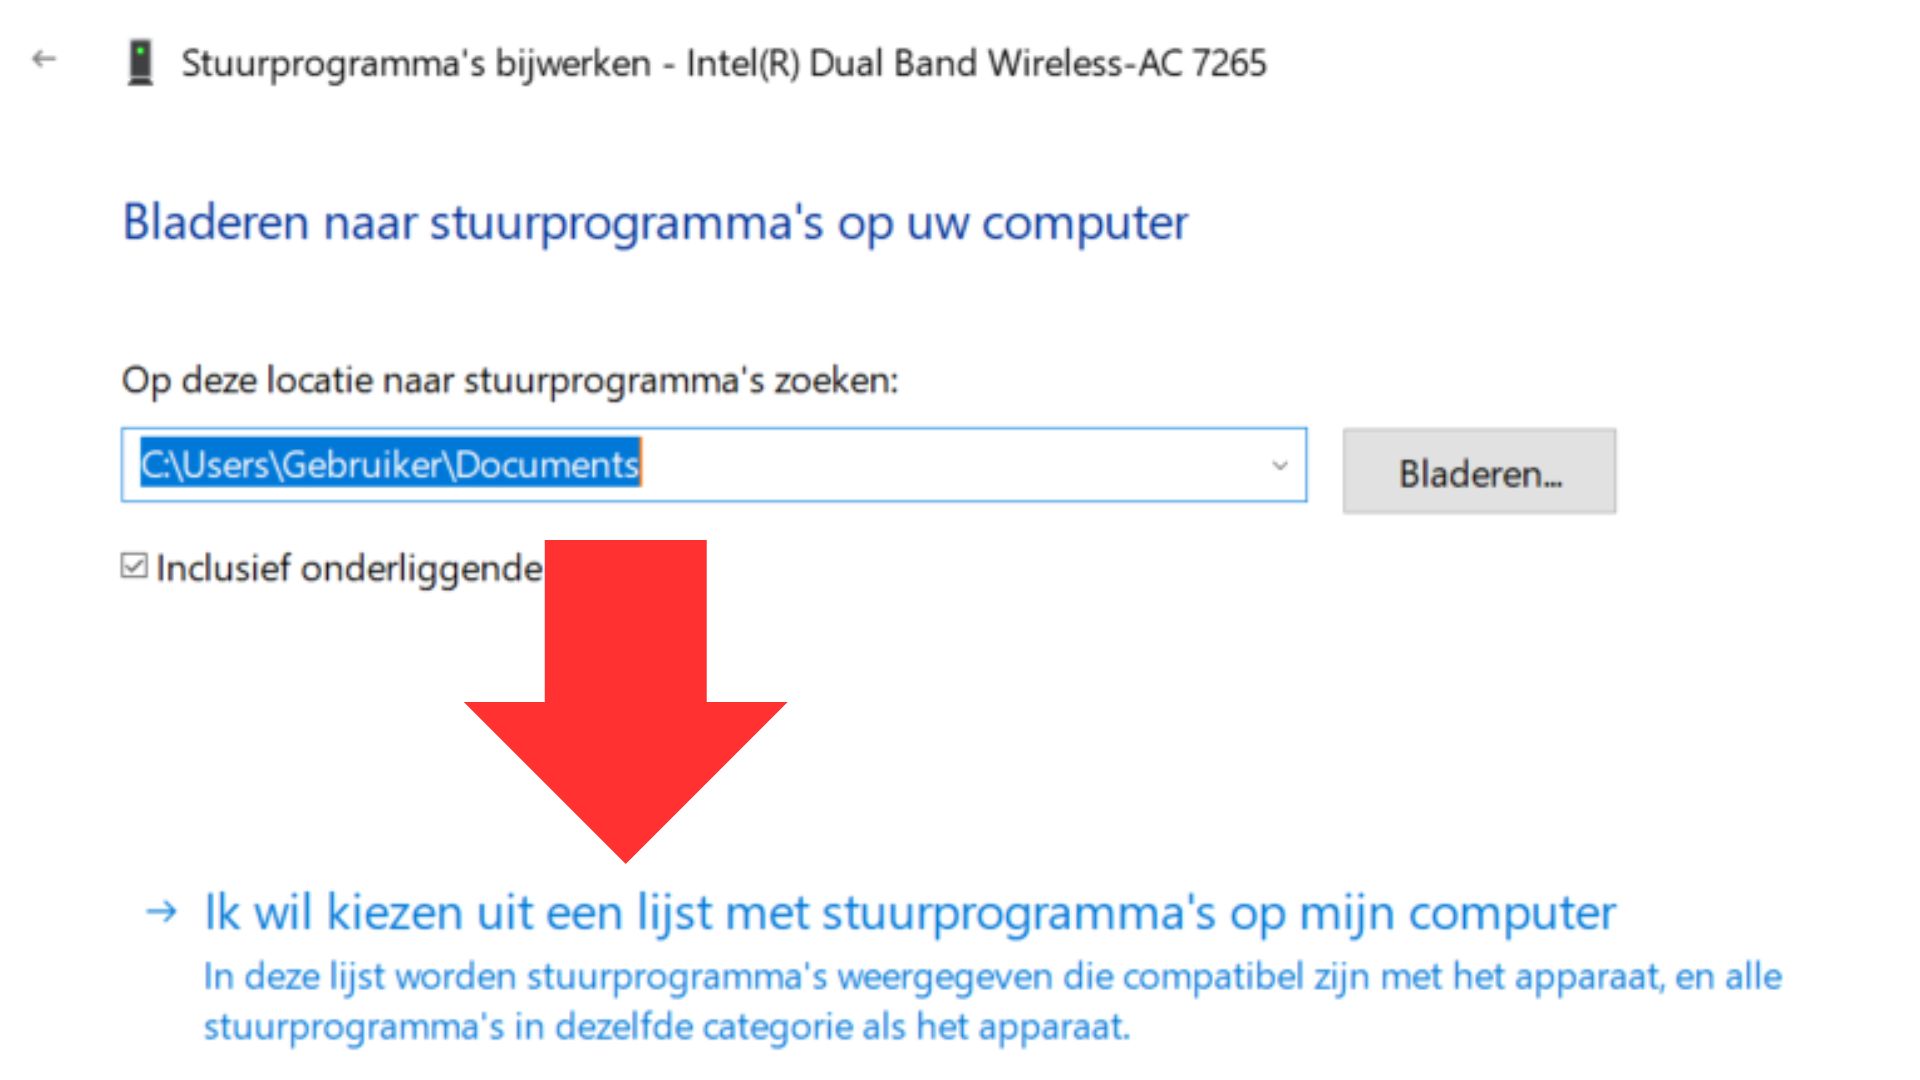
8. After clicking on update driver you will see the option to either ”browse your computer for drivers” or ”search automaticly for drivers”, choose ”browse your computer for drivers”.
nnnnnnnn
9. Then select ”let me pick from a list of available drivers.
nnnnnnnn
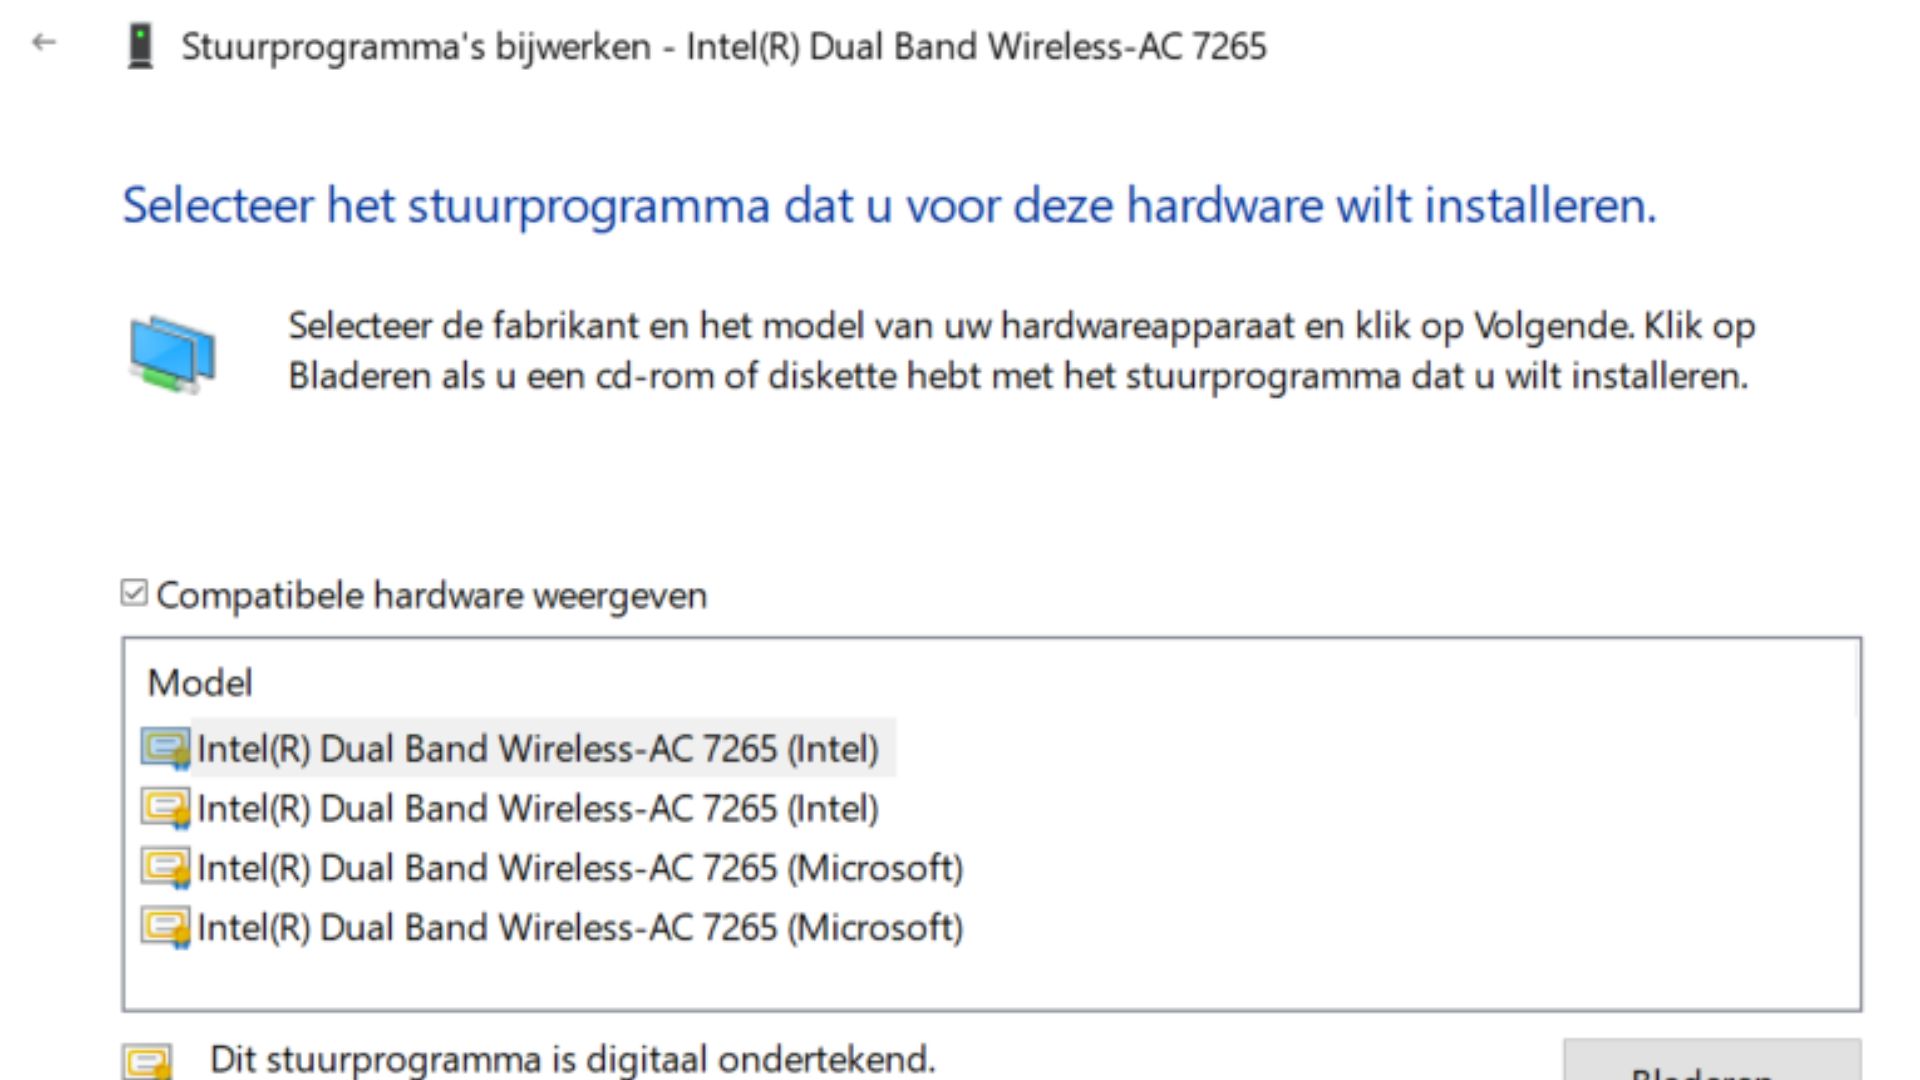
10. Here, you’ll see a few different drivers and you want to choose the newest one. Now if you don’t have the dates listed (like with mine) you will have to try each one and see which works.
nnnnnnnn
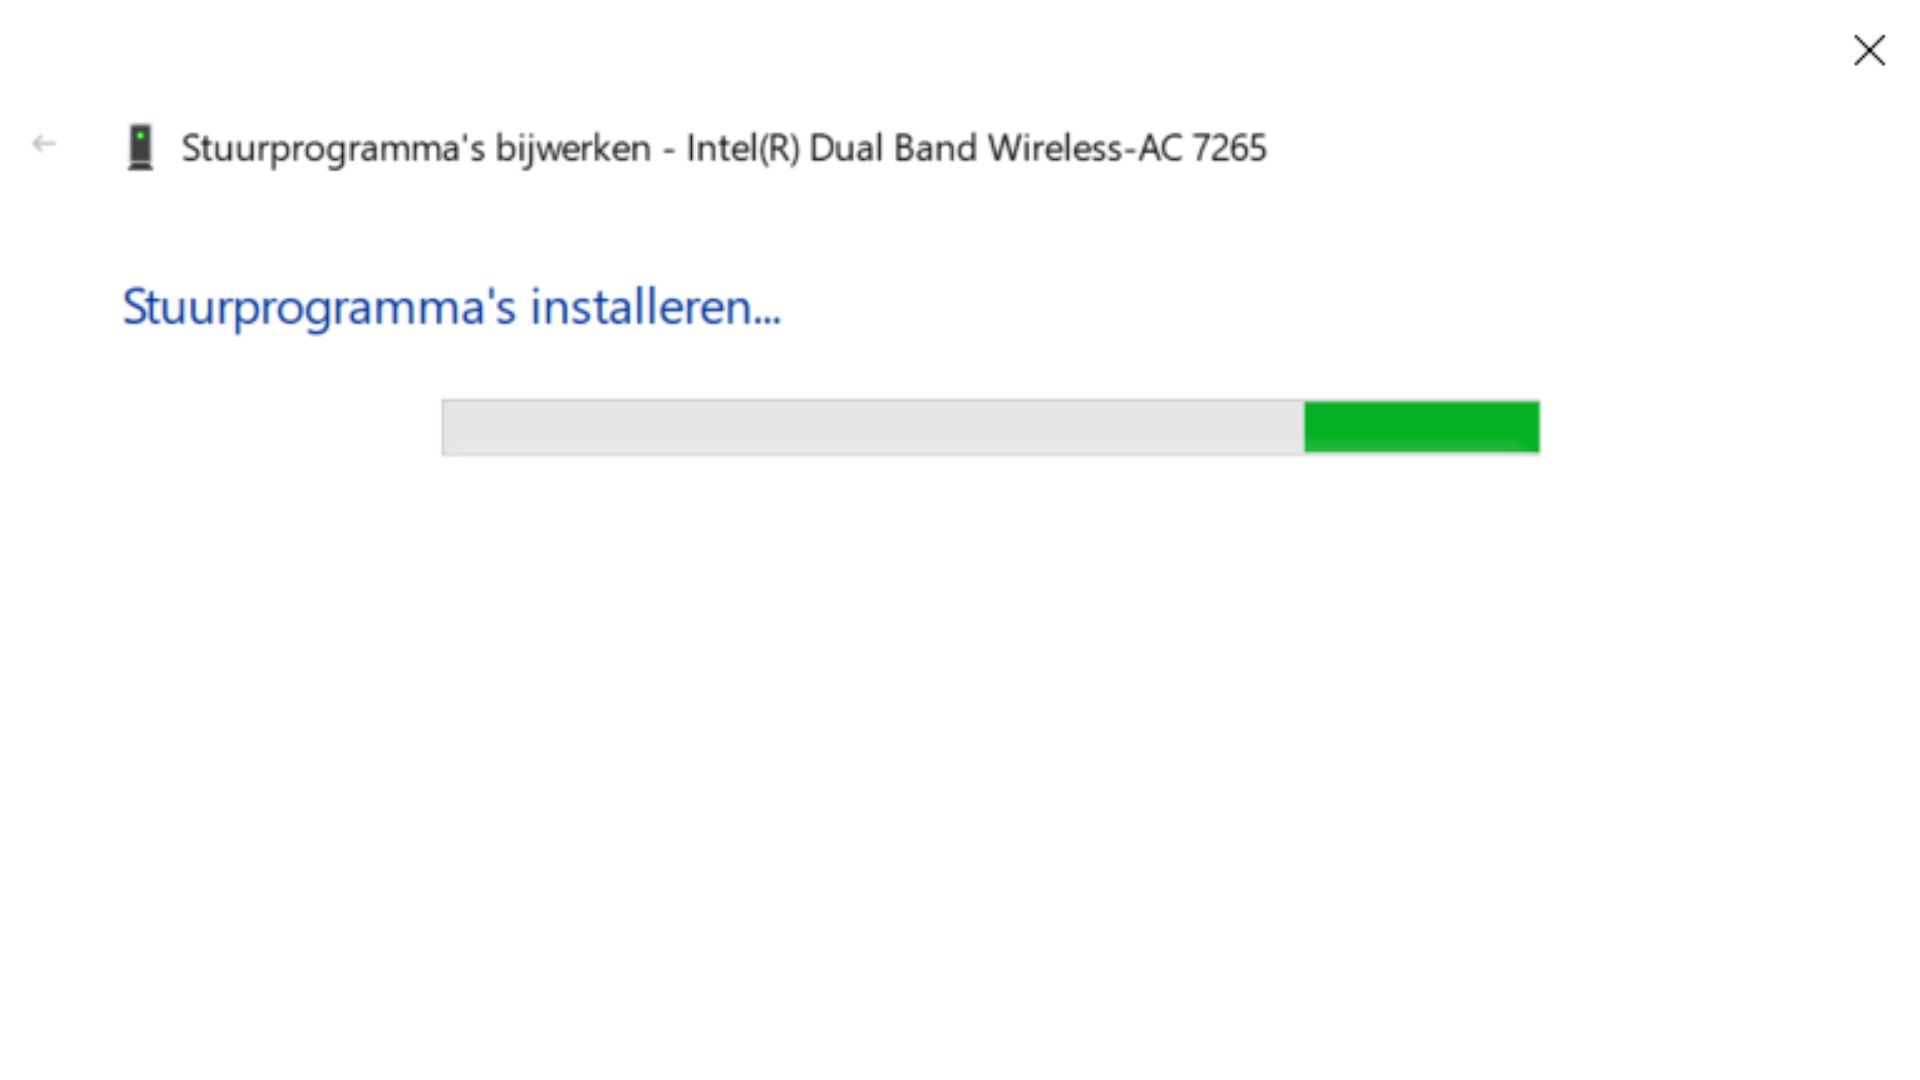
11. Click next and it will start installing and hopefully fix your problem.
nnnnnnnnnnnn
#3 Troubleshooting On Windows
nnnnnnnn
This is another very simple fix using the in-built windows network troubleshooter. This guide will be for Windows 10 only.
nnnnn
Go to your settings by typinh ”settings” in the windows search bar.
nnnnnnnnn
2. Go to ”network & internet”
nnnnnnnn
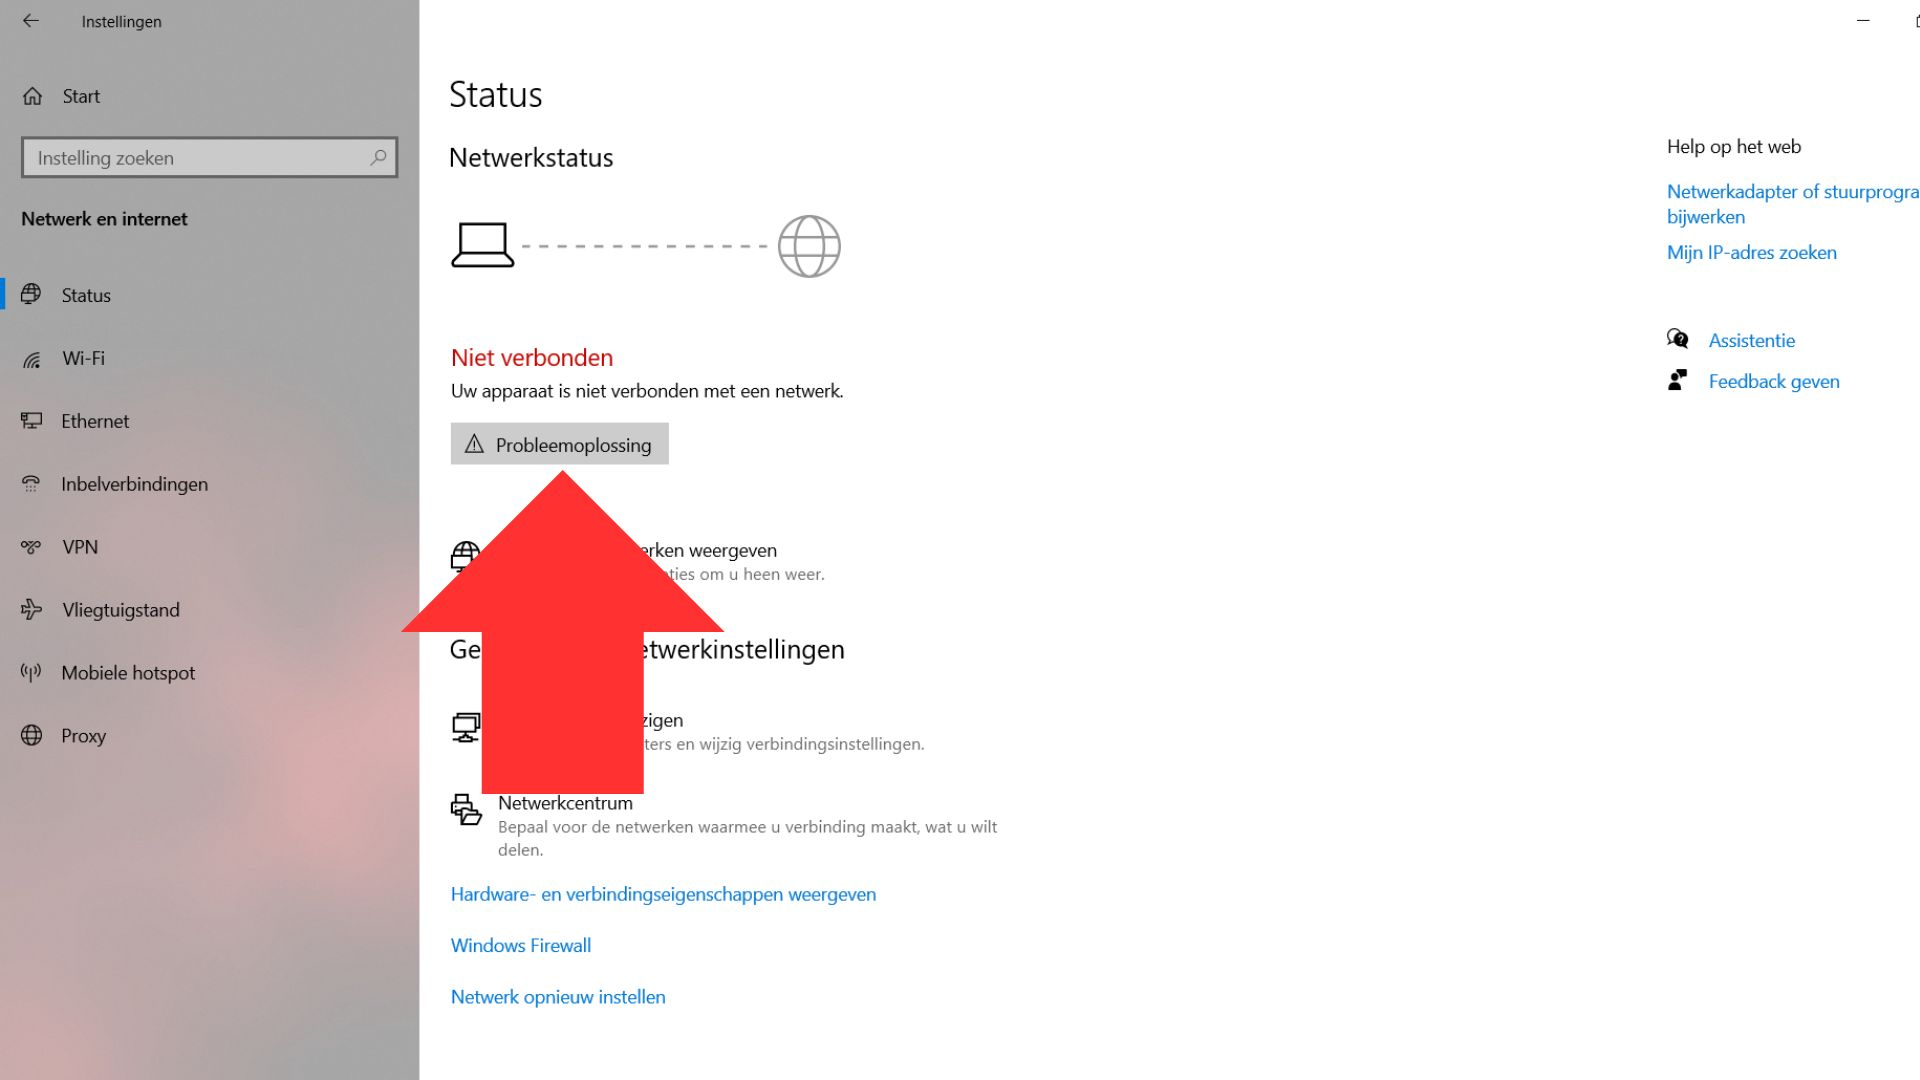
3. Click on Troubleshoot.
nnnnnnnn
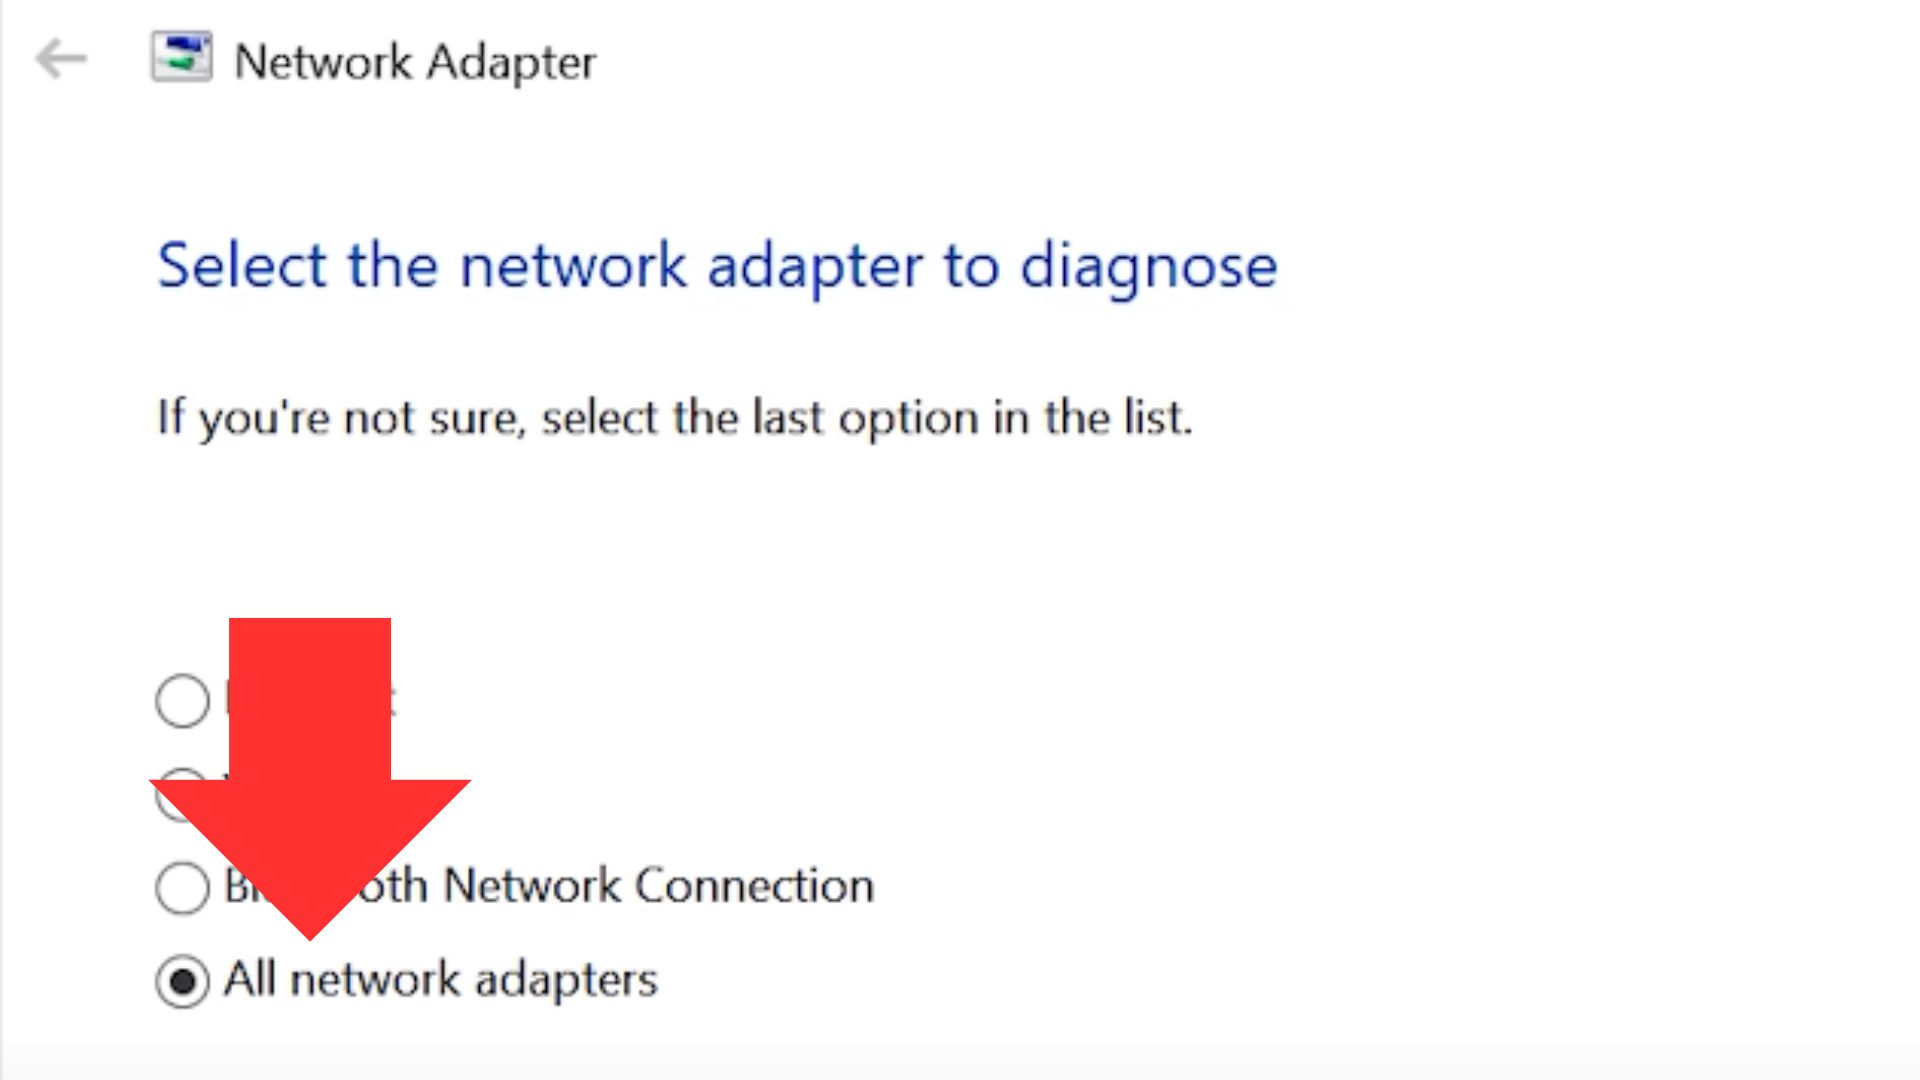
4. Select ”all network adapters”
nnnnnnnn
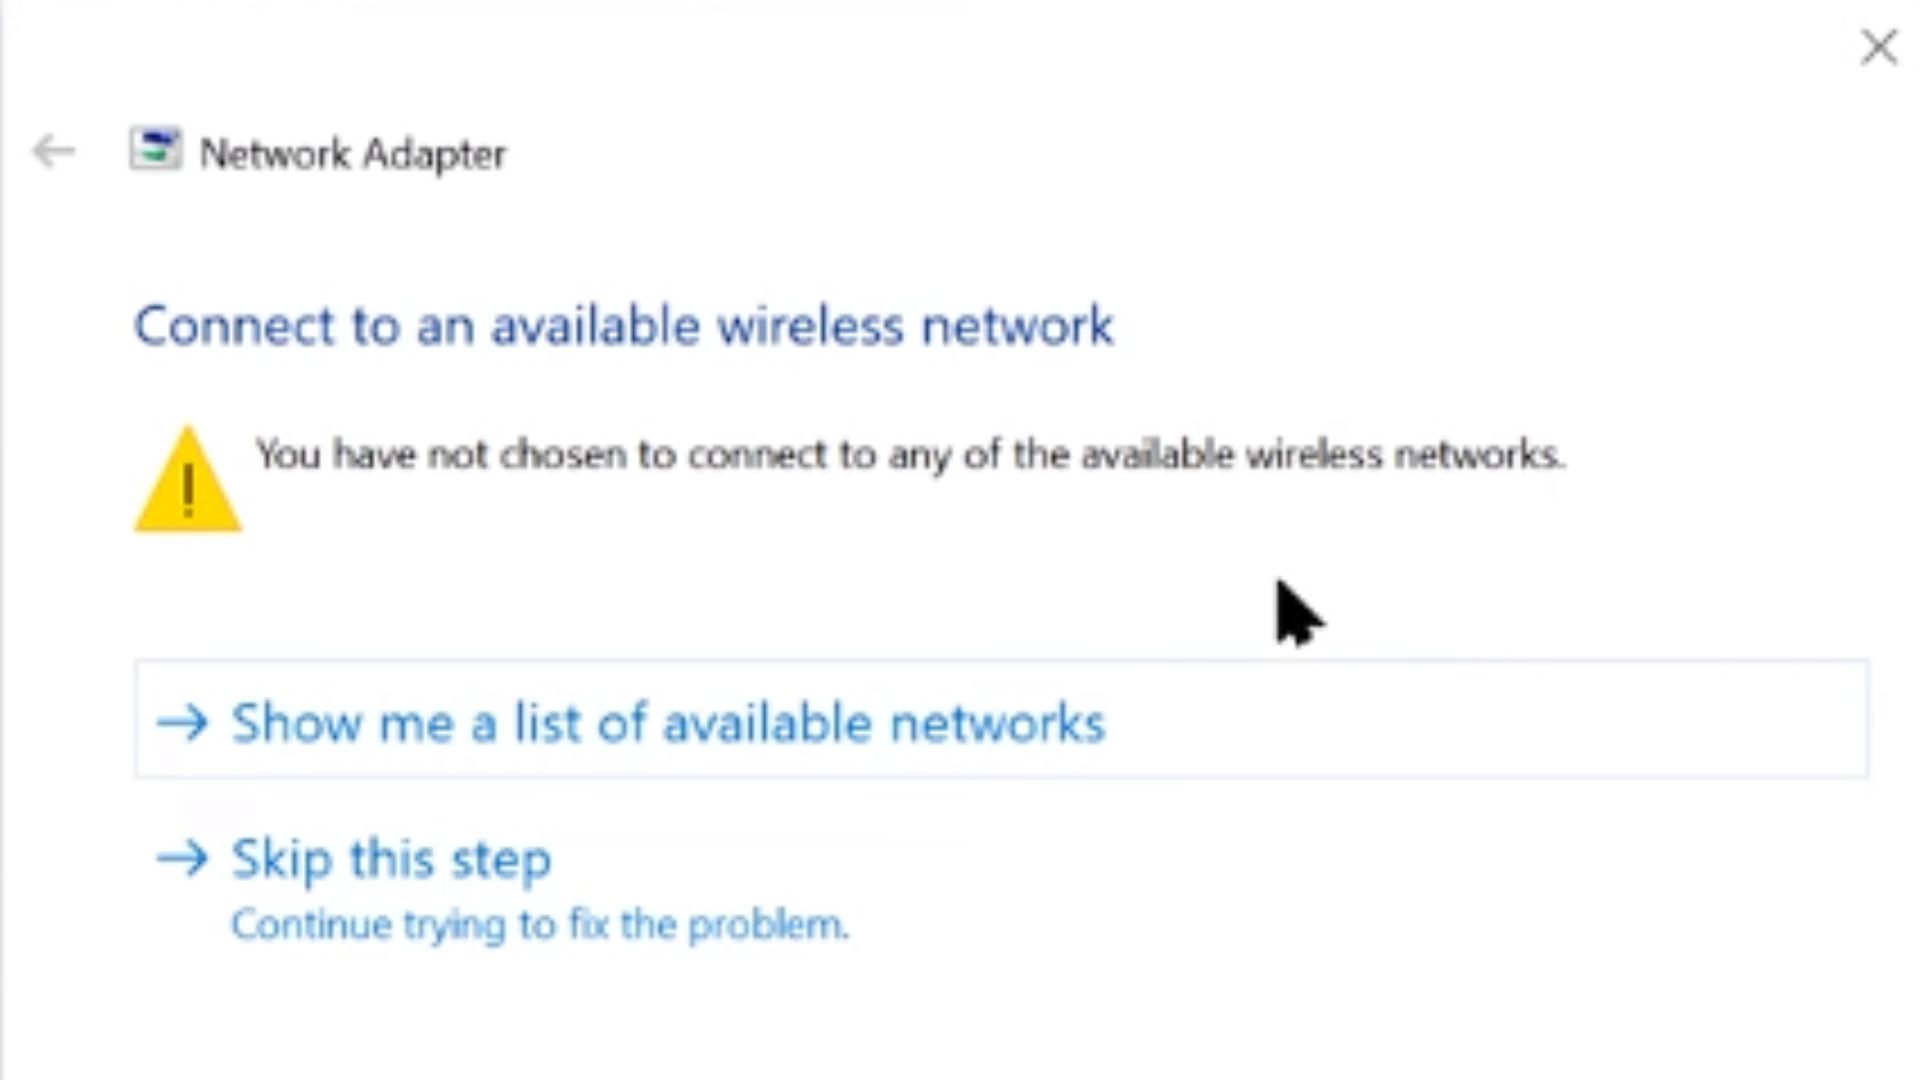
5. If it recommends a fix then apply that fix and select ok, do make sure that you choose the option to try these repairs as an administrator to prevent anything from going wrong. But since there’s nothing wrong with my hardware it’s just showing me to connect to a network.
nnnnnnnnnnnn
#4 Forgetting The Network
nnnnnnnn
If you’re seeing your network in the network list but are having trouble connecting to it than this is the fix for you.
nnnnn
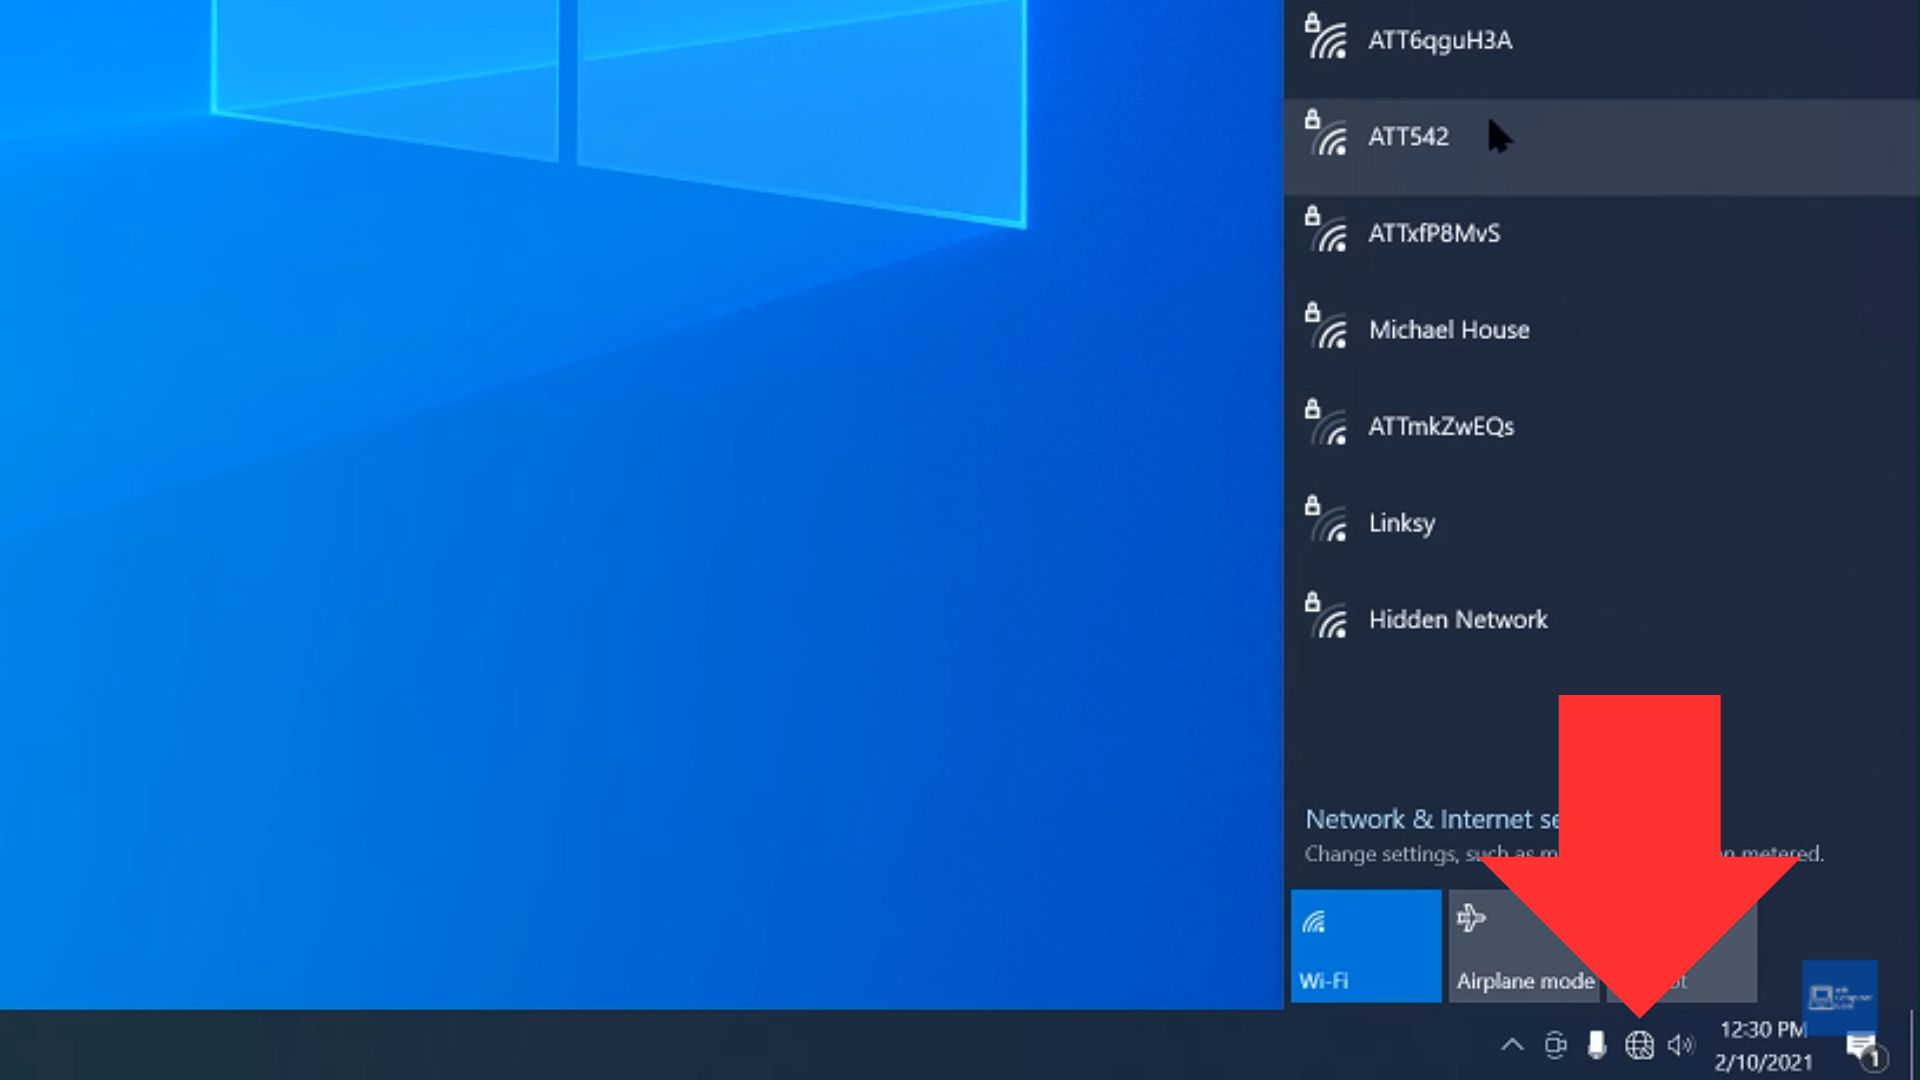
Open you wireless connections on the bottom right.
nnnnnnnnn
2. Right click on the network you’re trying to connect to and click on forget
nnnn
3. Type in your password for that network (since it forgot it) and you should be able to connect to it again.
nnnn
I hope this blog helped you with connecting to your wireless network again with your laptop and be sure to check out some of my other blog posts.
Have you ever wanted to try out using your keyboard and mouse on the Xbox One? Well, you’ve come to the right place, because today I’m going to explain a simple way of doing this and how to take full advantage of using your keyboard and mouse on the Xbox One. I’ll first show how to do this with a traditional wired keyboard and mouse and then how to wirelessly connect them to your Xbox One. Do check that your Xbox One has been fully updated before trying to connect your mouse and keyboard as the earlier versions might not support it.
nnnnnnnn
How To Connect Wired Keyboard & Mouse To Xbox-One
nnnnnnnn
Connecting your wired keyboard and mouse to your Xbox One is a fairly easy process. All you have to do is plug them in the back of your Xbox One as shown below and it should immediately start to work. Now if you notice that your mouse doesn’t work on the homepage, that isn’t because it’s broken or anything but the Xbox One homepage is only controlable with the keyboard. Apart from that the mouse should work in any games you want to play, but do check you’ve selected mouse and keyboard in the settings of the game you’re playing. One downside is that there isn’t much control for the keyboard and mouse in the settings of the Xbox One. You can only adjust the pointer speed and swap the primary & secondary mouse buttons.
nnnnnnnn
(Credit: Aplhr)
nnnn
How To Connect Wireless Keyboard & Mouse to Xbox-One
nnnnnnnn
Before trying to connect your wirelless keyboard & mouse to your Xbox-One, be sure your Xbox-One has been updated to the latest version.
nnnnn
Makesure your Xbox One is powered on. Make sure that the console and the TV are working properly.
nnnn
Locate the USB receiver of your keyboard & mouse and plug it into your Xbox One, If your keyboard or mouse can be turned off and on make sure they’re powered on.
nnnn
Navigate to the settings menu by pressing the Xbox button on your Xbox One, from the menu navigate to the settings option.
nnnn
Go to: devices & connections > connectivity > Bluetooth & devices, there you should see your mouse and keyboard.
nnnn
Select your mouse and keyboard, then follow the instructions and you should be good to go!
nnnnnnnnnnnnn
I hope this blog helped you with connecting your keyboard and mouse to your Xbox-One and be sure to check out some of my other blog posts.