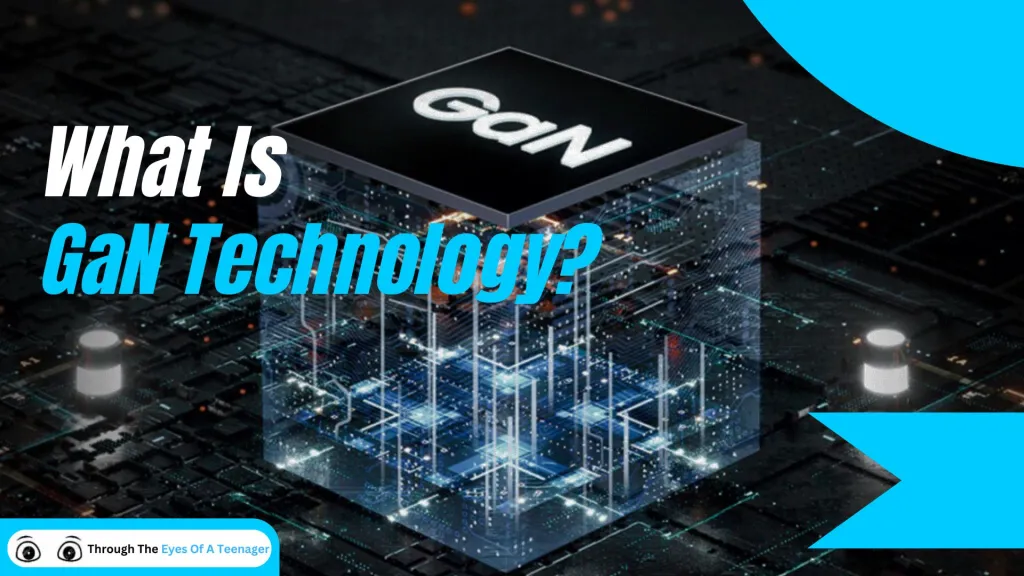
If you’ve upgraded to a GaN (Gallium Nitride) charger recently, you might’ve noticed a change. Your new device charges faster, while taking up way less space than the older one.
GaN is one of the most exciting innovations in charging tech. It’s completely revolutionizing the way we power everything from smartphones to laptops and even gaming consoles.
But what exactly is GaN, and how does it make chargers better? Let’s break it down.
Quick Summary:
GaN chargers use Gallium Nitride to offer faster charging and better efficiency than traditional silicon chargers.
They are smaller, generate less heat, and work well with smartphones, laptops, and other high-power devices.
Common myths about cost and safety are unfounded; GaN chargers are safe, durable, and worth the investment.
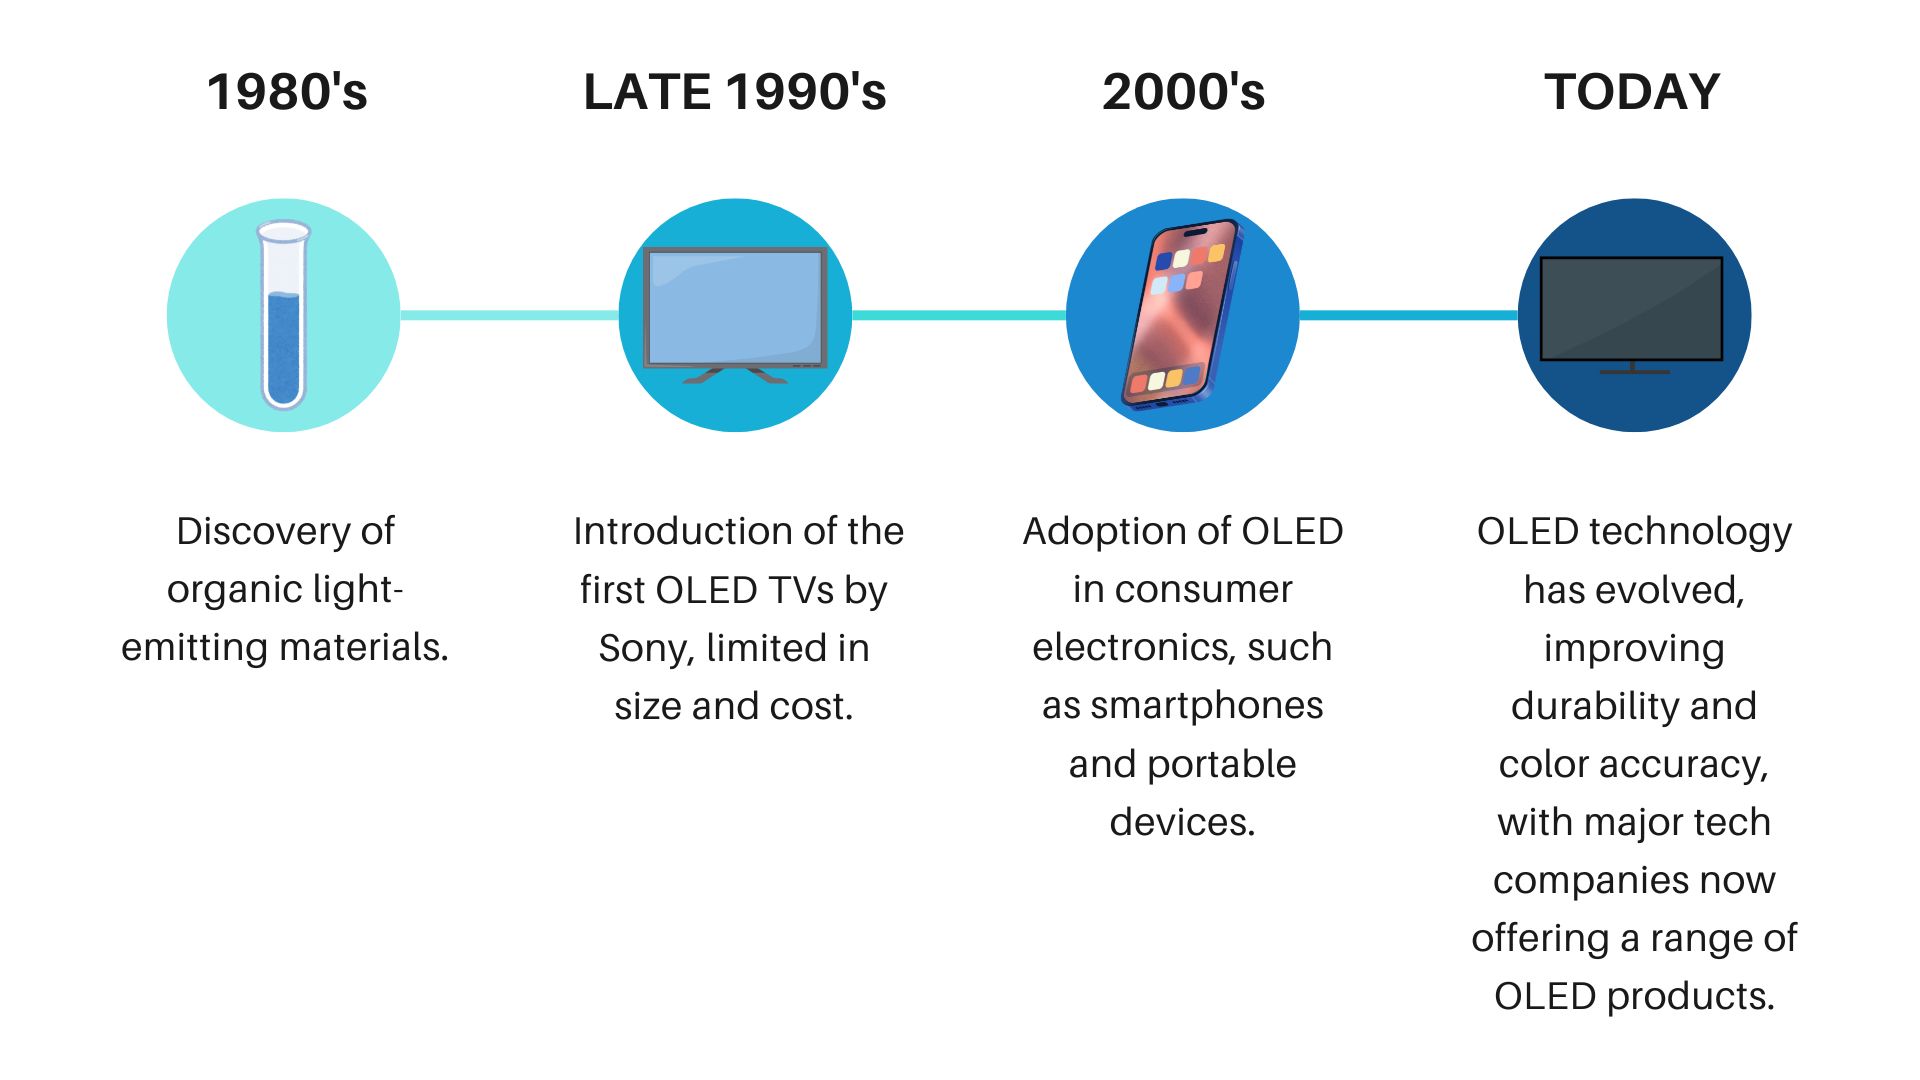
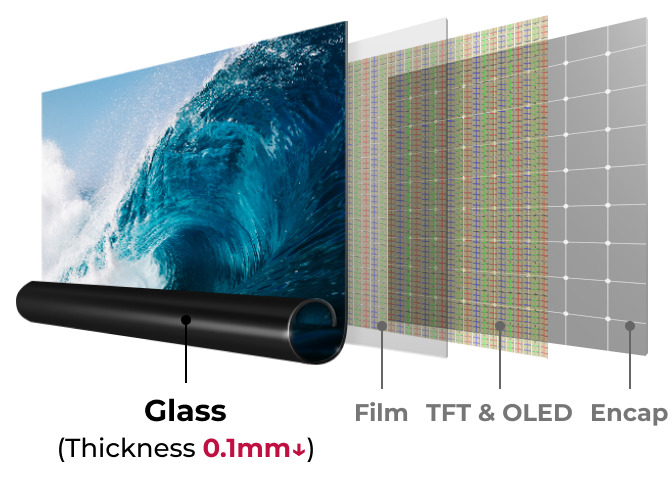
GaN technology is a semiconductor innovation using Gallium Nitride for efficient, high-speed power transfer and superior heat resistance. Which unlike silicon—long the standard for chargers—allows faster electron movement, higher efficiency, and better performance in compact devices. If that sounds confusing, then here is everything that you need to know in simple terms:
The Science Behind It
GaN technology uses Gallium Nitride, a wide-bandgap semiconductor, enabling higher efficiency, faster switching, and better heat resistance than silicon.
GaN’s wide bandgap property allows it to operate at higher frequencies, meaning it can switch electrical signals faster and more efficiently. That translates into less heat generated and faster, more efficient power transfer. Essentially, GaN reduces energy loss, which means more power is transferred to your device rather than being wasted in the form of heat.
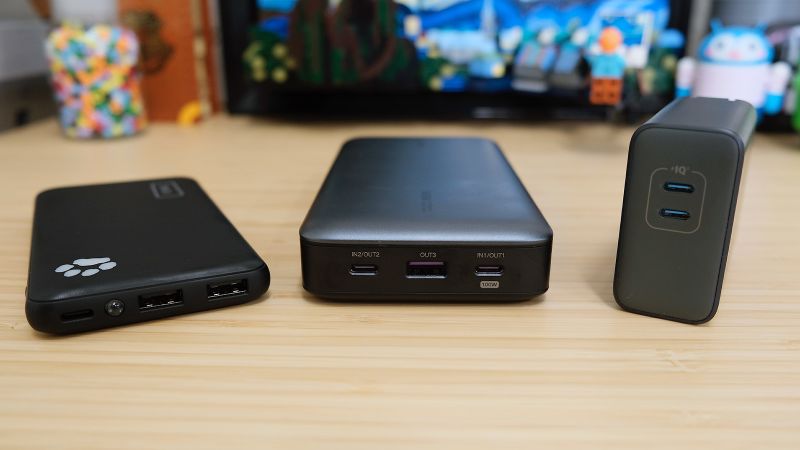
GaN vs. Silicon
GaN (Gallium Nitride) is more efficient and compact than silicon in power electronics, offering faster switching and lower energy loss. Silicon, however, remains more cost-effective and widely used for standard applications.
(Image credit: throughtheeyesofateenager.com)
To put it simply, GaN can handle higher voltages, switch electricity more efficiently, and operate at higher temperatures than silicon. This makes GaN chargers not only more efficient but also smaller and lighter than their silicon-based counterparts.
Get all the latest post on through the eyes of a teenager straight in your inbox.
Subscribe to stay updated, it’s free!
When you think about it, it’s pretty amazing that a tiny chip made from GaN can provide so much power while staying cool and compact.
Manufacturing Improvements
Thanks to improvements in manufacturing techniques, GaN chips are getting more affordable and widely available. As these advancements continue, it’s only a matter of time before GaN becomes the standard for chargers everywhere.
As previously mentioned, some smartphones like the RedMi Note 12 discovery edition are hopping on this GaN train. Allowing for 200 Watt charging, whilst being under $400!
Benefits of GaN Chargers: Why You Should Consider Switching
Now that we know what GaN is, let’s talk about why it’s such a game-changer for chargers.
1. Efficiency: Less Power Loss, More Charge
One of the standout features of GaN chargers is their efficiency. This efficiency helps with:
Silicon chargers often waste power in the form of heat, but GaN chargers minimize energy loss. That means they can charge devices faster without generating the heat that older chargers tend to produce. So not only do you get your device juiced up faster, you also get a charger that doesn’t overheat or become a fire hazard.
2. Compact and Lightweight
If you’re anything like me, you understand how annoying it is to carry bulky chargers around. GaN chargers are a godsend in that department. They’re compact, lightweight, and perfect for travel.
(Image credit: throughtheeyesofateenager.com)
You can charge a powerful device without having to deal with the huge, clunky adapter that always used to come with it. This portability is a big plus for anyone who’s constantly on the move.
3. Faster Charging
Who doesn’t love fast charging? GaN chargers excel in this area, providing a quicker, more efficient charge than traditional silicon chargers. If you’re always on the go and need a boost, GaN is definitely the way to go. Whether you’re charging your phone during a quick break or topping off your laptop during a class. GaN chargers are always up to the task.
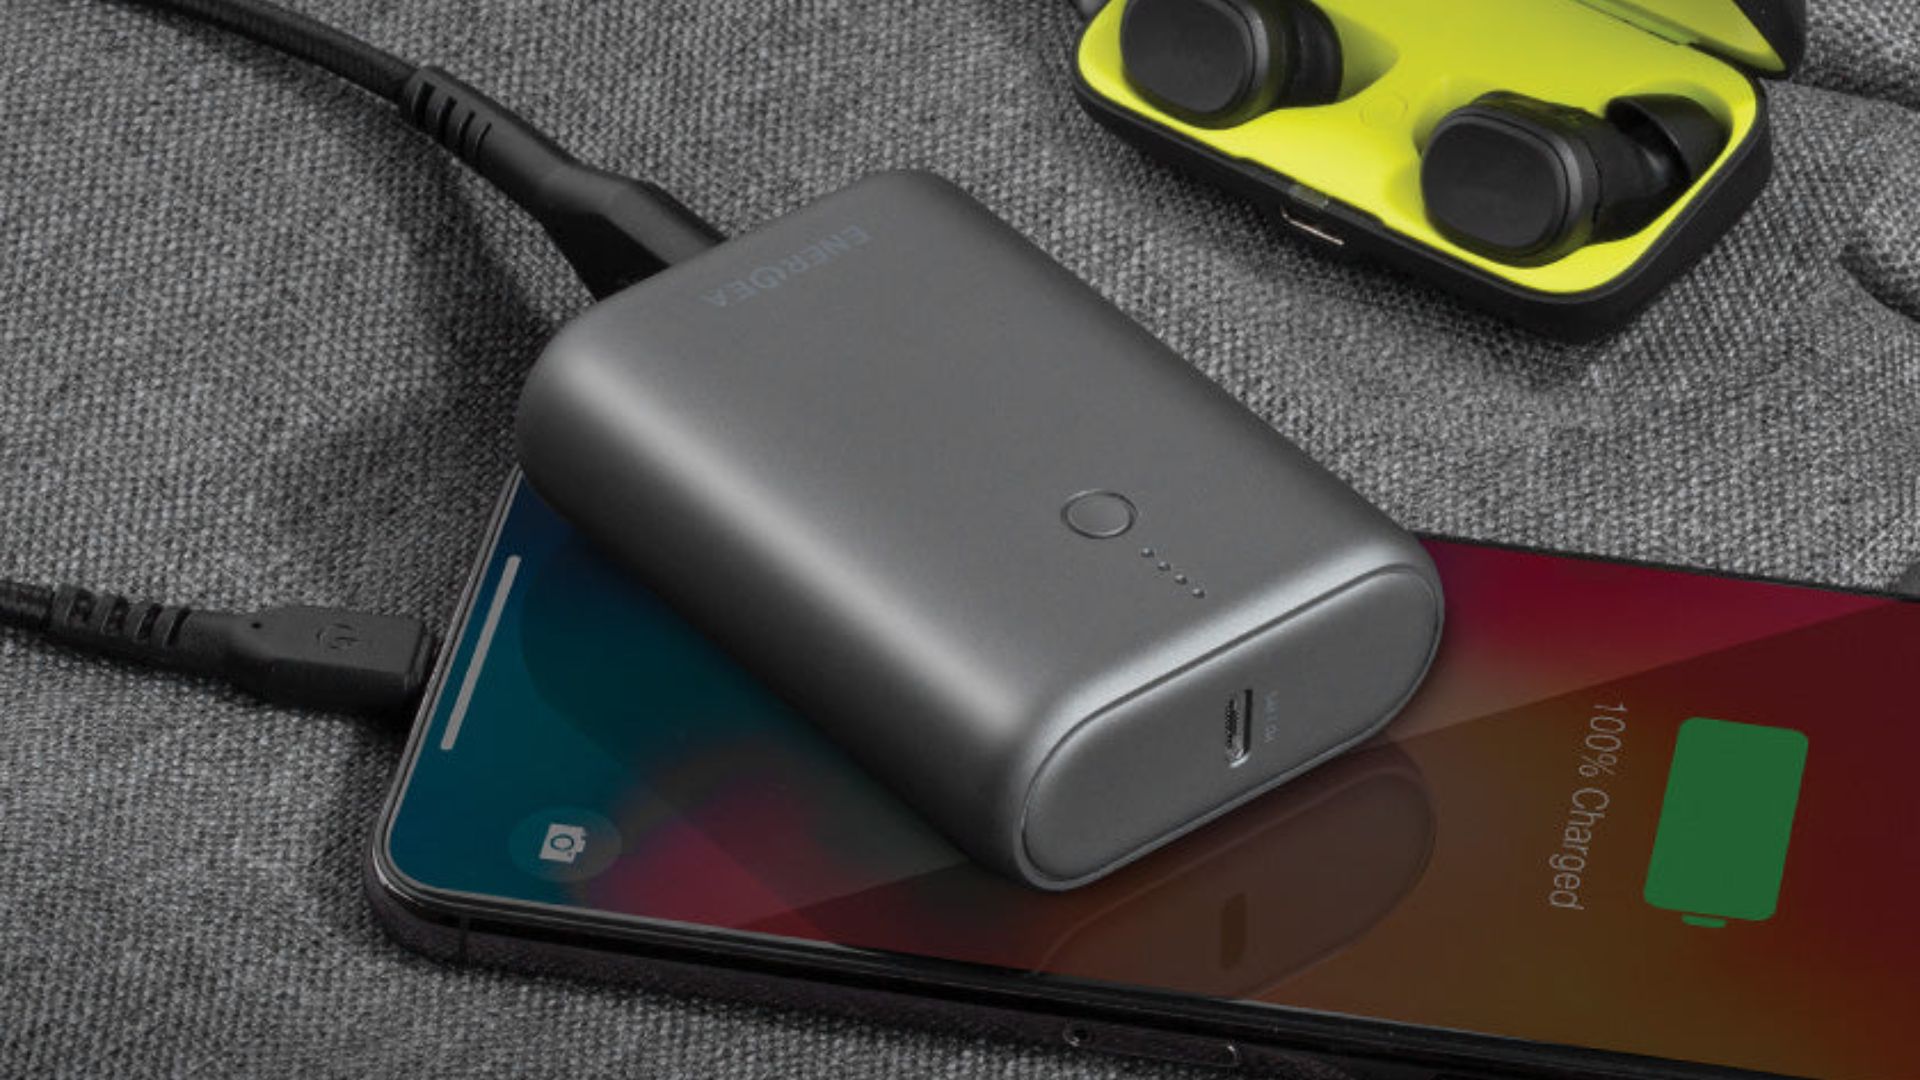
For example, the RedMi Note 12 discovery edition is a prime example of how much faster you can charge your phones with this new technology. As shown in the image above, this phone can charge from 0-100% in just 9 minutes! I know I’ve mentioned this a couple times now. However I just have to keep banging on about it because I think it’s so cool that this is even possible.
4. Temperature Control and Safety
The fact that GaN chargers generate less heat is not just a matter of comfort—it’s also about safety. Traditional chargers can get dangerously hot, especially when used for extended periods. GaN chargers, on the other hand, stay cool even under heavy use, making them much safer for your devices and for you.
I’ve had a fire hazard being caused in my family due to a charger overheating. Which makes it comforting to know that this is also a safe option while being extremely fast and efficient.
5. Eco-Friendliness
There’s also an environmental benefit to using GaN chargers. They are more efficient, which means less energy is wasted. Plus, the longer lifespan of GaN chargers reduces the need for constant replacements. Plus also all these other benefits:
Reduced Carbon Footprint: Their higher efficiency means fewer fossil fuels are burned for electricity, leading to lower CO₂ emissions.
Smaller Size: GaN technology allows for compact designs, using less raw material and reducing packaging waste during manufacturing.
Higher Power Output: One GaN charger can power multiple devices simultaneously, eliminating the need for multiple chargers and further cutting waste.
Less Heat Generation: They generate less heat, which means they require fewer cooling materials during production and are less likely to fail early.
A modern GaN charger is estimated to last around 3-5 years, ofcourse this depends on the quality of the charger and how you use it. All of this make GaN chargers a win for your wallet and for the planet!
GaN Chargers: Real-World Applications
The impact of GaN chargers isn’t just theoretical. They’re already in use across various devices, and their applications are continuing to expand every single day. Here are some examples:
1. Smartphone Charging
Gone are the days of waiting hours for your phone to charge. GaN technology has allowed smartphone chargers to become smaller and faster. Delivering a quick charge without taking up much space in your bag.
2. Gaming Console Charging
Gamers need power, and they need it quick. GaN technology is already being used to power gaming consoles like the Nintendo Switch and PlayStation. These devices demand a lot of energy, and GaN’s efficiency ensures that gamers can keep playing as long as they want. Without worrying about their charger overheating or taking up too much space.
3. Laptop Charging
With laptops becoming more and more powerful, the need for fast, efficient charging is even more critical. GaN chargers are perfect for laptops, especially those that require higher power to run efficiently. Instead of lugging around a bulky, outdated charger, a GaN charger offers a lightweight, high-power alternative.
4. Other Electronics
GaN’s versatility means it’s also being used in everything from e-bikes to electric vehicles, and even in industrial and medical equipment. As technology advances, we can expect to see GaN making its way into even more devices.
Key Factors to Consider When Choosing a GaN Charger
If you’re thinking about making the switch to a GaN charger, there are a few factors to keep in mind.
Firstly, not all GaN chargers are created equal. Some are designed for smartphones, while others are made to handle laptops and gaming consoles. Make sure to choose a charger that delivers enough power for your device. Higher wattage means faster charging, so consider what you need based on your device’s power requirements.
One of the key selling points of GaN chargers is their compact design. However, not all GaN chargers are tiny, so be sure to choose one that fits your needs. If you’re traveling often, you might want to look for a charger that’s as small and lightweight as possible.
Since USB-C is quickly becoming the standard for fast charging, look for a GaN charger that includes it. USB-C is faster, more efficient, and can charge a wide variety of devices. Making it a great option for anyone who wants a versatile charger.
Here are some further key factors to keep in mind when buying a GaN charger:
Safety Features: Look for protections against overheating, overcurrent, and overcharging. Certifications like UL, CE, or FCC ensure the charger meets safety standards.
Multi-Port Functionality: Some GaN chargers come with multiple ports, allowing you to charge several devices at once. This is great for reducing clutter and improving efficiency.
Price vs. Performance: GaN chargers range from budget-friendly to premium. Compare features like wattage, port options, and size to find the best value for your money.
Top GaN Chargers in 2024
If you’re in the market for a GaN charger, here are some of the top options to consider:
With any new technology, there are bound to be some myths. So, let’s bust a few:
Myth 1: GaN Chargers Are Too Expensive
While GaN chargers may have been pricey when they first hit the market, prices have come down significantly since. With the increased adoption of GaN technology, you can now find affordable options that won’t break the bank everywhere.
For example, the Anker PowerPort Atom PD 2 I mentioned earlier is only $29.99. Which is slightly more expensive than traditional 65W chargers, but we’re talking about like $5 here.
Myth 2: GaN Chargers Are Dangerous
Some people worry that GaN chargers may be unsafe because they’re so powerful. In reality, GaN chargers are often safer than traditional chargers because they generate less heat and have built-in safety features.
Myth 3: GaN Chargers Only Work with USB-C Devices
GaN chargers are primarily designed for USB-C devices, but that doesn’t mean they’re limited to just one type of device. Many GaN chargers are versatile and work with a wide range of devices. You can use them for almost everything from your phone to your Bluetooth toaster.
What Is GaN Technology – Conclusion
GaN technology is making chargers smaller, faster, and more efficient than ever before. If you’re tired of bulky, slow chargers, then switching to a GaN charger is a no-brainer.
Not only do you get a sleek, portable device that charges your electronics quickly, but you also benefit from better efficiency, safety, and environmental impact.
With more devices than ever adopting GaN technology every year, it’s clear to me that GaN is here to stay. So, whether you’re looking to replace your outdated charger or upgrade your power game, GaN is the way to go!
Yes, GaN chargers are compatible with most devices that support USB-C charging. They work with smartphones, laptops, and other gadgets as long as they use USB-C ports, but older devices with micro-USB or proprietary ports may need adapters.
Yes, GaN chargers are safe to leave plugged in overnight. They’re equipped with safety features like overcharging protection, heat regulation, and surge protection to keep your devices safe while charging.
Whether you’re a tech-obsessed teen or a cool adult, let’s jump into the world of gadgets. As a teen who’s always surrounded by the latest tech, like my smartphone and wireless earbuds. Which I bring with me everywhere I go. Trust me, I rely on gadgets all the time in my day-to-day life.
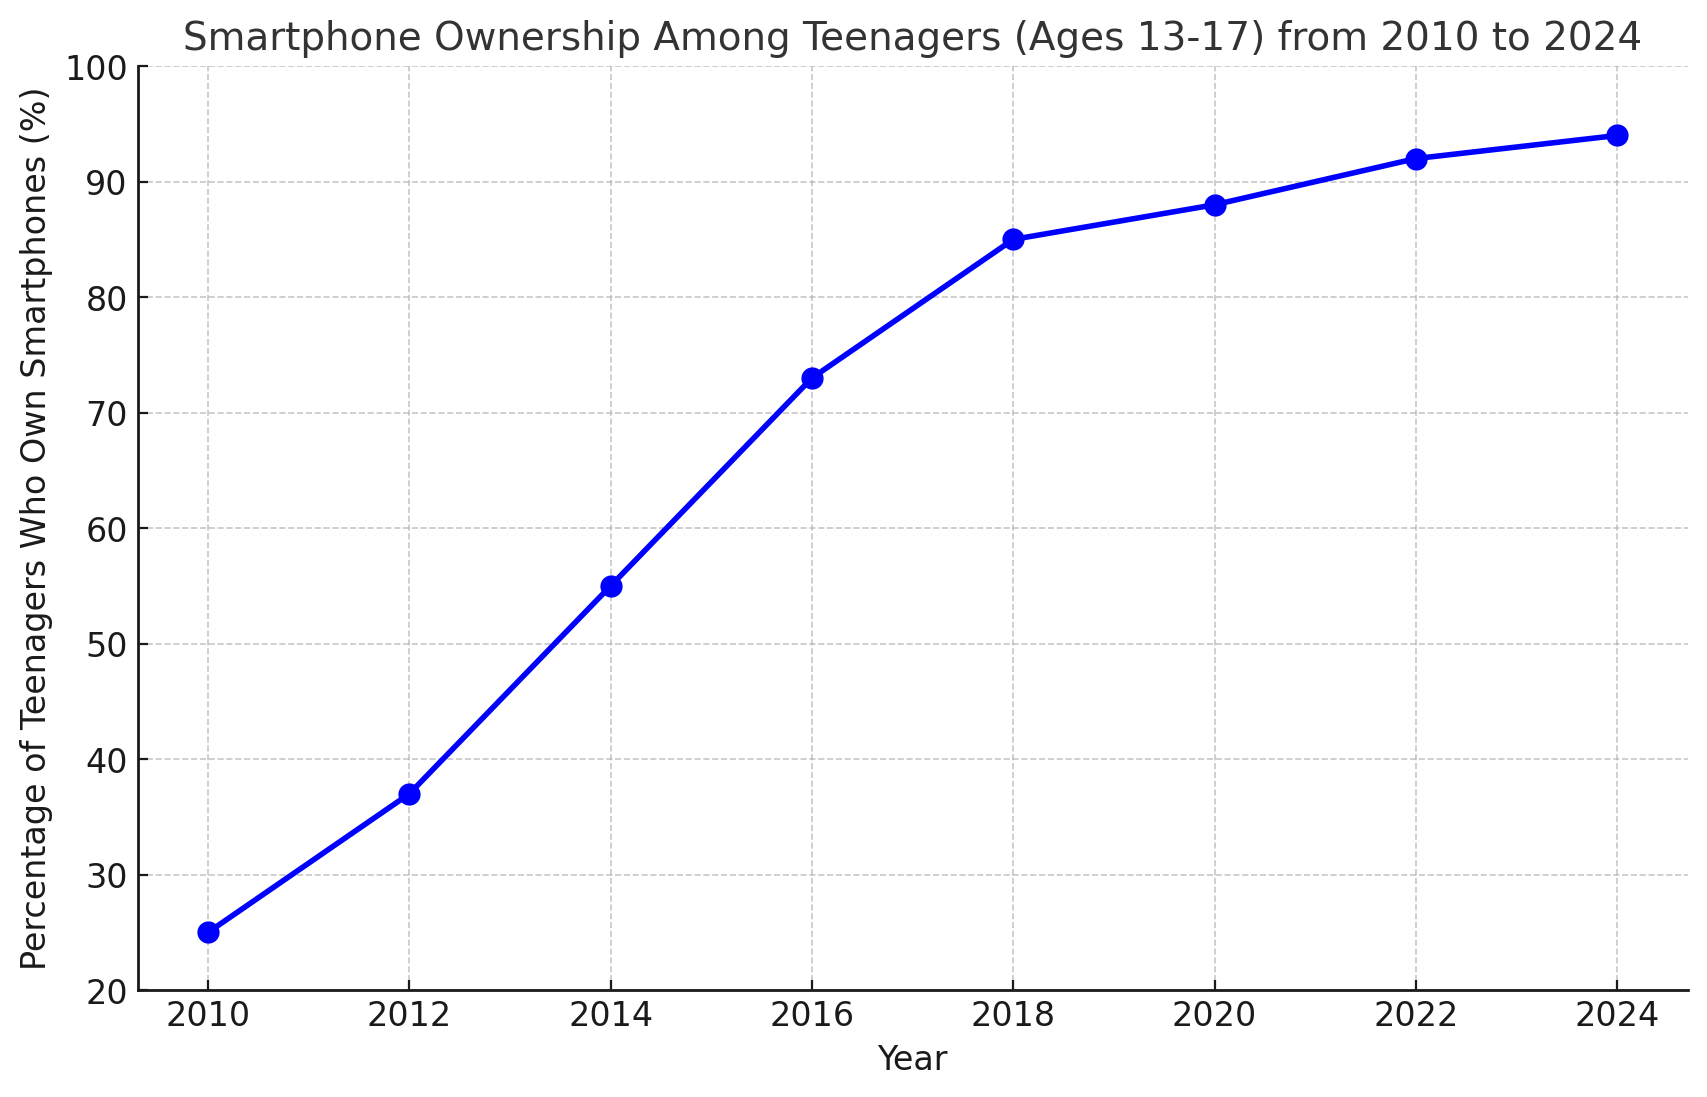
Fun fact: about 95% of teens have a smartphone these days, but that’s just scratching the surface. If you’re after TikTok-ready camera gear or some handy study tools, this list has something for you.
I’ve searched everywhere across the web to bring you the must-have gadgets for 2024. With so many choices, it can get a bit overwhelming. But no worries—I’ve sorted it all out! I’ll be rating each product based on the following key factors to help you find the best fit.
Price: I understand that most teens can’t blow $500 on the latest gadgets.
Cool-ness: Is it cool enough to make your friends go wow?
Practicality: Do they help you with school, or do they make your life easier in some way?
Durability: Will it withstand the daily hustle and bustle of a teen’s life?
These tools will be what I’m using to rate these products out of 5. You’ll see this rating on every product. Plus a list of the pros and cons so you can make an informed decision.
These tools will help you ace those tests and still have time to hang out & chill with your friends. So, let’s jump in and check out the coolest tech that 2024 has to offer. This is tech for teenagers October gadgets edition. Trust me, these gadgets will make your friends say, “OMG, where did you get that?!”
Reusable Pages: Can be wiped clean with a damp cloth, allowing for multiple uses.
Digitization: Scans and uploads notes to cloud services via the Rocketbook app.
Smart Tags: Preprinted symbols for automatic organization in the app.
Pros and Cons
Pros
Cons
✔️Reusable Pages: Reduces paper waste and allows for continuous use of the notebook.
❌Pen Compatibility: Limited to Pilot Frixion pens, which might not be preferred by everyone.
✔️Digitization: Easily digitizes and organizes notes with cloud integration, making them accessible from anywhere
❌Page Feel: The synthetic paper might not have the same writing experience as traditional paper for some users.
✔️Affordable: Provides a cost-effective solution compared to other smart notebooks with similar features.
❌Erasability: Erased content might leave ghosting or smudging, especially if not cleaned properly.
Quick Overview
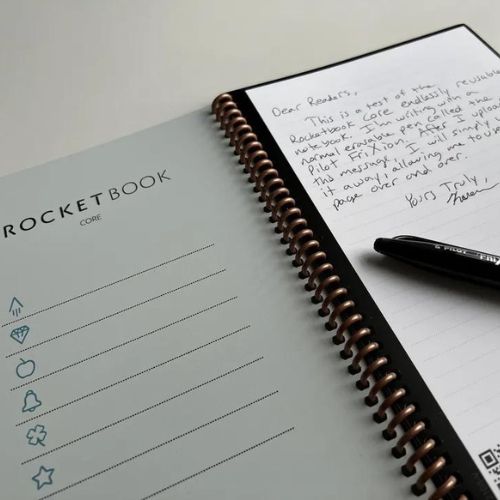
The Rocketbook Core is a game-changer for note-takers, letting you erase and reuse pages while easily digitizing your notes with the Rocketbook app. It’s budget-friendly and eco-conscious, making it perfect for students and professionals who want to keep their notes organized and accessible. Just be aware that it works exclusively with Pilot Frixion pens and the paper might feel a bit different from traditional notebooks.
The Rocketbook Core is a smart notebook that combines the best of both traditional handwriting and modern digital storage.
It features reusable pages that can be wiped clean with a damp cloth, so you can keep using it over and over. Plus, it syncs with the Rocketbook app. This makes it easy to scan your notes and store them in the cloud. You can use Google Drive, Dropbox, or Evernote for storage. It’s super handy for anyone who wants to stay organized without wasting paper.
What makes it stand out is how simple the system is. You write with a Pilot Frixion pen, scan your page, and it’s saved digitally. The built-in smart tags help automatically sort and categorize your notes.
However, it does have a few limitations. Firstly, you have to use a specific pen. And secondly, the synthetic paper may feel different from regular notebooks. But if you’re looking for an eco-friendly and affordable way to keep your notes accessible and organized, the Rocketbook Core is definitely worth considering.
AI-Powered Study Mode: Adapts to your progress, focusing on weak areas for more effective learning.
Customizable Flashcards: Create your own flashcards tailored to any subject or topic.
Interactive Learning Tools: Engage with quizzes, games, and tests to make studying more dynamic and fun.
Pros and Cons
Pros
Cons
✔️AI-Powered Personalization: Tailors study sessions based on your performance, improving efficiency.
❌Limited Advanced Features in Free Version: Some features, like advanced study tracking and custom tests, are only available in the paid version.
✔️Vast Content Library: Access millions of pre-made study sets across a variety of
❌Repetitive Learning Style: Heavy reliance on flashcards may not suit every learning style or subject.
✔️Interactive Learning: Offers games, quizzes, and flashcards to make studying more engaging.
❌Not Ideal for Deep Learning: Best for memorization and review rather than in-depth concept understanding.
✔️User-Friendly Interface: Easy to navigate and accessible on both desktop and mobile devices.
✔️Collaborative Features: Share study sets and collaborate with classmates or study groups.
Quick Overview
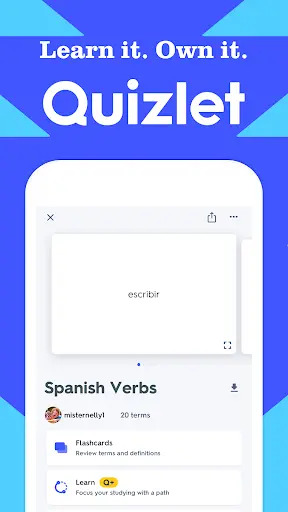
Quizlet is a powerful study tool that uses AI to help you focus on areas where you need to practice the most. Whether you’re prepping for a test or just trying to memorize key concepts. Its customizable flashcards and interactive quizzes make learning way more engaging. Plus, you can access tons of pre-made study sets, so you’ll always have what you need to study smarter, not harder.
Quizlet is one of the best tools for anyone looking to study smarter, not harder. It’s packed with customizable flashcards that let you create study sets tailored to any subject you need.
The AI-powered study mode is one of my favorite features. It learns from your progress and focuses on the areas you struggle with the most, so you’re not wasting time on things you already know. You can even try millions of pre-made study sets covering everything from math and science to languages.
What really makes Quizlet fun is the interactive side of it. Instead of just reading notes, you can quiz yourself, play games, and take practice tests, which makes learning way more engaging.
Whether you’re studying on your phone or desktop, Quizlet keeps everything synced. Making it so you can take your flashcards with you wherever you go. It’s super easy to use, but the free version has some limitations. Features like advanced study tracking and custom practice tests are part of the paid plan.
So, if you’re looking for a tool to help with memorization and review, Quizlet is hard to beat!
Affordable Active Noise Cancellation (ANC): The Go Air Pop Pro offers ANC at a price point that’s hard to beat.
Impressive Battery Life: With up to 32 hours of total playtime. They can easily last through a full day of listening.
Customizable Sound with EQ Settings: You can choose from three built-in EQ presets to adjust the sound to your liking
Pros and Cons
Pros
Cons
✔️Affordable ANC: Offers active noise cancellation at a low price point, making it a great option for budget-conscious buyers.
❌Moderate ANC Performance: The active noise cancellation is decent but not as effective as higher-end models.
✔️Extended Battery Life: Up to 32 hours of total playtime with 8 hours in the earbuds and 24 hours in the case.
❌No Wireless Charging: Lacks wireless charging capabilities for the case.
✔️Customizable Sound: Features three built-in EQ presets. These presets are JLab Signature, Balanced, and Bass Boost. They adjust the audio experience without needing an app.
❌Touch Controls Sensitivity: The touch controls can be overly sensitive, potentially leading to accidental actions.
Quick Overview
The JLab Go Air Pop Pro offers an impressive feature set for its price, including ANC, solid battery life, and customizable sound settings. While its ANC isn’t as powerful as premium models, it’s a great option for those looking for solid sound and noise cancellation on a budget. With a compact, durable design and easy-to-use controls, these earbuds are perfect for everyday use. To read my full review of the Jlab Go Air Pop Pro’s, click here
The JLab Go Air Pop Pro easily ranks as one of the best earbuds you can buy for under €25. I’ve been using them for over a year now, and they’ve held up remarkably well.
For a budget option, these earbuds offer a ton of value, from their solid build to their surprisingly good sound quality. Whether you’re commuting, working out, or just chilling, they’ve been a reliable pair that sound like they’re a whole price tier above.
In terms of sound quality, they really deliver for the price. While the bass isn’t as powerful as more premium options, and there are occasional bugs (like audio cutting out in one ear), the overall clarity is solid.
You’ll get crisp sound without needing to blast the volume. Though finding the right balance between too soft and too loud can be tricky. Still, for everyday listening, whether it’s music, podcasts, or videos, they get the job done better than most earbuds around this price.
Durability is another big win here. After a year of use—including some pretty rough drops—they’re still going strong. The case has only picked up a few minor scratches, and the hinge remains solid. It snaps shut securely and hasn’t gotten loose over time, which isn’t always the case with budget earbuds.
At under $25, they’re hard to beat for both sound and build quality, making them a great option if you’re looking for affordable, reliable earbuds.
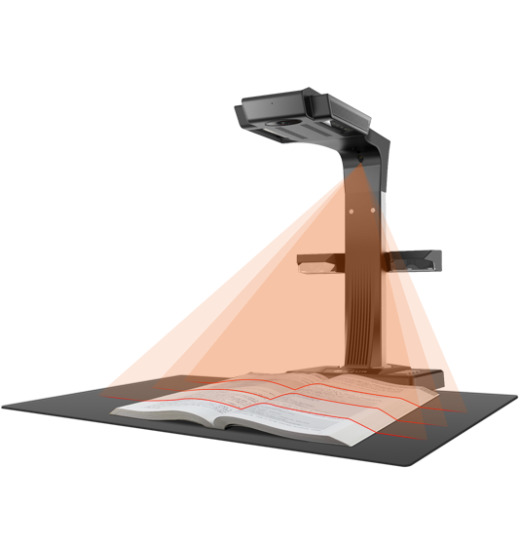
Fast Scanning Speed: Scans a page in just 1.5 seconds, perfect for quickly digitizing large books or documents.
Book Curve Flattening Technology: Automatically flattens curved pages, making it ideal for scanning textbooks without damaging the spine.
Powerful OCR Technology: Converts scanned images into editable and searchable documents in multiple formats.
Pros and Cons
Pros
Cons
✔️Fast Scanning Speed: 1.5 seconds per page allows for quick digitization of large volumes.
❌Bulkier Design: Larger than traditional portable scanners, making it less compact.
✔️Book Curve Flattening Technology: Scans curved pages flat, great for thick textbooks.
❌Requires a Power Source: No wireless or battery option, which limits portability.
✔️OCR Functionality: Converts scans into editable Word, PDF, and other formats.
❌Occasional Software Issues: Some users experience bugs, requiring frequent updates.
✔️High-Resolution Scans: Produces clear, detailed images for both text and photos.
✔️User-Friendly Setup: Easy to operate with a simple interface and quick installation.
Quick Overview
The CZUR ET16 Plus is an overhead scanner designed to make digitizing books and documents quick and easy. Its standout features include fast scanning, curve-flattening technology for textbooks, and powerful OCR for quickly converting scans into editable text. While it’s a bit larger than other portable options, it is efficient. Its specialized book-scanning features make it a great tool for students and professionals.
If you’re constantly dealing with thick textbooks and need a scanner that won’t ruin the binding, the CZUR ET16 Plus is a lifesaver. Its overhead design and page-flattening technology mean you can scan even the biggest textbooks without worrying about damaging the spine. With a super-fast scanning speed of 1.5 seconds per page, you’ll do all your digitizing tasks in no time.
The built-in OCR is another game-changer. Whether you’re scanning for class or just archiving notes, this feature converts your scans into searchable documents. While also making them editable, which saves you TONS of time. Yes, it’s a bit larger than typical portable scanners, but if you’re mainly scanning books, the extra size is totally worth it for the added functionality.
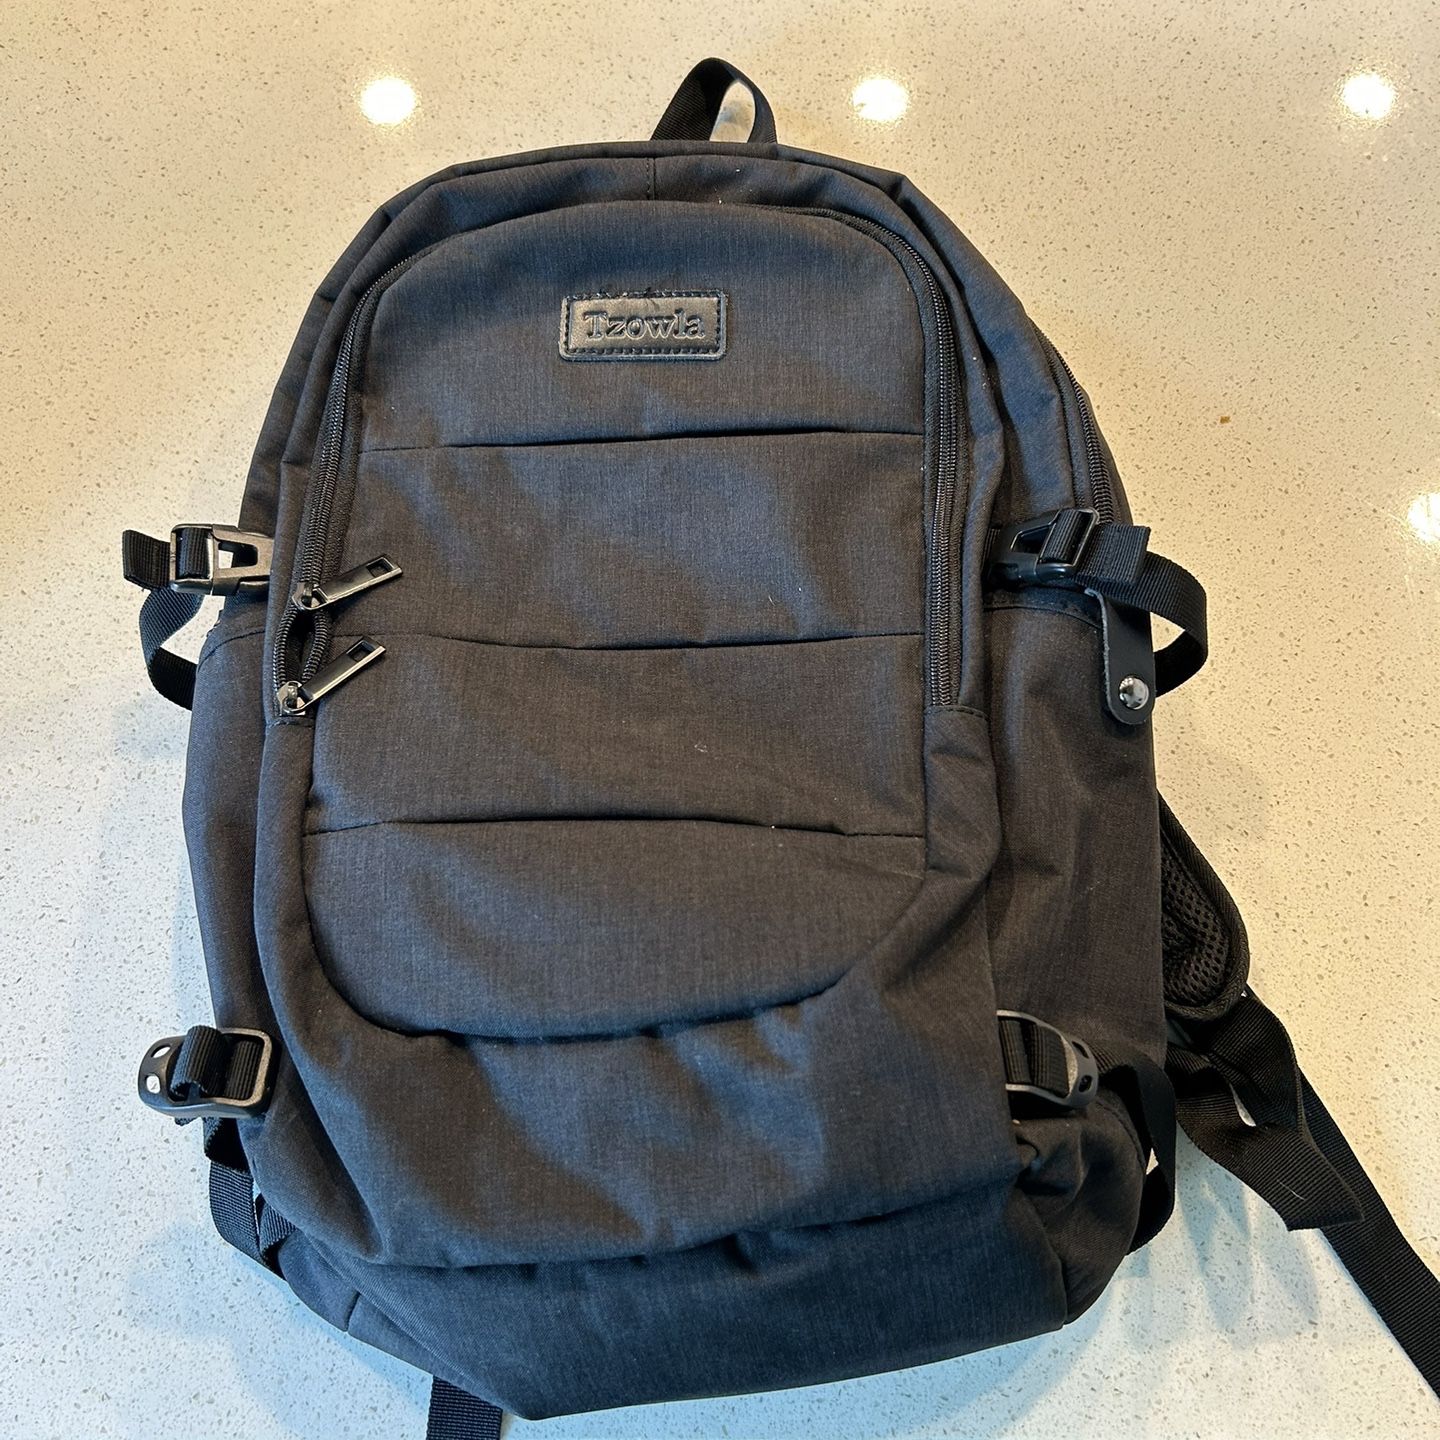
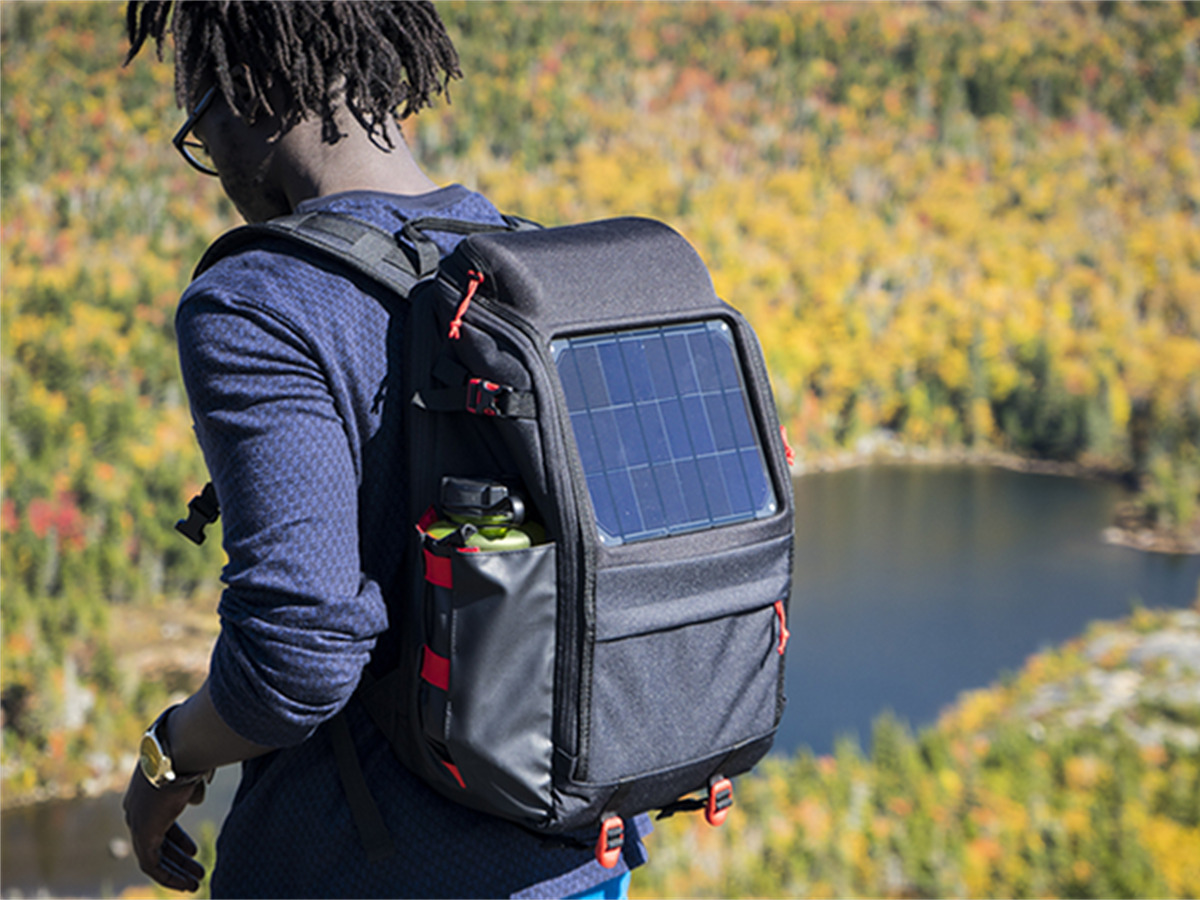
USB Charging Port: Equipped with an integrated USB port for convenient device charging.
Ergonomic Design: Features padded shoulder straps and a back panel for enhanced comfort.
Durable Material: Constructed from water-resistant polyester for long-lasting use.
Pros and Cons
Pros
Cons
✔️Comfortable Fit: Padded shoulder straps and back panel reduce discomfort during extended use.
❌Power Bank Not Included: You need to provide your own power bank for the charging feature.
✔️Durable Build: Water-resistant polyester keeps your gear safe from moisture and wear.
❌Limited Color Options: Fewer color choices might not appeal to everyone.
✔️Spacious Compartments: Offers ample room and organization for laptops and other essentials.
Quick Overview
The Tzowla Business Laptop Backpack combines practicality with comfort. Its built-in USB port allows you to charge your devices super easily, while the ergonomic design ensures comfort during long commutes or travels. With its durable, water-resistant material and spacious compartments, it’s a reliable choice for both work and leisure.
The Tzowla Business Laptop Backpack is a fantastic mix of style and function. With its built-in USB port, you can keep your devices charged without needing to have to search for an outlet.
The ergonomic design features padded shoulder straps and a back panel, makes it comfortable to wear even for extended periods. Which is a real bonus if you’re always on the go.
On top of that, the durable, water-resistant polyester ensures that your stuff stays safe and dry. While it doesn’t come with a power bank, the spacious compartments are perfect for organizing everything you need, from laptops to notebooks.
If you’re looking for a backpack that combines practicality with a sleek & modern design, the Tzowla is definitely worth considering.
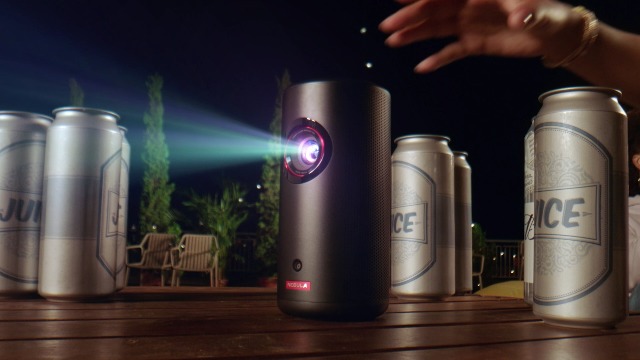
720p HD Resolution: Delivers clear, sharp visuals in a compact size.
Android TV Built-In: Access thousands of apps directly from the projector, including Netflix and YouTube.
2.5-Hour Battery Life: Long enough to watch most movies without needing a recharge.
Pros and Cons
Pros
Cons
✔️Compact and Portable: Small, soda-can size makes it easy to carry anywhere.
❌Limited Battery Life for Longer Movies: The 2.5-hour battery might not cover longer films or extended use.
✔️Built-in Android TV: Offers access to a wide range of streaming apps without the need for extra devices.
❌Only 720p Resolution: While it’s HD, some users may expect 1080p in this price range.
✔️Decent Sound Quality: Built-in speakers provide surprisingly good sound for such a small projector.
❌Dimmer in Bright Rooms: Performs best in dark environments, as brightness is limited.
Quick Overview
The Anker Nebula Capsule II is a highly portable, compact projector that balances both size and performance well. With 720p resolution, built-in Android TV, and 2.5 hours of battery life, it’s designed for easy, on-the-go entertainment. While it works best in dim lighting, its convenience and feature set make it a top pick for impromptu movie nights or just casual viewing.
If you’re looking for a projector that’s perfect for quick, spontaneous movie nights, the Anker Nebula Capsule II is your best bet.
It’s small enough to fit in your backpack or even a larger jacket pocket. With AndroidTV built-in, you can stream your favorite shows and movies directly. Without the need to hook up extra devices.
Plus, the sound quality is surprisingly good for its size—meaning that there’s no need to carry around extra speakers.
However, it’s not all perfect. The 720p resolution, while good for casual viewing, might not be enough if you’re used to sharper, 1080p visuals. And if you’re planning on watching something longer, like a Lord of the Rings marathon, the 2.5-hour battery life could leave you searching for an outlet mid-movie.
But if portability, ease of use, and quick setup are what you’re after, the Nebula Capsule II is tuff to beat.
Standalone Operation: No PC or console required; play anywhere, anytime.
High-Resolution Display: 1832 x 1920 resolution per eye for sharp visuals.
Extensive Game Library: Access to hundreds of VR titles from action to adventure.
Pros and Cons
Pros
Cons
✔️No Cables: Wireless setup allows full freedom of movement during gameplay.
❌Limited Battery Life: Only 2-3 hours of playtime per charge, which might require frequent recharges.
✔️Affordable: Offers premium features at a budget-friendly price for VR.
❌Standalone Graphics Limitations: While good, it doesn’t match the power of PC-based VR systems for the most high-end graphics.
✔️Comfortable Fit: Lightweight design with adjustable straps for longer play sessions.
❌Mandatory Facebook Account: Initially required (though Meta has started phasing this out).
Quick Overview
The Meta Quest 2 is a powerful and affordable standalone VR headset. Which brings high-quality immersive experiences to gamers without needing a PC or console. With crisp visuals, a wide range of games, and no cables. Making it easy to set up and use wherever in your home. However, it does have some limitations in battery life and graphics compared to high-end VR systems like the new Meta Quest 3.
When it comes to VR on a budget, the Meta Quest 2 is a standout choice. Its wireless setup means no annoying cables will be holding you back while you’re exploring the vast virtual worlds.
And with a crisp display, everything feels just that little bit more realistic. Whether you’re fighting off zombies or exploring alien planets, the experience is immersive.
The range of games available is impressive, from adrenaline-packed action titles to chill puzzle games, so there’s something for everyone.
Sure, the battery life isn’t great, but it’s enough for a solid gaming session. You’ll probably want to keep a charger nearby if you’re planning on doing a long night of VR gaming.
Other that that the graphics are pretty solid. However, hardcore gamers looking for the absolute best visuals might notice a difference compared to PC-based systems.
Still, for the price, it delivers an incredible gaming experience without the need for extra gear or cables. It’s perfect for anyone looking to dive into VR without completely breaking the bank.
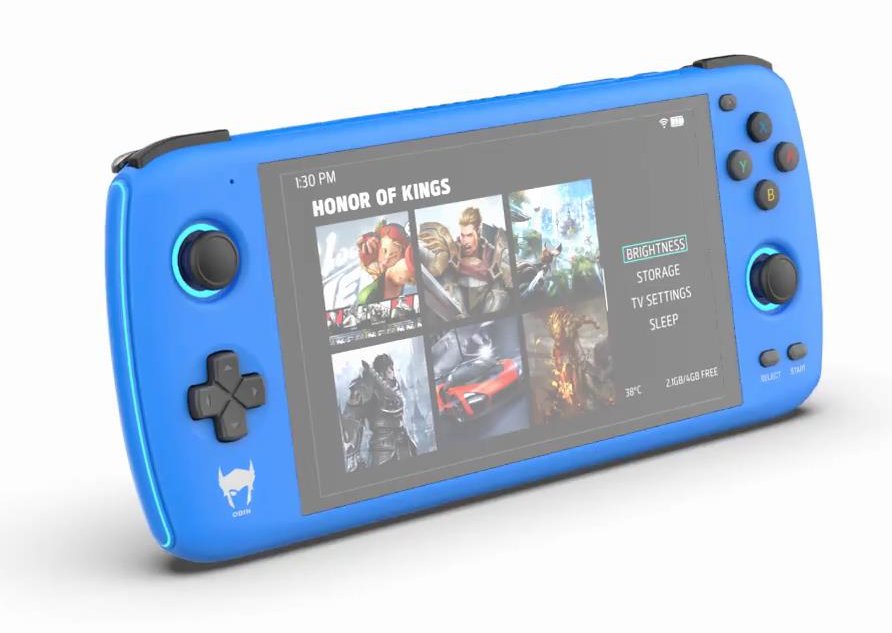
Powerful Performance: The Ayn Odin Pro features a Qualcomm Snapdragon 888 processor and 8GB of RAM..
Enhanced Display: It comes with a 7-inch full HD touchscreen, offering a clearer and vibrant display.
Premium Build Quality: The Ayn Odin Pro is designed with high-quality materials and has a robust build.
Pros and Cons
Pros
Cons
✔️Excellent Performance: Snapdragon 888 and 8GB of RAM ensure smooth and responsive gaming.
❌Price: Although under $300, it’s on the higher end of the budget range.
✔️High-Quality Display: The 7-inch full HD screen provides a sharp and immersive gaming experience.
❌Battery Life: As with many powerful devices, the battery life might not be sufficient for very long gaming sessions.
✔️Durable Build: Constructed with premium materials, the Ayn Odin Pro is built to last.
❌Size: The 7-inch screen, while larger, may make the device less compact and portable compared to smaller models.
Quick Overview
The Ayn Odin Pro stands out in the portable gaming market with its Snapdragon 888 processor and 8GB of RAM. Making it more than capable for cloud gaming. The 7-inch full HD screen enhances the visual experience, providing a vibrant display. Its durable build ensures that it can handle regular use.
The Ayn Odin Pro is a standout option for portable gaming enthusiasts. Its Snapdragon 888 processor and 8GB of RAM deliver top-notch performance. Making it perfect for cloud gaming services like Xbox Cloud Gaming and NVIDIA GeForce Now.
The 7-inch full HD touchscreen enhances your gaming experience with sharp visuals and vibrant colors, adding to the overall immersion.
While the Ayn Odin Pro is a bit pricier. However, Its powerful specs and premium build quality justify the cost. The device is well-built, ensuring durability for extended gaming sessions.
Although the battery life might fall short during very long playtime’s. It still offers some good value for those looking for a high-performance portable gaming console.
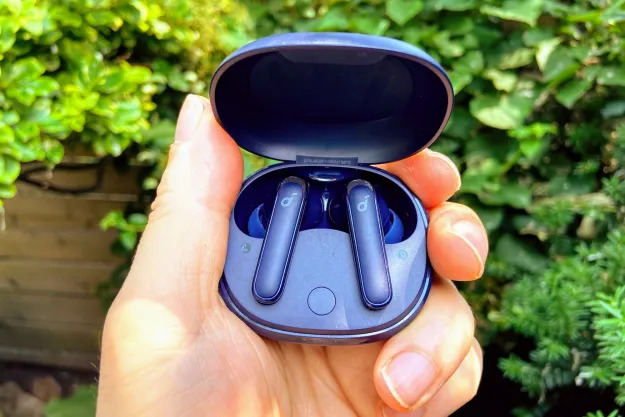
Spatial Audio Support: Delivers an immersive 3D sound experience for music, movies, and games.
Impressive Battery Life: Up to 35 hours of playtime with the case, perfect for long listening sessions.
Customizable Sound Profiles: Use the Soundcore app to adjust EQ settings and tailor the sound to your liking.
Pros and Cons
Pros
Cons
✔️Affordable Price: Offers great sound quality and features for less than $100, making it budget-friendly.
❌No Wireless Charging: The charging case requires a cable, which might be inconvenient for some users.
✔️Effective Noise Cancelling: Blocks out background noise, letting you focus on your audio.
❌Limited Water Resistance: It has an IPX5 rating, so it’s splash-proof but not fully waterproof.
✔️Comfortable Fit: Lightweight design with multiple ear tip options for a secure and comfortable fit.
❌Spatial Audio Limited to Certain Apps: Works best with apps that support spatial audio, so the feature isn’t always active.
Quick Overview
The Soundcore Life P3 is a solid choice if you’re looking for wireless earbuds with spatial audio on a budget. With customizable sound profiles, active noise cancellation, and a comfortable fit, these earbuds pack a punch for their price. While the spatial audio experience isn’t available everywhere, when it works, it enhances your listening experience in an epic way.
The Soundcore Life P3 earbuds offer an immersive experience without breaking the bank. Whether you’re streaming movies or listening to your favorite tracks, the spatial audio feature adds depth to your sound.
It makes you feel like you’re right in the middle of the action. It’s a perfect match for teens who want to upgrade their sound setup without going over budget.
Plus, the noise-cancelling feature means you can block out distractions. You can focus on what matters—whether it’s your playlist or a chill study session.
Another great part is how customizable these earbuds are. The Soundcore app lets you tweak the EQ settings to suit your specific needs. Whether you’re all about that bass or you want clearer vocals, you can adjust it to your preference.
The battery life is pretty impressive too, it can last up to 35 hours with the case! So you won’t have to worry about charging them constantly.
While they don’t support wireless charging and spatial audio is limited to certain apps, it’s still overall a steal!
For under $100, you’re getting features that are usually only found in higher-end models. All in all, the Soundcore Life P3 is a great option if you’re into epic soundscapes!
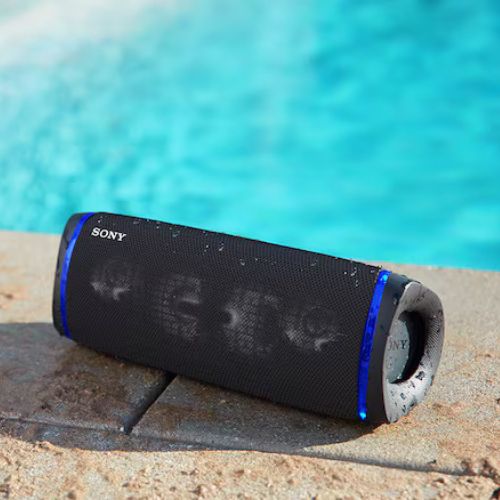
Voice-Activated Party Mode: With a simple voice command, activate party features like music syncing with lights.
Extra Bass Sound: Boosts low-end frequencies for deeper, punchier beats, perfect for party settings.
Long Battery Life: Up to 24 hours of playtime, so your music lasts throughout the night.
Pros and Cons
Pros
Cons
✔️Durable and Waterproof: Rated IP67, so it can handle spills, dust, and even outdoor use in the rain.
❌A Bit Bulky: The size is larger compared to some other portable speakers, making it less travel-friendly.
✔️Customizable Lights: Built-in LED lights that sync with the beat, making your party even more dynamic.
❌Limited Smart Features: While it has voice commands, it lacks deeper smart home integrations.
✔️Impressive Sound Quality: Delivers rich, clear audio with powerful bass, ideal for larger gatherings.
❌Charging Takes Time: Fully charging the battery takes a few hours, so you’ll need to plan ahead for longer parties.
Quick Overview
The Sony SRS-XB43 stands out as a top choice for party-people. It offers voice-activated party mode, punchy bass and customizable light features. It’s durable enough for outdoor events and provides solid sound quality. With up to 24 hours of battery life, it keeps the fun going long after the party starts.
The Sony SRS-XB43 is basically designed for people who love throwing parties. So, whether you’re chilling outside with friends or hosting an indoor dance-off. It doesn’t matter, the voice-activated party mode makes it easy to switch things up.
You can do this without stopping the music. Just ask it to sync the lights or boost the bass, and you’re good to go.
The speaker’s sound quality is seriously impressive. The Extra Bass feature gives your music that extra punchyness that’s perfect for party vibes. Plus, the LED lights that flash to the beat create a cool atmosphere. It’s more than just a speaker, it’s almost like a mini light show.
However, the only downside is its size. It’s a bit bigger than some of the super portable options. You won’t be tossing it in a small backpack but it will handle the outdoors with its waterproof and durable design.
Health and Fitness Tech for the Wellness-Conscious Teen:
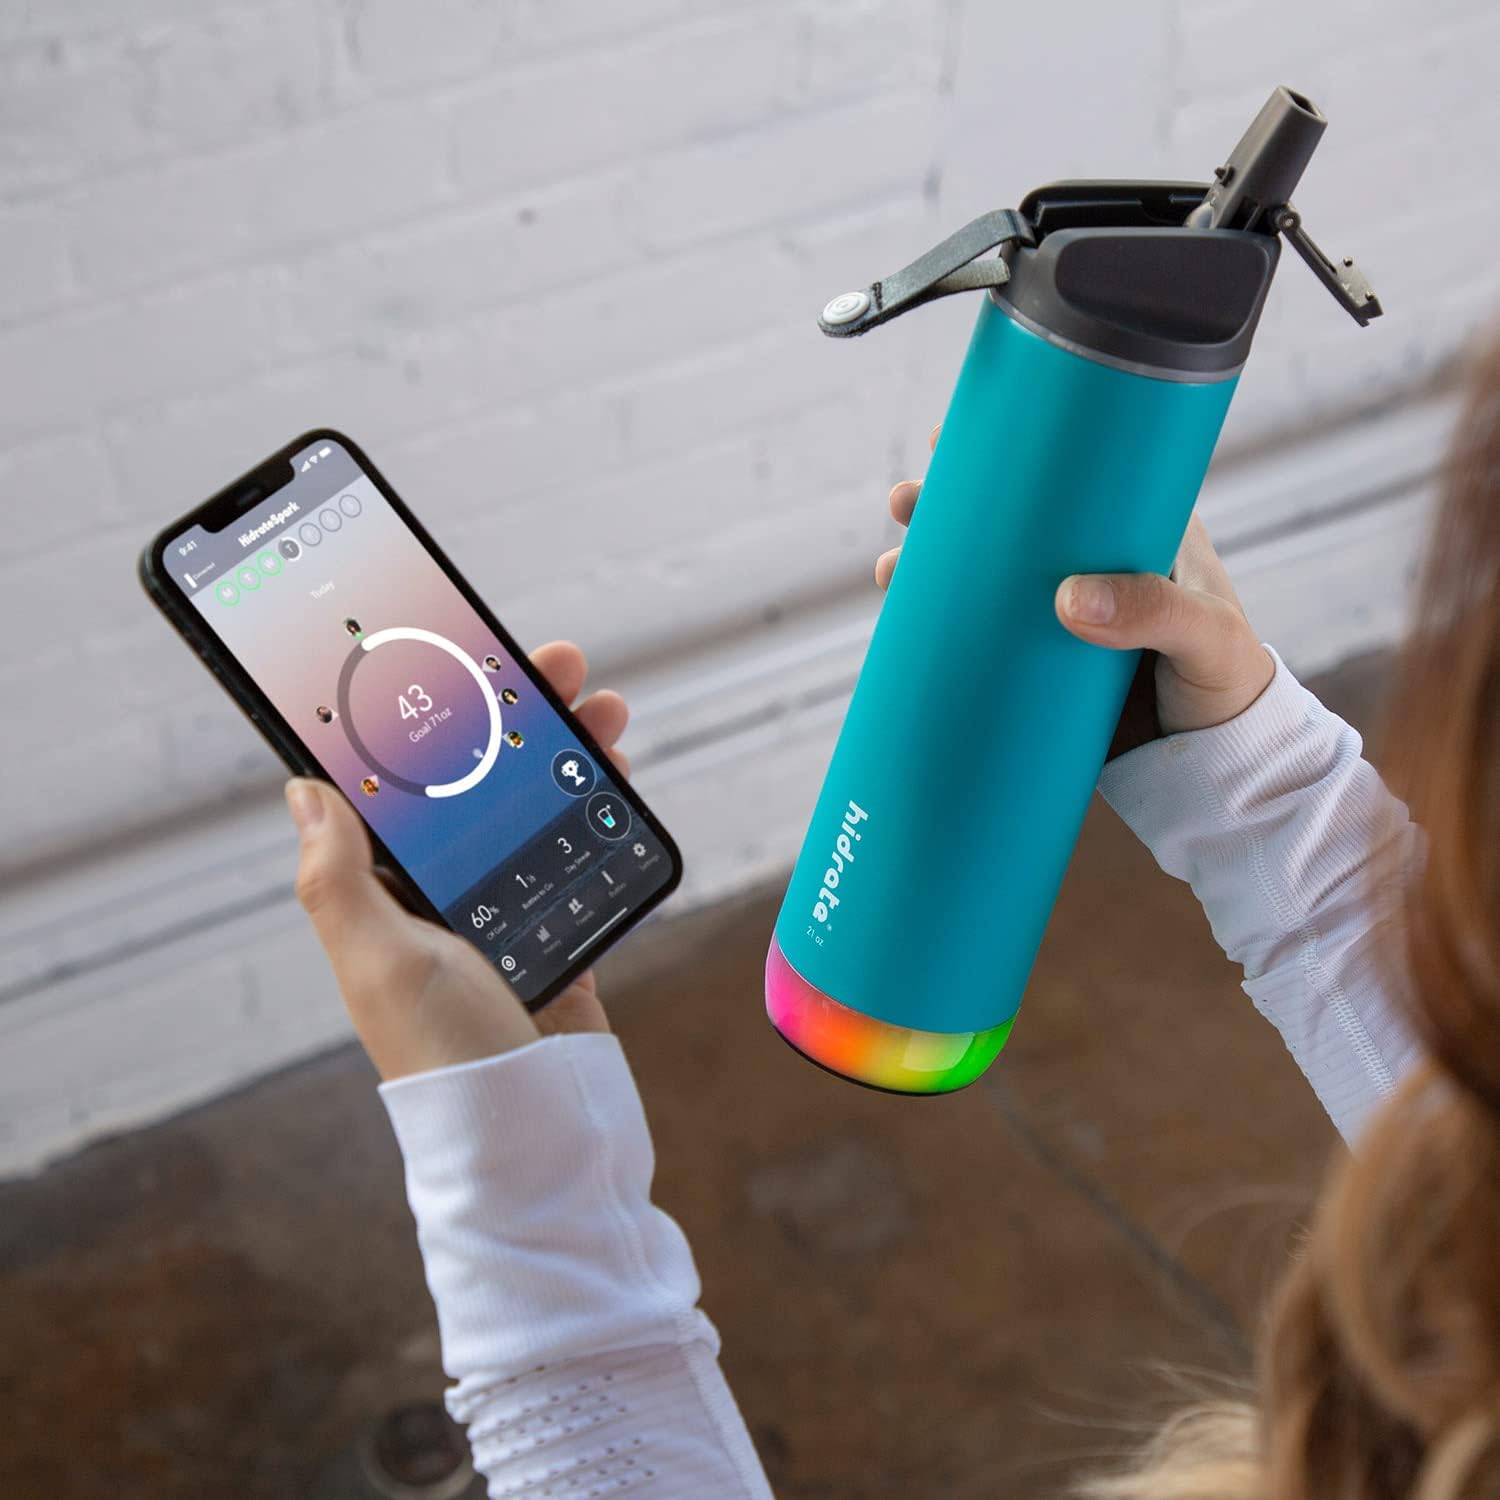
LED Smart Sensor: Glows to remind you when it’s time to drink water.
Hydration Tracking: Syncs with an app to monitor your daily water intake.
Stainless Steel Insulation: Keeps drinks cold for up to 24 hours.
Pros and Cons
Pros
Cons
✔️Customizable Hydration Goals: Adjusts water intake suggestions based on your activity level and environment.
❌App Dependent: Most features require the app, so it’s not as useful without your phone.
✔️Long Battery Life: Lasts several days on a single charge, so you don’t need to worry about frequent charging.
❌Pricey Compared to Regular Bottles: Higher price point than standard water bottles, even though it offers smart features.
✔️Durable Build: Stainless steel design makes it both sturdy and stylish.
❌Bulky Size: The added tech makes it a bit heavier and bulkier than regular bottles.
Quick Overview
The HidrateSpark PRO is designed to keep you on top of your hydration game. It features a glowing LED that lights up to remind you to drink water. It also connects to an app that tracks your water intake in real time. The stainless steel version is durable and keeps your drinks cold, making it both practical and cool-looking.
The HidrateSpark PRO is perfect for anyone who struggles with remembering to stay hydrated throughout the day. The glow feature is cool and practical. It acts as a gentle reminder to take a sip without needing to check your phone all the time.
Plus, it’s really helpful for those who like keeping track of their health. The app gives detailed insights on how much water you’ve had and how much more you should drink.
The only downside is that it’s a bit on the heavier side because of all the tech built inside. But if you’re someone who’s always on the go and cares about hydration, this is worth it.
You’re not just getting a water bottle. You’re getting a health tool that adapts to your specific needs. It works whether you’re at school, the gym, or just chilling at home.
Overall, it’s an awesome pick for anyone who wants to take hydration seriously.
Advanced Stress Management: Tracks your stress levels using an EDA (electrodermal activity) sensor.
Built-In GPS: Perfect for outdoor activities without needing your phone.
Health Metrics Dashboard: Keeps track of heart rate, sleep, and other vital signs for a complete health overview.
Pros and Cons
Pros
Cons
✔️EDA Sensor for Stress Monitoring: Helps you manage stress by measuring your body’s response to stressors.
❌Premium Features Locked Behind Subscription: Some of the more advanced insights are only available through Fitbit Premium.
✔️Bright AMOLED Display: Clear and easy to read, even in bright sunlight.
❌No Music Control: You can’t control music directly from the tracker, which might be a downside for gym-goers.
✔️Built-in GPS: Great for runners and outdoor lovers who want to track their routes without a phone.
❌Average Battery Life: Lasts about 5-7 days, but heavy use of GPS or EDA tracking will drain it faster.
Quick Overview
The Fitbit Charge 5 is a great option for anyone wanting to keep track of both fitness and stress levels. Its EDA sensor provides a unique way to monitor how your body reacts to stress throughout the day. The built-in GPS makes it a great choice for people who like outdoor workouts. However, if you’re looking for deeper insights, be ready to pay for the Fitbit Premium subscription.
If you’re a teen trying to stay on top of your fitness while managing their stress, the Fitbit Charge 5 could be perfect.
The built-in EDA sensor make it really easy to see when your body is feeling stressed. on top of that, the app also gives you feedback to help you calm down when needed.
It’s also really useful if you’re into running or cycling. Thanks to the GPS, you can track your routes without having to drag your phone around.
The display is bright and colorful, making it easy to check your stats while you’re on the go.
However, one thing to keep in mind is that some of the cool features require a Fitbit Premium subscription. These features include advanced stress insights and guided meditation.
That being said, even without paying extra, you still get a ton of features for managing fitness and stress. So if you’re looking for a tracker that does more than just count steps, this one’s worth checking out!
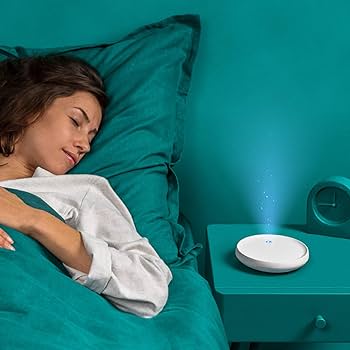
Guided Breathing: Helps you fall asleep faster by synchronizing your breathing with a soft light.
Portable and Simple: Small, easy-to-use design that fits on any bedside table.
Non-Invasive: No need for medication or tech that’s worn on your body, just natural breathing techniques.
Pros and Cons
Pros
Cons
✔️Easy to Use: Just tap the device, and you’re ready to start the sleep session.
❌Limited Features: It only offers one main feature, which is guided breathing for sleep.
✔️No App Required: Unlike many sleep gadgets, Dodow doesn’t require a smartphone app.
❌May Not Work for Everyone: Some users find that it takes time to adjust to the breathing technique.
✔️Natural Sleep Aid: Relies on breathing techniques instead of chemicals or medication.
❌Basic Design: No advanced tech features like sleep tracking or smart alarms.
Quick Overview
The Dodow Sleep Aid Device is a minimalist gadget designed to help people who have trouble falling asleep at night. It uses a simple breathing technique guided by a soft light. This encourages a more calm and relaxed state. Which can help you fall asleep faster. It’s non-invasive, easy to use, and doesn’t require any apps or special setup.
If you’re struggling to fall asleep at night, the Dodow is a cool and affordable solution. It’s super simple, so no fancy apps or setups required.
You just tap the device, follow the light with your breathing, and you’re good to go. This makes it perfect for anyone who wants to relax and fall asleep faster without relying on medication.
One of the best things about Dodow is that it teaches you how to calm your mind naturally. The soft light pulses in a way that slows down your breathing, making it easier to fall asleep.
The only downside is that it doesn’t have any extra features like alarms or sleep tracking. But if you’re just looking for something simple to help you sleep better, it’s a great option.
Overall, it’s a great pick for teens who want an affordable and easy-to-use gadget to improve their sleep.
Plus, you don’t need to worry about complicated tech—it’s all about breathing, and that’s something literally everyone can do!
Real-Time Posture Feedback: Vibrates gently to remind you when you’re slouching.
Compact & Discreet: Small enough to wear comfortably under your shirt, so it’s barely noticeable.
Customizable Tracking: Syncs with an app to monitor and track your posture over time.
Pros and Cons
Pros
Cons
✔️Real-Time Alerts: Immediate feedback helps you adjust your posture without needing to constantly check yourself.
❌Limited Battery Life: The battery lasts around 10 hours, so you’ll need to recharge it daily if you’re using it for long periods.
✔️Easy Setup: The app is user-friendly and connects quickly, making it super simple to get started.
❌Adhesive Pads Need Replacing: The sticky pads wear out after a while and need to be replaced, which can be a hassle.
✔️Comfortable Design: Small and lightweight, so you’ll forget it’s even there during your study sessions.
❌Vibration Sensitivity: Some users feel that the vibrations can be a bit too sensitive, especially if you move a lot.
Quick Overview
The Upright GO 2 is a sleek and discreet posture corrector that helps train your body to stay upright during those long study sessions. With real-time feedback and an app that tracks your progress, it’s an excellent tool for improving your posture over time. Overall, it’s a solid choice for students who need to stay focused while also taking good care of their posture.
When you’re stuck in the books for hours, it’s easy to slump over without even noticing it. That’s where the Upright GO 2 comes in.
It’s designed to help you sit up straight by sending you gentle vibrations when you start slouching. It’s small enough to wear under your shirt, and it syncs with an app to give you progress reports on your posture throughout the day.
What’s great about it is how simple it is to set up and use. You just stick it on, and it connects to the app, ready to track your posture in real-time.
The only downside is that the adhesive pads need replacing after a while, but for the benefits it provides, it’s 100% worth it.
If you’re serious about correcting your posture during those long study sessions, this is an easy and effective way to do it!
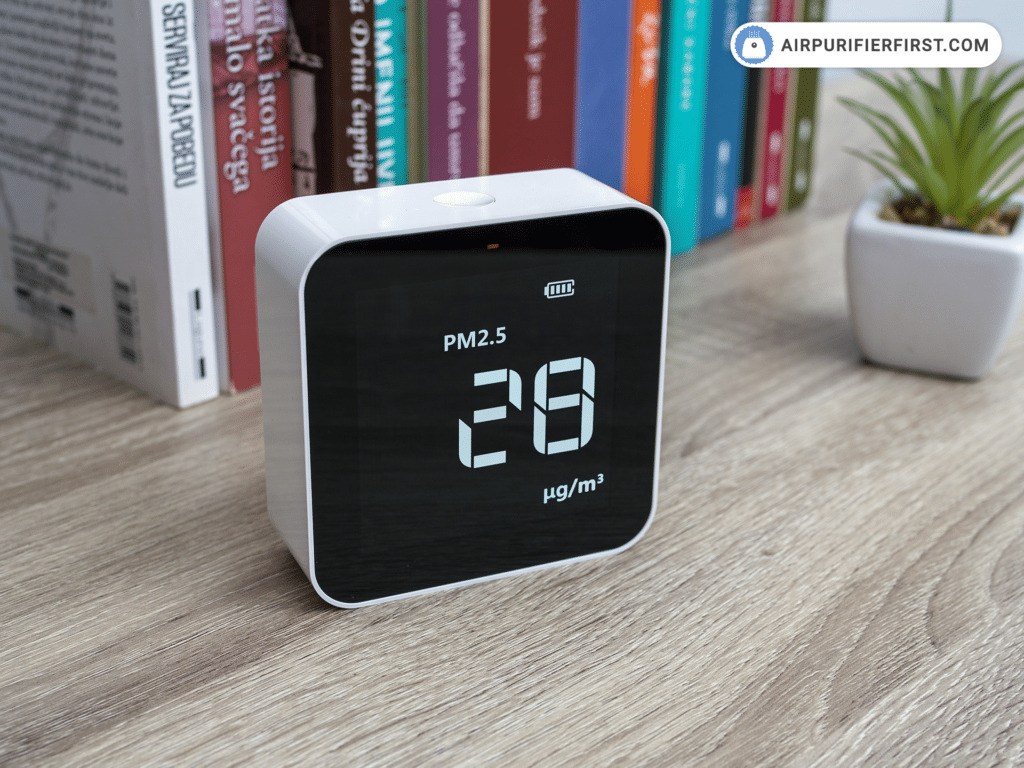
Real-Time Air Quality Detection: Monitors PM2.5, formaldehyde (HCHO), TVOCs, and AQI (air quality index) in real-time.
Compact & Portable: Lightweight and small enough to carry in your bag for easy monitoring on the go.
Simple Display: Color-coded air quality indicator, making it easy to understand at a glance.
Pros and Cons
Pros
Cons
✔️Comprehensive Air Quality Monitoring: Covers all key pollutants (PM2.5, HCHO, TVOCs) that are essential for keeping your air safe.
❌Limited Data History: Doesn’t store data, so you can only view current air quality, not past readings.
✔️User-Friendly Design: Straightforward interface and easy-to-read display make it simple to use.
❌Basic Features: Lacks advanced features like app connectivity or in-depth analysis.
✔️Portable and Rechargeable: Small size and rechargeable battery make it ideal for teens on the go.
❌Short Battery Life: Needs frequent recharging, especially with continuous use.
Quick Overview
The Temtop M10 is a compact air quality monitor that tracks essential air pollutants, including PM2.5 and formaldehyde. Its easy-to-read color-coded display and portable design make it a great choice. Especially for teens who want to keep an eye on their surroundings. Priced under $80, it provides all the basics needed to stay informed. You can use it at home or on the go to monitor air quality.
The Temtop M10 is perfect for teens who want to be more aware of the air they’re breathing. Whether they’re at school, home, or out with friends. It’s small enough to fit in your backpack and gives you instant feedback on whether the air your breathing is clean or not.
The color-coded display is simple to understand, so even if you don’t know much about pollutants like PM2.5 or TVOCs. You’ll still know when the air is good or when you need to open a window or leave the area.
While it’s great for tracking real-time air quality, it doesn’t have many advanced features like storing previous readings or syncing with an app. That being said, for the price, it’s perfect for keeping track of your air quality without all the extra fuss.
Plus, with more awareness around health and the environment, it’s something that can help you make more conscious choices about where you spend your time. You just have to make sure you keep it charged!
Photography and Social Media Gear for the Content Creator
❌Battery life could be better: Lasts around 6 hours, so you might need a recharge during long shoots.
✔️Portable design: It’s lightweight and foldable, making it easy to carry anywhere.
❌Limited to smartphones: No support for bigger cameras if you’re thinking of upgrading in the future.
✔️Great for beginners: The DJI Mimo app provides tutorials and easy controls for first-timers.
Quick Overview
The DJI Osmo Mobile 6 is a great choice for teens looking to create smooth, professional-looking videos on their phones. With 3-axis stabilization and advanced tracking features, it ensures your videos are steady and cinematic. Whether you’re shooting content for TikTok, YouTube, or just making some fun memories, it works flawlessly. Priced under $150, it’s a solid, fairly budget-friendly option.
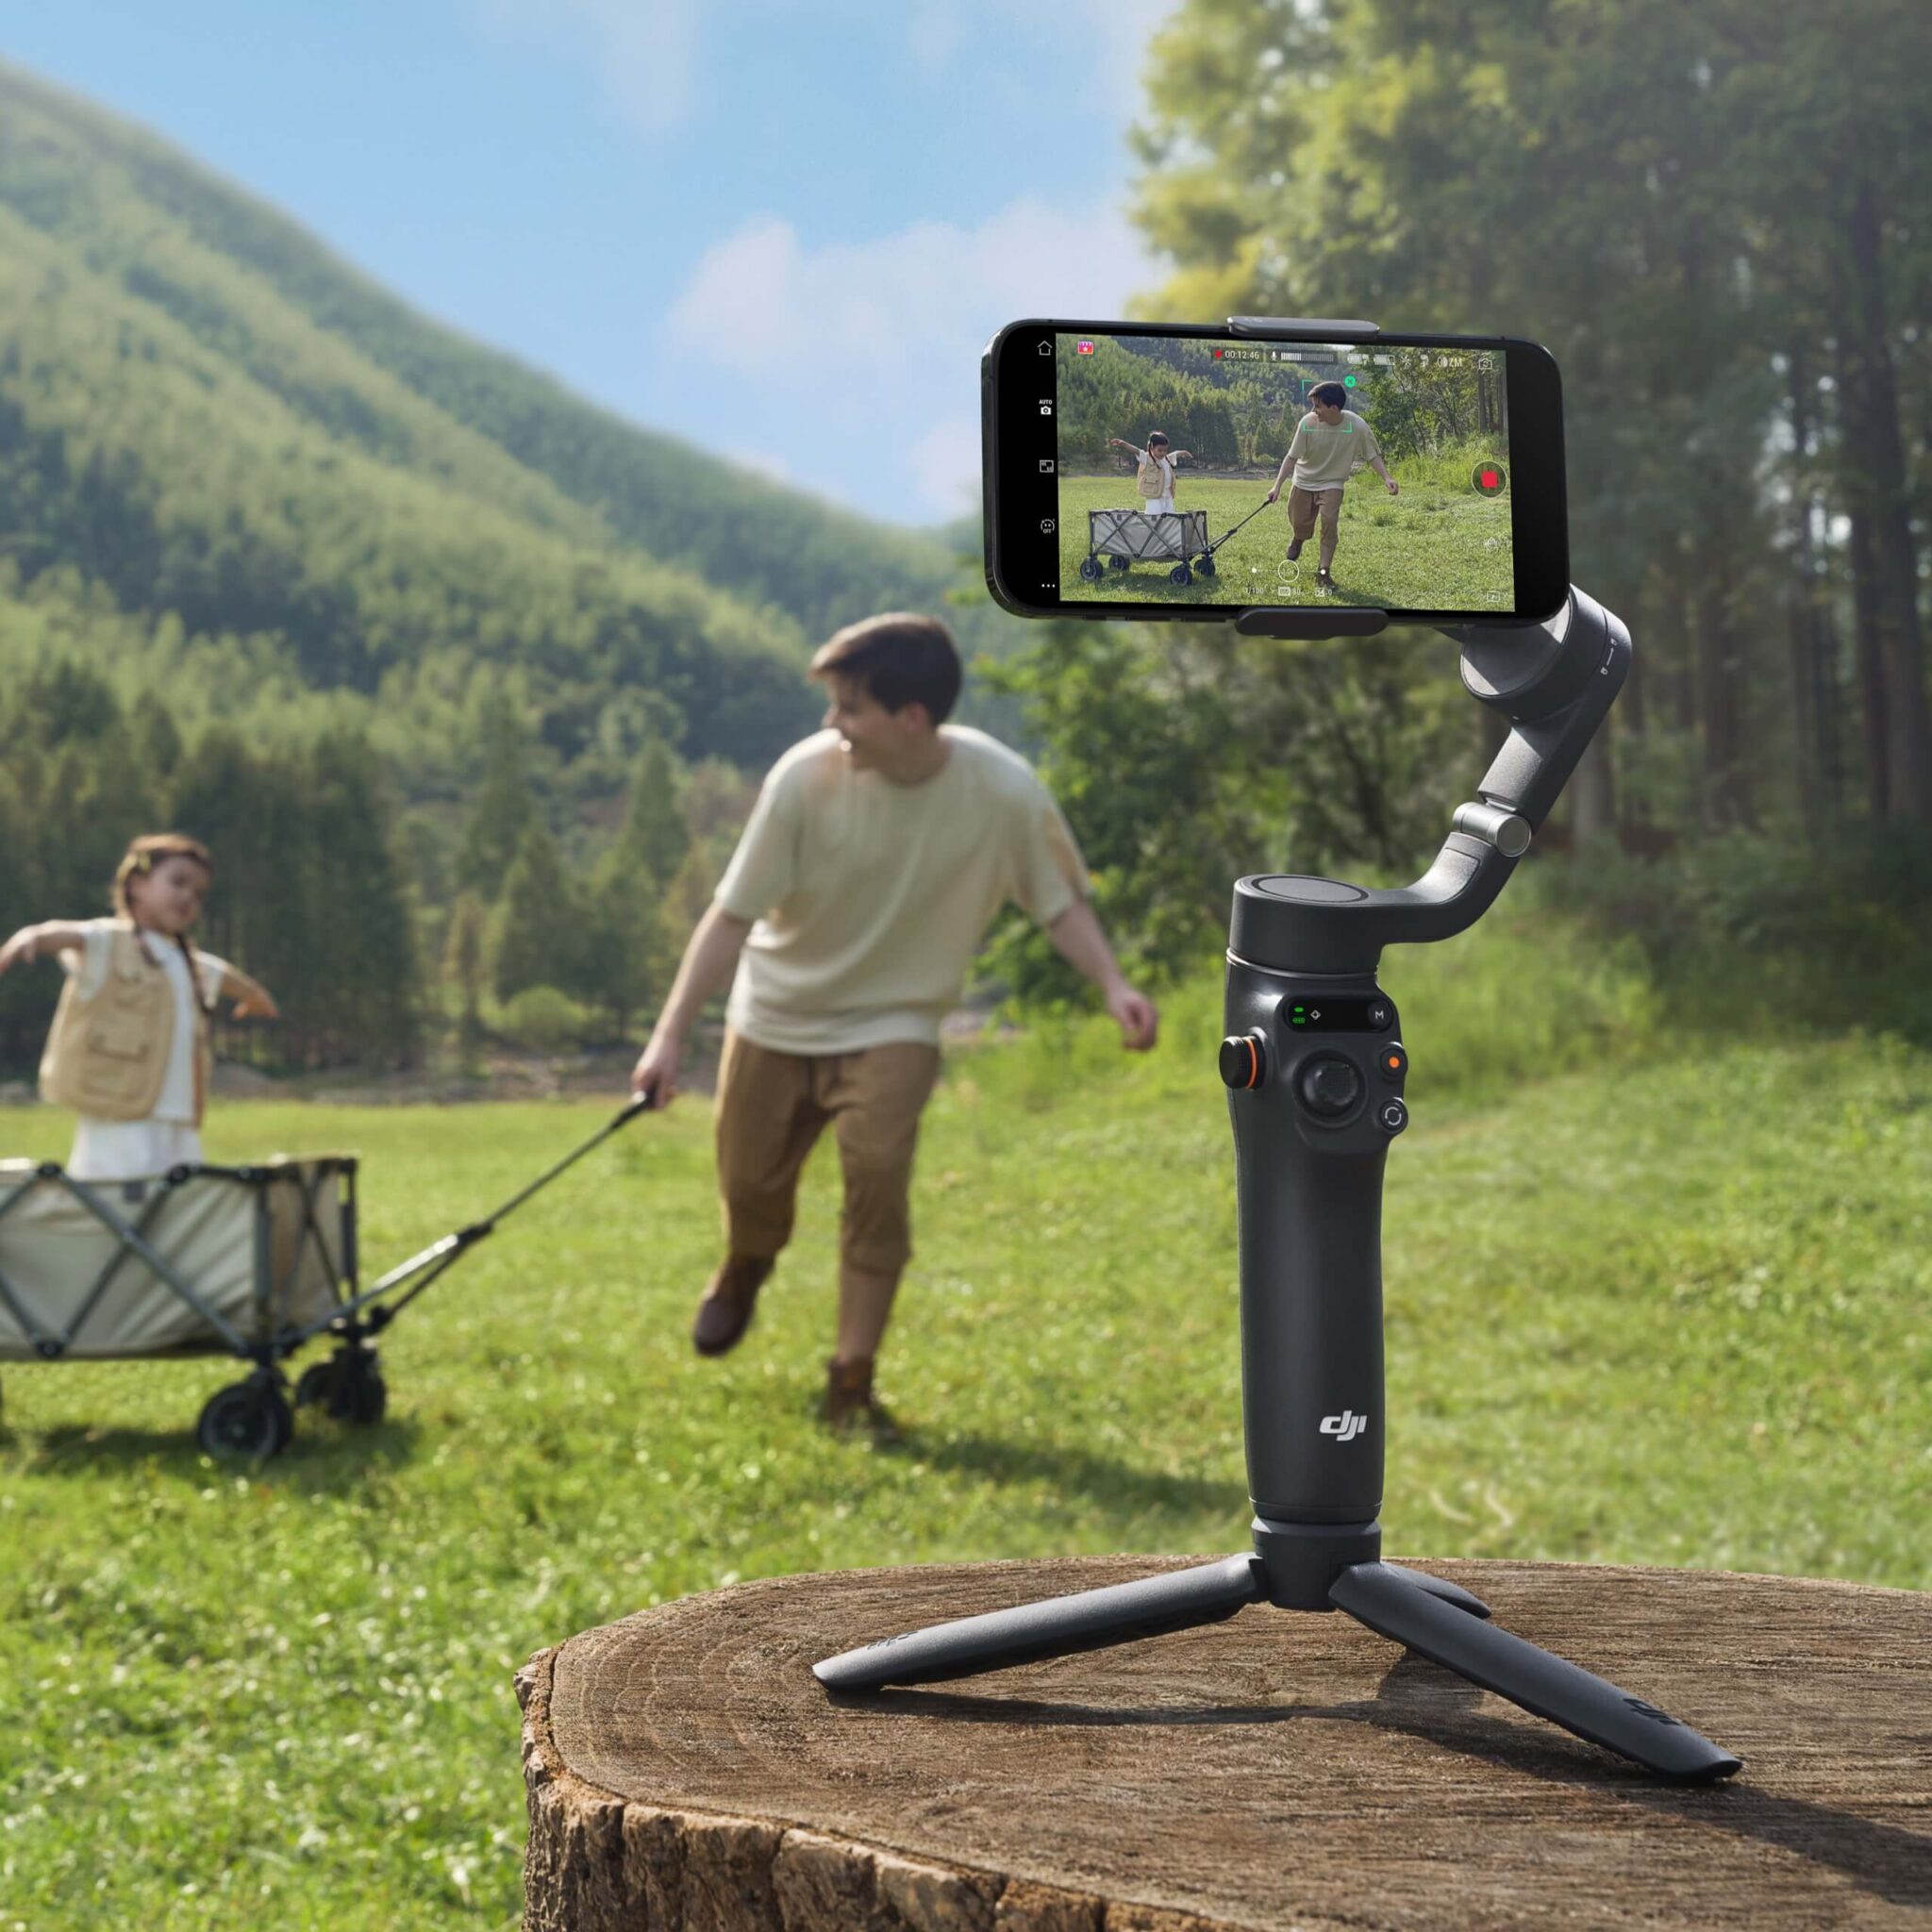
If you’re looking to level up your video content without obliterating the bank, consider the DJI Osmo Mobile 6. It’s one of the best smartphone gimbals you can get.
The 3-axis stabilization is a complete game-changer, making your videos look smooth and professional. Even if you’re walking, running, or just panning around. Plus, it’s small and portable, so it won’t be a hassle to bring it with you wherever you go.
The built-in extension rod is a cool bonus. You can get wider shots without needing a selfie stick, which is great for group videos or creative angles.
And with ActiveTrack 5.0, the gimbal will always keep your subject in focus. Making it perfect for vlogs, action shots, or capturing your friends at a party.
Sure, the battery life could be a bit better, but for most short shoots, it’ll get the job done.
Plus, if you’re only using it with your smartphone, it’s an affordable option that gives you all the tools to create buttery-smooth videos. Whether you’re a beginner or just want to step up your content game, this gimbal makes it super easy.
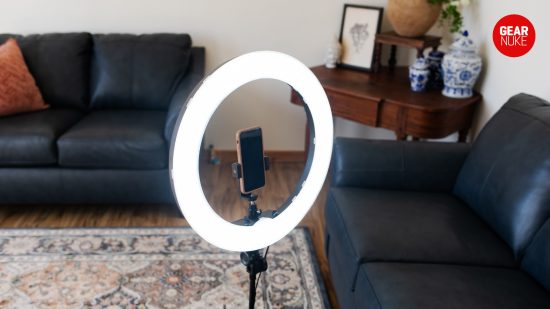
18-inch LED Ring: Provides soft, even lighting for flawless selfies or videos.
Adjustable Brightness & Color Temperature: Allows you to switch between warm and cool tones to match your mood.
Built-in Phone Holder & Stand: Holds your phone securely in the middle of the light for perfectly centered shots.
Pros and Cons
Pros
Cons
✔️Large Light Size: The 18-inch size offers wide, soft lighting that enhances photo and video quality.
❌Bulky: It’s a bit large for small spaces, which might be a problem for on-the-go use.
✔️Customizable Lighting: Adjustable brightness and color temperature help you get the perfect look for any situation.
❌No Battery Option: Needs to be plugged in, so it’s not as portable as some battery-powered models.
✔️Complete Kit: Comes with everything, including the light, phone holder, stand, and carry bag.
❌Phone Holder is Basic: The phone holder works but can feel a little flimsy with larger phones.
Quick Overview
The Neewer 18-inch LED Ring Light Kit is designed for content creators who need professional lighting without breaking the bank. Its large ring ensures your selfies or videos are well-lit, and the adjustable settings let you control brightness and color temperature. So, whether you’re just making some TikToks, Instagram Reels, or just taking selfies. This kit helps you achieve studio-level lighting at home.
This ring light is a perfect choice for teens who want to level up their selfie game or create some amazing content.
The 18-inch size ensures that your face and surroundings are evenly lit, making it great for both photos and videos.
Plus, the adjustable color temperature is really handy. So whether you’re shooting during the day or in a dim room, you can find the perfect setting.
One of the best parts is the built-in phone holder that keeps everything stable and centered, so you don’t need a bunch of extra equipment.
However, it is a little bulky, so if you don’t have much room or need something portable, it might not be ideal. Still, for home setups and consistent lighting, this ring light is hard to beat at this price!
Compact Design: Fits easily in your pocket or bag, making it perfect for on-the-go printing.
Fun Filters and Frames: Customize your photos with fun edits before printing.
Fast Printing: Prints photos in about 12 seconds, so you get your memories almost instantly.
Pros and Cons
Pros
Cons
✔️Portable and lightweight: Easy to carry around, making it perfect for events and travel.
❌Limited to small prints: The printer only supports Instax Mini film, which means smaller photos.
✔️App features: The Instax app offers creative options like collages and frames, adding fun to your prints.
❌No internal memory: You’ll need your phone to print photos since it doesn’t store images on its own.
✔️Affordable film: Film refills are reasonably priced compared to other instant printers.
Quick Overview
The Fujifilm Instax Mini Link 2 is a fantastic choice if you’re looking to print physical photos right from your phone. It connects via Bluetooth, works with both iOS and Android devices, and offers fast, fun, and easy printing. Plus, it comes in under $100, making it a solid budget pick.
If you’re into capturing moments on your phone but want some physical memories, the Fujifilm Instax Mini Link 2 is a great choice. It’s small enough to throw into your bag and print pictures on the spot. Whether you’re hanging out with friends or at a school event you’ll be able to print those pictures.
The app is pretty fun to use too. You can add filters and even print collages, which is perfect for making your pictures stand out.
The one thing to keep in mind is the size. The photos are about the size of a credit card, so they’re small, but that kind of adds to the charm.
Plus, the film for the Instax Mini is relatively affordable, so you won’t break the bank. Overall, it’s a great way to keep your favorite moments on a physical photo. Since it prints in just seconds, it’s perfect for some instant fun.
Stunning Wide-Angle Shots: Captures epic landscapes or large group photos without distortion.
High-Quality Glass: Designed with cinema-grade glass for crystal-clear images.
Durable Build: Made with aerospace-grade metal, it’s built to last and handle daily use.
Pros and Cons
Pros
Cons
✔️Incredible Clarity: No noticeable distortion or loss of image quality.
❌Requires Moment Case: You’ll need to buy the Moment case separately to attach the lens.
✔️Versatile Compatibility: Works with both iPhone and Android through Moment cases.
❌Pricey for Teens: At close to $130, it might be on the high end for some budgets.
✔️Portable: Easy to carry around for on-the-go photography.
Quick Overview
The Moment Wide Lens 18mm is one of the top choices for smartphone photographers who want to take their photography game to the next level. With superior glass and construction, it transforms your phone camera into something that delivers near-professional results. All whilst fitting being small enough to fit in your pocket. This lens makes everything from landscapes to group selfies look sharp and vibrant.
If you’re into photography and love taking pictures with your phone, the Moment Wide Lens 18mm is a complete game-changer. It allows you to capture much more in your shots. While avoiding the awkward stretching or distortion you usually get with other wide-angle lenses.
So, whether you’re hiking and want to show off an amazing view, or taking group pics at a party. This lens keeps everything in focus and looking sharp.
However, the quality of the glass is what really sets this lens apart. It’s the kind of thing that a lot professional photographers use, just made smaller for your smartphone.
One downside is that you need the Moment phone case to attach the lens, which adds a bit of extra cost. But honestly, the results are worth it. Especially if you love taking photos and want to show them off on Instagram or even in a photography class.
The lens is super sturdy too. You won’t have to worry about it breaking easily if you take it out and about.
❌Limited Width: Not ideal for larger setups or wide shots.
✔️Portable: Can be packed up and moved around without hassle.
Quick Overview
The Elgato Green Screen is a fantastic option if you’re looking for a high-quality green screen that’s portable and easy to use. It’s perfect for TikTokers who want to add fun, creative backgrounds to their videos without the hassle of complicated setups. However, it may be a bit pricey if you’re just starting out. Also its size might limit how much space you can cover.
Are you’re a TikToker wanting to step up your game with some cool, eye-catching backgrounds? Then the Elgato Green Screen is a great pick. Its fast setup is perfect when you’re inspired and need to start filming right away.
The wrinkle-free material means your background won’t look awkward or distorted on camera. Plus, the fact that it folds into a hard case makes it super easy to store and take with you.
The only downside is that it’s a little pricey for beginners. However, it’s a great investment if you’re serious about your content. And while it’s portable, the width might not cover everything. Which can be an issue if you’re shooting with multiple people or just want a bigger scene.
Still, for most TikTok creators, the Elgato Green Screen has a great balance between portability, ease of use, and high quality!
Eco-Friendly Gadgets for the Environmentally Aware
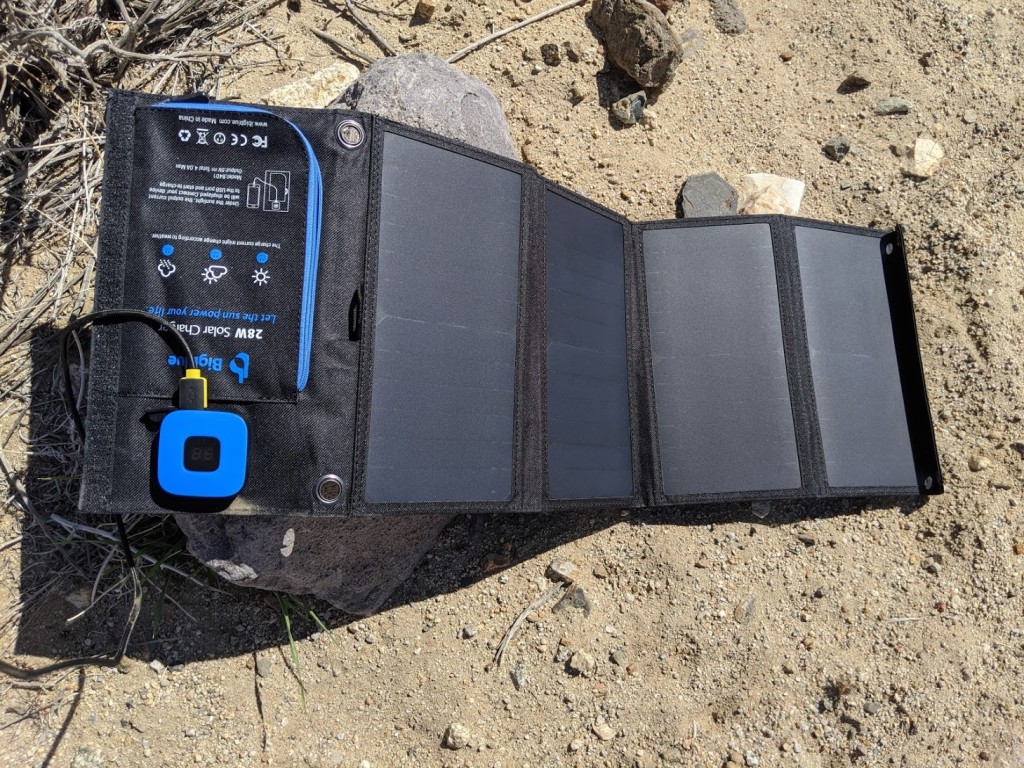
High-Efficiency Panels: Converts up to 23% of solar power into free energy for your devices, perfect for outdoor use.
Compact and Portable: Folds down small enough to fit in a backpack but opens up to offer great charging power.
Weatherproof: Made with durable materials to handle unpredictable weather conditions.
Pros and Cons
Pros
Cons
✔️Fast Charging: Charges phones quickly even in low light.
❌Requires Direct Sunlight: Slower charging on cloudy days or in shaded areas.
✔️Lightweight Design: Easy to carry during hikes or long treks.
❌No Internal Battery: Doesn’t store energy, so you need sunlight when charging.
✔️Multiple Ports: Can charge up to three devices at once.
Quick Overview
The BigBlue 28W Solar Charger is a fantastic choice for anyone going on a lot of off-grid adventures. With its efficient solar panels and lightweight design, it’s perfect for keeping your phone charged while you’re out exploring outdoors. While it doesn’t store power, it does has fast charging capability and a fairly rugged build. Making it a reliable companion for all types of weather.
Whether you’re planning a camping trip or just want to stay connected while hiking, the BigBlue 28W Solar Charger is perfect.
It is very practical. It’s lightweight and pretty easy to pack, so you can take it wherever you go without worrying about extra weight. Plus, it can charge multiple devices at once, so you and your friends can all stay powered up.
One of the coolest things about this charger is how fast it works, even if the sun isn’t super bright.
This makes it perfect for unpredictable weather, especially if you’re out for days at a time. Just make sure you have direct sunlight when using it, since it doesn’t store energy.
So, if you’re looking for a solar charger that balances performance and portability, this one definitely delivers on that!
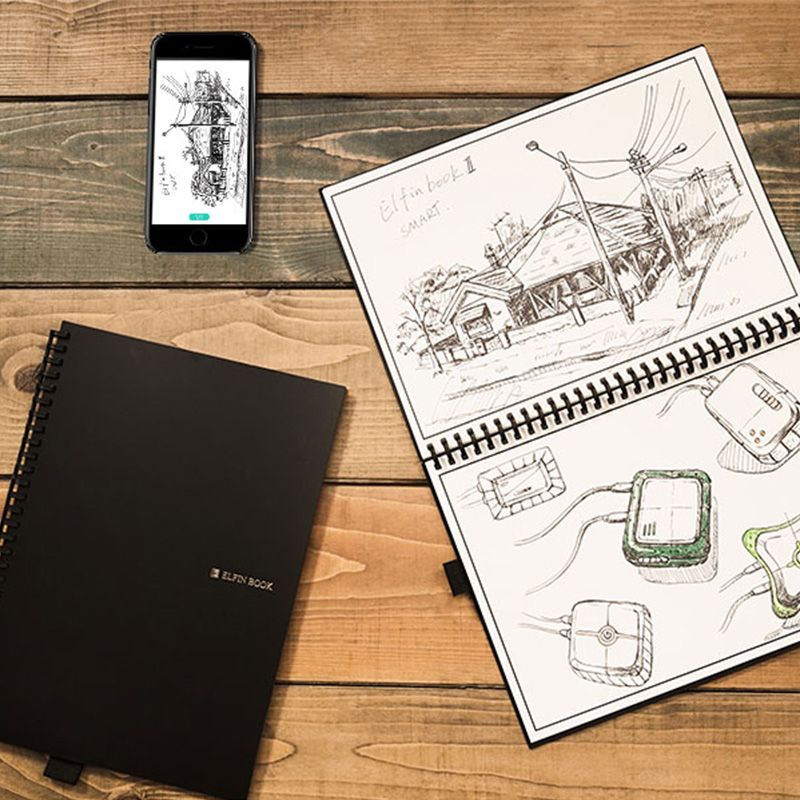
Microwave-to-erase: Simply pop it in the microwave to erase your notes.
Multiple formats: Comes with both lined and dotted pages for versatile use.
App Scanning: Save and organize your notes digitally with the Elfinbook app.
Pros and Cons
Pros
Cons
✔️Unique erasing method: Erase your notes by microwaving the entire notebook.
❌Limited erasing cycles: Can be reused about 500 times before the pages wear out.
✔️High-quality pages: Smooth, thick pages that feel just like traditional paper.
❌App isn’t as polished: The Elfinbook app works but isn’t as smooth as some competitors.
✔️Multiple page types: Combines lined and dotted pages, perfect for both writing and sketching.
❌Microwave requirement: You’ll need access to a microwave for the erasing feature.
Quick Overview
The Elfinbook Smart Reusable Notebook 2.0 is a cool, eco-friendly option that allows you to erase your notes by microwaving the entire notebook! It offers both lined and dotted pages, so it’s great whether you’re taking notes or just sketching some ideas. Paired with the Elfinbook app, you can save your notes digitally and always have them available online. For teens looking to reduce their paper usage and have some fun while doing it, this notebook is a solid pick.
The Elfinbook Smart Reusable Notebook 2.0 takes things up a notch with its unique microwave-to-erase feature. Instead of just wiping pages with water, you get to microwave the whole notebook!
It’s a weird but functional method for clearing pages. It makes this notebook feel a little more special compared to others. Plus, you’ve got both lined and dotted pages, so it’s flexible enough for different types of schoolwork or creative projects.
What’s even better is how easy it is to save your notes digitally. The Elfinbook app allows you to scan your notes and organize them in the cloud. Which is super helpful if you want to keep track of your study notes or just an handy digital backup.
The only catch is that the app isn’t as smooth as some others out there, but it gets the job done.
This notebook is also great for anyone who wants to help the environment by cutting down on paper waste. While it’s a little less polished than some competitors, the unique microwave erasing feature makes it stand out. It’s fun, reusable, and makes note-taking a lot more interesting!
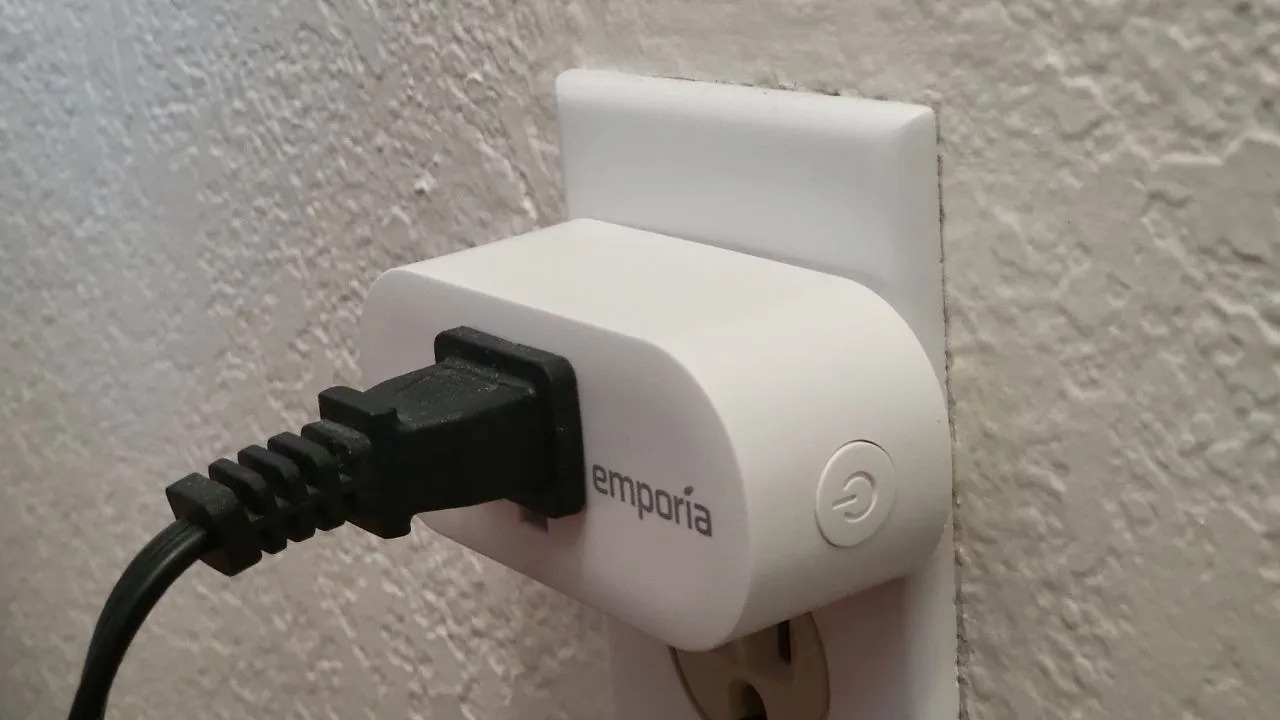
Real-time energy tracking: See your device’s power usage live through the app.
Custom schedules: Set times for your devices to turn on/off automatically.
Voice control compatibility: Works with Alexa and Google Assistant for hands-free control.
Pros and Cons
Pros
Cons
✔️Affordable price: One of the most cost-effective smart plugs for energy monitoring.
❌Needs Wi-Fi: No offline functionality, so it’s dependent on a stable Wi-Fi connection.
✔️Affordable price: One of the most cost-effective smart plugs for energy monitoring.
❌Limited load capacity: Not ideal for heavy appliances (over 10A).
✔️Easy setup: The plug and app are user-friendly, making it simple for anyone to set up.
❌Basic design: The look is a bit plain and may not blend well with modern interiors.
Quick Overview
The Emporia Smart Plug offers real-time energy monitoring. Which makes it super easy to see exactly how much power your devices are using. It’s also compatible with most home assistants, so you can control your appliances with your voice or schedule them to turn off automatically. For anyone looking to cut down on energy waste, this plug offers some great value.
Whether you’re trying to cut back on your energy bill or just want to know how much power your gaming setup is using, the Emporia Smart Plug has you covered. It’s super easy to set up, and the app gives you a clear breakdown of what each plugged-in device is using.
You can even create schedules for things like lamps or chargers. Making it so they can automatically turn off when you’re not using them. No more wasted energy!
The real highlight is how much control you get. You can monitor everything in real-time. And if you’re using Alexa or Google Assistant, you can turn devices on or off just by asking.
Plus, it’s priced well under $15, so it’s a smart buy for anyone looking to get serious about saving energy. Just be aware that it’s not built for heavy-duty appliances, so it’s best to stick to smaller electronics.
Overall, it’s a solid choice for making your room or home smarter while cutting back on energy use.
100% Compostable: Made from plant-based materials that break down completely, leaving no harmful waste behind.
Seed Planting Included: Comes with seeds you can plant after you’re done with the case.
Stylish and Protective: Looks great and protects your phone from drops and scratches.
Pros and Cons
Pros
Cons
✔️Eco-friendly materials: It’s 100% biodegradable, meaning it won’t add to plastic pollution.
❌More expensive than regular cases: You pay extra for sustainability, but it’s worth it for the eco-conscious.
✔️Easy to plant seeds: Comes with instructions on how to plant the seeds that come with the case.
❌Limited color options: There aren’t as many colors as you’d find with plastic cases.
✔️Durable for a biodegradable case: Protects your phone while being soft and flexible.
Quick Overview
The Pela Case is one of the best options for those who want a biodegradable phone case that comes with plantable seeds. It’s made from compostable materials, meaning you can just toss it into the compost when you’re done using it. With solid protection and eco-friendly features, this case is a great fit for anyone looking to reduce their carbon footprint.
If you’re into sustainability, the Pela Case is perfect. It doesn’t just protect your phone, but also helps protect the planet.
What’s cool about this case is that it’s completely compostable, so when you’re done using it, you can just compost it. Rather than add more plastic waste to the environment. Plus, they include seed plantings that you can grow, making it feel like you’re giving back to nature.
Sure, it’s a bit pricier than a standard plastic phone case, but you’re paying for eco-friendliness and durability. It even protects your phone well, which is surprising for a compostable product.
If you care a lot about sustainability and want something that’s pretty unique. Then this is one of the best cases out there. It’s a great pick for teens who want to do their part for the environment while keeping their phone stylish!
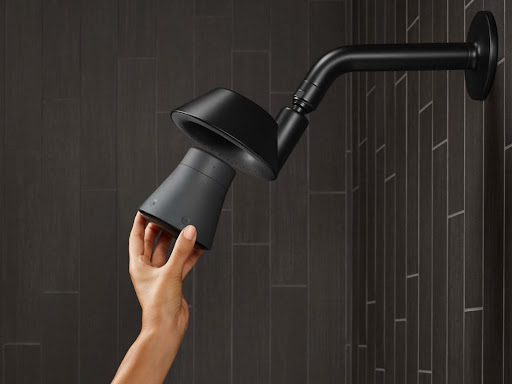
Water-saving design: Uses only 2.0 GPM, helping you save water without sacrificing water pressure.
Detachable Bluetooth speaker: The speaker magnetically attaches to the showerhead and can be used outside the shower too.
Long battery life: The speaker lasts up to 9 hours, so you won’t need to charge it too often.
Pros and Cons
Pros
Cons
✔️Water-efficient: Uses less water, which saves money on bills and helps the environment.
❌Limited color options: Only available in a few finishes, which might not match every bathroom style.
✔️Great sound quality: Offers clear audio for podcasts or music while you shower.
❌Charging the speaker: The speaker needs charging, so if you forget, you’re out of music until it’s recharged.
✔️Detachable speaker: You can take the speaker with you and use it around the house.
Quick Overview
The Kohler Moxie Showerhead is a sleek, modern choice for those who want to combine both music and water efficiency in the shower. Its Bluetooth speaker adds a fun twist, and with its 2.0 GPM flow rate, it saves water without losing performance. Plus, it’s simple to pop the speaker in and out for easy charging.
The Kohler Moxie Showerhead is perfect for anyone who wants to jam out in the shower while staying eco-friendly. Whether you love listening to podcasts, music, or even audiobooks, this Bluetooth speaker gives you clear and crisp sound. Straight from your showerhead!
It’s also detachable, which means you can keep listening to your playlist even after your done showering or bring the speaker with you to other rooms.
But do you want to know one of the coolest parts? It’s water-efficient, meaning it helps cut down your water use, which is great for saving money and the planet.
Even though it uses less water, it doesn’t feel weak—your shower will still have solid pressure. Just keep in mind that you’ll need to charge the speaker every now and then. However, with up to 9 hours of battery life, that won’t be too often.
So if you want to make your showers more fun and more sustainable, this is a solid choice!
Discreet Design: Looks like an elegant necklace or bracelet, hiding the fact that it’s a GPS tracker.
Emergency Alerts: Sends your location and a distress signal to selected contacts with a simple press.
No Monthly Fees: Unlike most GPS trackers, it doesn’t require a subscription for tracking services.
Pros and Cons
Pros
Cons
✔️Stylish Design: You won’t even notice it’s a tracker, making it easy to wear every day.
❌No Real-Time GPS: It only sends your location when you activate it, so it’s not tracking 24/7.
✔️Immediate Emergency Alerts: Sends help with just one press, perfect for safety in unexpected situations.
❌Limited Range for Alerts: Depends on your phone’s connection, so in areas with poor service, it may not work as smoothly.
✔️Long Battery Life: Lasts up to a year without needing to charge, so you won’t have to worry about maintenance.
❌Basic Features: No advanced tracking or fitness options, it’s more focused on safety.
Quick Overview
The InvisaWear Smart Jewelry is a GPS tracker designed to blend in with your everyday outfits while offering life-saving emergency alerts. It’s simple to use and doesn’t come with any extra monthly costs, which is a huge bonus. However, it’s more suited for occasional safety rather than continuous tracking.
The InvisaWear Smart Jewelry is a cool gadget that doesn’t look like tech at all. Whether you’re hanging out with friends or heading out solo, it looks like a simple piece of jewelry. However, it’s packed with a secret safety feature.
With just one press, you can instantly alert your family or friends if you’re in trouble. Which makes it a great option for teens who want to feel safer without carrying around something bulky or obvious. Or worried parents who want to make sure their teens are always safe.
Even though it’s not a 24/7 GPS tracker, it still does the job if you need help fast. The fact that you don’t need to charge it for a year makes it super low-maintenance too.
If you’re after a stylish, discreet safety device that won’t mess with your look, this one’s worth considering.
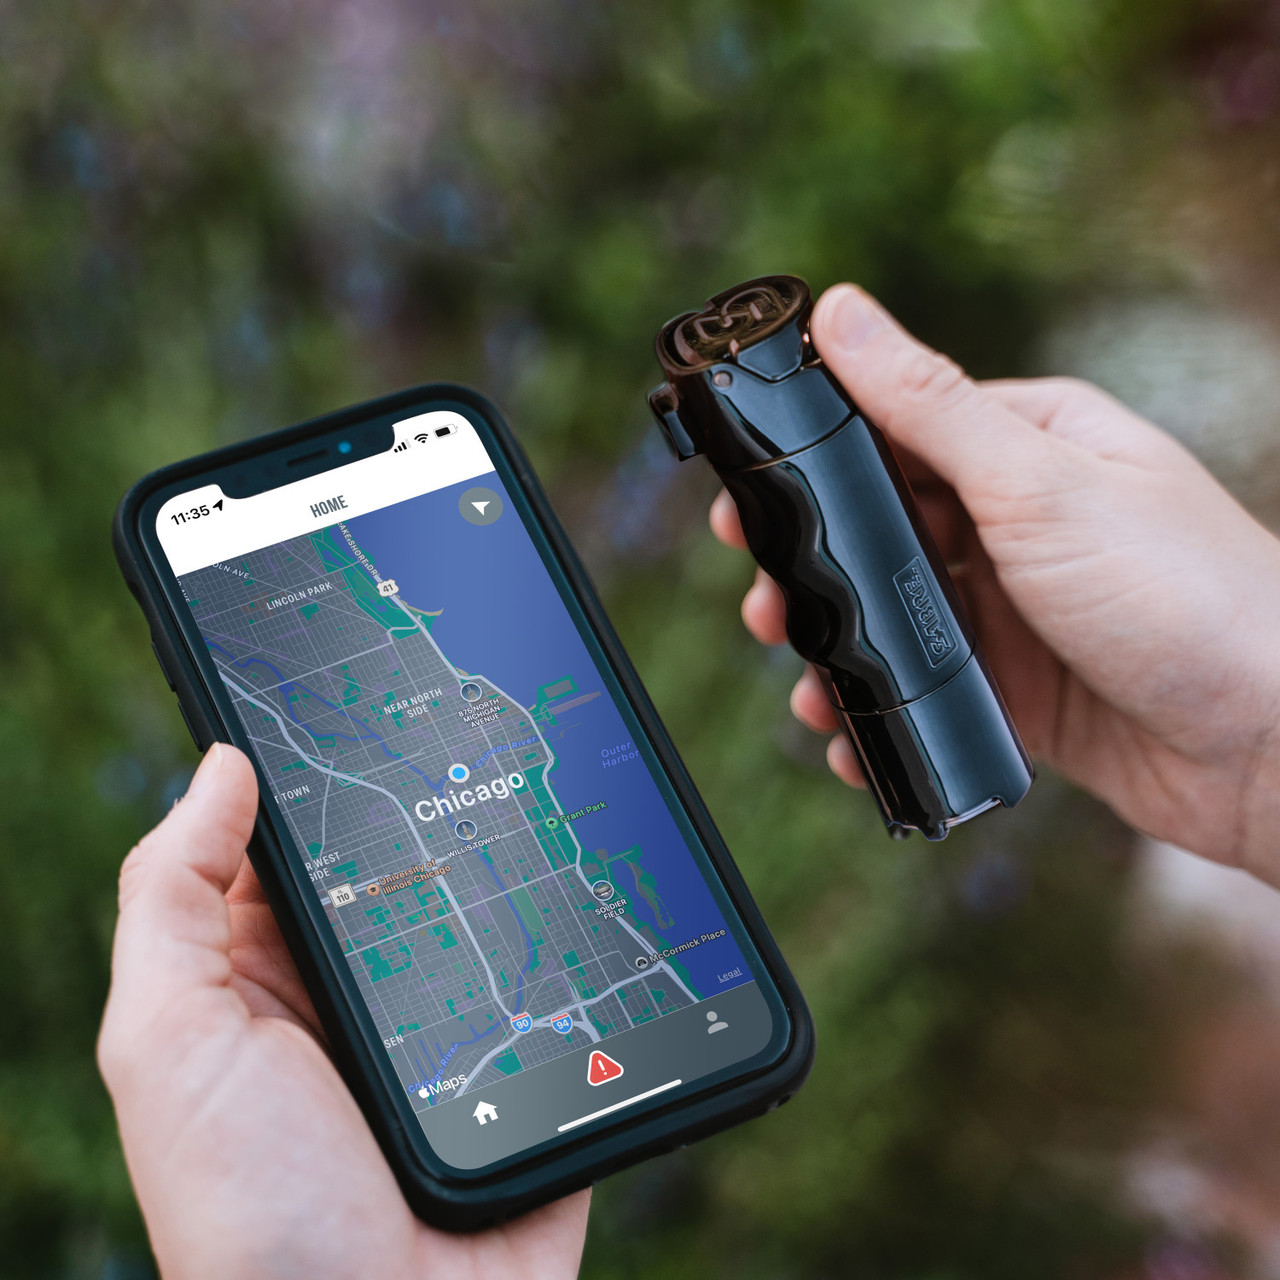
Automatic Alerts: Sends an alert with your location to emergency contacts as soon as it’s deployed.
Bluetooth Connected: Pairs with your phone through an app to track location and usage.
Compact Design: Easy to carry around, perfect for pockets or small bags.
Pros and Cons
Pros
Cons
✔️Instant Location Sharing: Your trusted contacts get alerted immediately with your GPS location.
❌Battery Life: The Bluetooth connection can drain the battery faster than expected.
✔️User-Friendly App: The app is simple and easy to set up, even for non-techy users.
❌Subscription Service: Some features require a paid plan after the free trial.
✔️Portable: Small enough to carry discreetly, making it perfect for teens.
Quick Overview
The SABRE Smart Pepper Spray combines safety and technology with its built-in Bluetooth and automatic alert system. It instantly notifies your contacts when you use it, adding an extra layer of protection. While still being Lightweight and compact, making it ideal for daily carry without feeling bulky.
This smart pepper spray is perfect for anyone looking for extra peace of mind. Whether you’re walking home late or just traveling, it sends your exact location to friends and family if you ever need to use it.
Plus, it’s super easy to carry around – it won’t take up any room in your bag or pocket.
The Bluetooth feature is also a game-changer. Once paired with your phone, it’s always ready to send an alert if things go wrong. And even though the app is pretty basic, that makes it even better because there’s no complicated setup or learning curve.
The downside? The battery might need to be recharged more often, but that’s a small price for some extra safety.
Automatic Location Sharing: Sends your real-time location to emergency responders.
Easy to Use: Simple button press activates the panic mode, making it quick and efficient.
Works with Smart Devices: Connects to smart devices like Apple Watch and Amazon Alexa for even faster response.
Pros and Cons
Pros
Cons
✔️Accurate location tracking: Keeps emergency services updated with your exact whereabouts.
❌Subscription required: You have to pay a monthly fee to access the full features.
✔️Discreet activation: You can trigger an alert without making it obvious to those around you.
❌U.S.-only coverage: The app only works in the U.S., limiting use for international users.
✔️Affordable subscription plans: Plans are under $5 per month, keeping it budget-friendly.
Quick Overview
Noonlight is an app designed to keep you safe by sharing your real-time location with emergency services at the press of a button. It offers seamless integration with smart devices and provides a very reliable way to get help quick. With its accurate location tracking and discreet activation, Noonlight ensures peace of mind whether you’re at home or on the go.
Noonlight stands out from the rest because it’s super easy to use and has a really simple design. So that even non tech-focused teens can quickly understand.
Whether you’re out with friends or walking home late, it only takes one tap to call for help. After this, your location is instantly sent to responders.
You can even connect it to your Apple Watch. This way, you don’t have to pull out your phone. Which is pretty handy if you’re in an uncomfortable situation.
What makes Noonlight even cooler is that it keeps updating your location while you’re moving. So even if you don’t know exactly where you are, Noonlight does.
The subscription is pretty affordable too—it’s less than the price of a coffee. Which is pretty cheap considering it gives you some serious peace of mind knowing you have backup if anything goes wrong.
This app is perfect for teens who want to stay safe, especially when they’re out alone or in unfamiliar places.
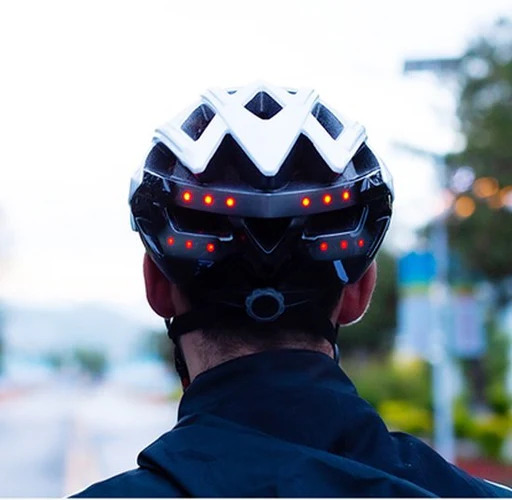
Built-in Turn Signals: The LIVALL BH60SE features LED turn signals activated by a handlebar remote, improving visibility and safety when turning.
Integrated Brake Light: A rear-facing brake light automatically activates when slowing down, enhancing your visibility to drivers.
Bluetooth Connectivity: Includes built-in Bluetooth for hands-free calls and music, keeping you connected while riding.
Pros and Cons
Pros
Cons
✔️Enhanced Safety: Built-in signals and brake lights make you more visible to drivers, especially in low light.
❌Battery Life: The battery for lights and Bluetooth needs regular charging.
✔️Bluetooth Integration: Lets you take calls and listen to music without needing additional devices.
❌Price: On the higher end of the budget for bicycle helmets.
✔️Comfortable Fit: Adjustable straps and padding ensure a snug, comfortable fit.
Quick Overview
The LIVALL BH60SE is a smart choice for cyclists who prioritize safety and connectivity. It integrates turn signals and brake lights directly into the helmet, making it easier to signal turns and stops. With added Bluetooth functionality, it combines safety with great convenience.
The LIVALL BH60SE helmet is a standout option for cyclists who want to boost their safety on the road. With integrated LED turn signals and a brake light, it makes signaling turns and stops super easy. This visibility is crucial, especially when riding in low light or during the evening, helping to alert drivers to your movements.
The helmet’s Bluetooth feature adds convenience, allowing you to take calls and listen to music without fumbling around with your phone.
Now as a dutch teen who cycles all the time, I wouldn’t recommend it to more experienced cyclers like myself. However, if you just recently started cycling or you cycle in a very busy invorenment and you want some extra safety. Then this is a great option.
Although it’s on the higher end of the budget, the LIVALL BH60SE is a smart investment for those who value both safety and cool tech integration.
Its comfortable fit and advanced features make it a reliable choice for everyday cycling. Ensuring you stay seen and connected on the go.
Compact and Lightweight: Easy to carry or wear without drawing attention.
110dB Loud Alarm: Effective in alerting others and scaring off potential threats.
Built-in LED Light: Provides additional visibility in low-light situations.
Pros and Cons
Pros
Cons
✔️Effective Alarm: The 110dB sound is loud enough to attract attention quickly.
❌Basic Features: Primarily an alarm with minimal extra functions.
✔️Compact Design: Small and easy to carry, making it discreet.
❌Battery Life: Requires frequent battery changes.
✔️LED Light: Helps in dark environments for added safety.
Quick Overview
The KOSIN Safe Sound Personal Alarm is a great option if you need a wearable device for emergency notifications. Its compact size makes it discreet, while the 110dB alarm ensures that you’ll be heard in a emergency situation. The added LED light is useful for visibility at night, making this alarm both practical and reliable.
The KOSIN Safe Sound Personal Alarm is a smart choice. It is perfect for anyone who wants a discreet yet powerful emergency alert device. Its compact size makes it easy to carry on a keychain or wear as a pendant. Blending seamlessly into your daily life without drawing any attention.
Despite its small size, it packs a punch with a 110dB alarm that’s loud enough to be heard from a distance. Which can be crucial in urgent situations.
Additionally, the built-in LED light enhances safety in low-light environments, making it easier to see and be seen by others.
So, the KOSIN Safe Sound Personal Alarm has a loud alarm and a useful light feature. Which makes it a handy tool for teens looking for a reliable way to stay safe.
Whether you’re walking home at night or simply want an added layer of security. This alarm provides peace of mind in a compact, user-friendly package.
Customizable Watch Faces: Change your watch face to match your mood or style with tons of fun designs.
Customizable Watch Faces: Change your watch face to match your mood or style with tons of fun designs.
Activity Tracking: Keep track of your workouts, steps, sleep, and heart rate—all from your wrist.
Pros and Cons
Pros
Cons
✔️Affordable: Great value for all the features it offers.
❌Basic App Store: Limited third-party apps compared to more expensive options.
✔️Lightweight: Comfortable to wear all day without feeling bulky.
❌No Speaker: Alexa responses are text-based, not voice.
✔️Long Battery Life: Can last up to 9 days on a single charge.
❌Plastic Build: It doesn’t have the premium feel of more expensive models.
Quick Overview
The Amazfit Bip U Pro is an affordable smartwatch that delivers most essential features like health tracking, Alexa integration, and customizable watch faces. Making it a solid pick for teens. Its lightweight design and long battery life add to the convenience. However, the limited app store and basic build may be downsides for some. Click here to read about the best smartwatches under $80
The Amazfit Bip U Pro is a great smartwatch for teens who want a lot of functionality without spending a fortune.
One of the coolest things about this smartwatch is how customizable it is. For example, you can change the watch face whenever you feel like switching things up. Which is perfect for anyone who likes to express their style.
Plus, having Alexa right on your wrist is super convenient. It allows you to set reminders for homework or even ask questions without having to pull out your phone.
While it might not have as many apps as more expensive watches, it covers the basics pretty well. Everything from tracking your workouts to keeping an eye on your sleep, this smartwatch can do it.
It’s also really light, which makes it comfortable to wear all day long. You also won’t need to charge it every night thanks to its long battery life.
So, if you’re looking for a smartwatch that focuses on the essentials and offers solid customization for under $60, then this one’s definitely worth considering.
Customizable Planners: Create and personalize planners, notebooks, and calendars to fit your style and needs.
Handwriting Support: Write and draw directly in the app using the Apple Pencil for a more natural experience.
Seamless Syncing: Syncs across iPhone, iPad, and Mac using iCloud, so your notes are always up to date.
Pros and Cons
Pros
Cons
✔️Easy syncing: Syncs automatically between iPhone, iPad, and Mac through iCloud.
❌iOS-only: Only available for Apple devices, no Android support.
✔️Handwriting support: Works perfectly with the Apple Pencil for handwritten notes and doodles.
❌Costly in-app purchases: Requires payment for additional templates or features.
✔️Variety of templates: Offers lots of pre-designed planners, calendars, and notebook layouts.
❌Limited collaboration: Does not offer real-time collaboration like some alternatives.
Quick Overview
GoodNotes 6 is a powerful digital planner that lets you create customized planners, take handwritten notes, and sync everything seamlessly across all your Apple devices. It’s also packed with features like handwriting support and various templates. However, it’s limited to the Apple ecosystem and may involve extra costs. Overall, it’s ideal for students and professionals who want an easy, flexible planning tool across their iOS devices.
GoodNotes 6 is an awesome choice for students or teens who use Apple devices. It makes planning super easy, whether you’re tracking homework, personal goals, or other activities.
You can handwrite notes using the Apple Pencil or type things out, which gives you loads of flexibility. The app’s syncing across devices means you can start planning on your iPad and quickly pick up on your iPhone or Mac without any hassle.
The big downside is that it’s only available for iOS and macOS, so if you’re using an Android device, this won’t work for you. Plus, you’ll have to pay for some of the cooler templates and extra features.
However, if you’re already deep into the Apple ecosystem. Then the GoodNotes 6 makes a lot of sense and is definitely worth the investment.
Real-time Focus Tracking: Tracks and provides live feedback on your focus levels.
Focus Coaching: Offers personalized suggestions to help improve your concentration.
Compact Design: Small, clip-on design makes it easy to wear without being intrusive.
Pros and Cons
Pros
Cons
✔️Real-time data: Keeps you aware of your focus at all times.
❌Requires phone app: Needs your phone for tracking and feedback.
✔️Custom coaching: Adjusts to your habits to help you stay on task.
❌Battery life could be better: You’ll need to recharge it daily.
✔️Lightweight and discreet: You can wear it without noticing it’s there.
❌Can be distracting: Notifications can sometimes pull you out of your focus.
Quick Overview
The FOCI 2 is a wearable designed to help improve concentration by tracking your cognitive state and offering feedback through an app. It’s perfect for anyone looking to boost focus during study sessions or work tasks. With real-time tracking and personalized coaching, it helps you stay focused without being intrusive. However, this isn’t a miracle product and this product alone probably won’t solve you getting distracted.
The FOCI 2 is a cool little device that clips onto your waist and monitors your breathing patterns to track your focus. It syncs up with an app on your phone, giving you live feedback. This feedback is mostly about when you’re concentrating and when your mind is wandering.
Which makes it a perfect study companion or tool for when you’re trying to focus during long sessions.
What makes this wearable even better is the personalized coaching it offers. Over time, it learns your habits and gives you tips on how to stay more focused.
The design is small and lightweight, so it won’t get in your way, which is a plus if you’re trying to keep things low-key. But the notifications from the app can sometimes be a bit distracting. Which kind of defeats the point of this whole device.
The battery life isn’t great, so daily recharges are a must. Still, it’s a great option for teens looking for a little extra help staying focused during those study marathons.
Again, just to clarify that this is not a miracle product so you shouldn’t go into this thinking that this will solve or your distractions.
Role-Playing Game Elements: Turn your tasks into a game with avatars, quests, and rewards.
Customizable Rewards: Create and assign rewards for completing tasks to stay motivated.
Social Features: Join guilds and participate in challenges with friends for added motivation.
Pros and Cons
Pros
Cons
✔️Engaging Gamification: Makes task management fun and interactive.
❌Learning Curve: It might take some time to get used to the app’s features.
✔️Flexible Rewards System: Customize rewards to fit your personal goals.
❌In-App Purchases: Some features and rewards require additional payments.
✔️Community Support: Connect with others to stay motivated and accountable.
Quick Overview
Habitica transforms managing tasks into a fun game by incorporating role-playing elements. You get to create an avatar, complete quests, and earn rewards for your real-life accomplishments. The app’s customizable rewards system and social features, like guilds and challenges, keep you motivated and engaged. While there is a bit of a learning curve and some features come with extra costs. Habitica still makes productivity enjoyable and interactive.
Habitica turns task management into an adventure. You create a customizable avatar and earn rewards for completing tasks, just like in a role-playing game. This gamified type of approach makes getting things done more exciting and less of a chore.
You can set up personal rewards, like a movie night or a treat, to motivate yourself even further. Habitica also lets you join guilds and take part in challenges, so you’re not tackling tasks alone. The app’s social features help keep you accountable and connected with friends.
The only downsides are that there’s a bit of a learning curve and the possibility of extra costs for some additional features. But overall, Habitica offers a unique and engaging way to stay productive.
Integrated Pomodoro Timer: Keeps you focused with timed work sessions.
Adjustable Color Temperature: Customize lighting to suit your task and mood.
Wide Coverage: Provides ample light for large desks and workspaces.
Pros and Cons
Pros
Cons
✔️Pomodoro Timer: Helps manage your work sessions and breaks effectively.
❌Price: On the higher end of the budget spectrum.
✔️Customizable Lighting: Adjust the color temperature for different tasks.
❌Size: Larger footprint may take up more desk space.
✔️Wide Light Coverage: Illuminates your entire workspace evenly.
Quick Overview
The BenQ e-Reading Desk Lamp is an excellent choice for those who need a smart lamp with some productivity features. Its built-in Pomodoro timer is perfect for managing study sessions and breaks, helping you stay focused and efficient. The lamp also offers adjustable color temperature, allowing you to tailor the lighting to your needs.
The BenQ e-Reading Desk Lamp with Bluetooth Speaker is a fantastic choice for teens looking to boost their study sessions with smart features. The built-in Pomodoro timer helps you break your work into manageable intervals. Which makes it way easier to stay focused and avoid burnout.
This feature is especially useful for tackling long study periods or assignments. As it ensures you take regular breaks to recharge.
Additionally, the lamp offers adjustable color temperature, allowing you to customize the light based on the task at hand. So, whether you need bright light for detailed work or a warmer tone for a relaxing reading session this lamp can do it.
The wide light coverage is also particularly useful for large desks, ensuring your entire workspace is evenly illuminated.
While it’s a bit pricey and has a larger footprint compared to some other lamps. Its features are still worth the investment for a more productive and comfortable study environment.
Elegant Design: A stylish piece of jewelry that blends in with any outfit.
Health Tracking: Monitors sleep, stress, and activity levels alongside notifications.
Long Battery Life: Lasts up to 8 days on a single charge.
Pros and Cons
Pros
Cons
✔️Fashion-forward look: It looks like a regular bracelet, making it a seamless accessory.
❌No screen: Some might prefer a more obvious display for notifications.
✔️Comprehensive health tracking: Goes beyond just notifications, including fitness and wellness data.
❌Limited app support: Only works with select apps for notifications.
✔️Long battery life: No need for constant recharging, making it super convenient.
❌Pricey for the features: Some might feel it’s expensive for what it offers compared to regular fitness trackers.
Quick Overview
The Bellabeat Ivy is perfect for teens looking for smart jewelry that doesn’t scream high-tech. It balances style with practicality, offering discreet notifications and some solid health-tracking features. Priced just under $40, it’s a premium piece for those who value both fashion and function.
The Bellabeat Ivy is great for anyone who wants to stay connected but doesn’t want to look like they’re wearing a piece of tech. It’s sleek and stylish, which is perfect if you don’t want to sacrifice your look just to get notifications. Whether you’re in school or hanging out with friends, this bracelet blends right in.
Besides just showing notifications, it’s also a health tracker, which means you can keep an eye on your stress, sleep, and activity levels. It’s like having a smartwatch on your wrist, but a lot more fashionable.
One downside is that it doesn’t have a visible screen, so you’ll need to check your phone for details. But if you want a discreet option, this is a solid pick.
So, whether you’re looking to stay connected in a subtle way or want a cool accessory with some smart features. The Bellabeat Ivy will give you that balance of tech and style.
25L Capacity: Enough space for a 15″ laptop, books, and gadgets.
10W Solar Panel: Charges devices with the power of the sun, even on the go.
Built-in Battery Pack: Stores energy for charging your phone, tablet, or other devices anytime.
Pros and Cons
Pros
Cons
✔️Durable Design: Made from recycled materials, so it’s both eco-friendly and tough.
❌Bulkier than regular backpacks: The solar panel adds some weight.
✔️Reliable Solar Power: Even on cloudy days, it stores enough power to keep devices charged.
❌Higher price tag – Still under $300, but more expensive than non-solar backpacks.
✔️Water-resistant: Protects your gear from rain or spills.
Quick Overview
The Voltaic Systems Array Solar Backpack is perfect for anyone who’s always on the move. It helps you keep your devices charged without needing to find a power outlet. It comes with a 10W solar panel and a built-in battery pack, giving you sustainable power for all your gadgets. The durable and water-resistant design ensures your tech is safe wherever you go.
The Voltaic Systems Array Solar Backpack is all about convenience for people who are always on the go. Whether you’re walking to school or biking around town. This backpack keeps your devices powered using solar energy, so you’re never ever stuck with a dead phone.
The built-in battery is also super handy. What it does is store energy, meaning you can charge your devices even when the sun isn’t shining. It’s also large enough to carry everything you need, from a laptop to textbooks and snacks.
One of the coolest things about this backpack is that it’s made from recycled materials. That means not only are you using renewable solar energy, but you’re also doing your part for the environment by using a sustainable product.
The only real downside is that it’s a bit bulkier than regular backpacks due to the solar panel. However, the charging capabilities make up for it.
So if you’re someone who hates hunting for outlets or just love some cool tech, this backpack is a game-changer!
Battery Life: Lasts up to 10 hours, perfect for staying warm during long bus rides.
3 Heat Settings: You can adjust the warmth based on how cold it is outside.
Lightweight and Water-Resistant: Keeps you warm without feeling bulky, even on rainy mornings.
Pros and Cons
Pros
Cons
✔️Long battery life: Keeps you warm throughout your day.
❌Limited sizing: Some sizes sell out quickly.
✔️Long battery life: Keeps you warm throughout your day.
❌Battery placement: Battery pack can feel bulky if you’re carrying a backpack.
✔️Fast heating: Starts warming up in seconds, no waiting around in the cold.
Quick Overview
The ORORO Men’s Heated Jacket is designed for cold weather with three adjustable heating levels and a battery that lasts up to 10 hours. It’s lightweight, water-resistant, and machine washable, making it a very convenient choice for everyday use. Whether you’re waiting for the bus on a chilly morning or just heading out for a walk, this jacket provides warmth and comfort at the push of a button.
Let’s face it—waiting for the bus or cycling/walking to school on cold mornings can be very brutal. The ORORO Men’s Heated Jacket is a real lifesaver in those moments.
It heats up quickly, so you won’t be shivering long. Plus, it’s super lightweight, meaning you won’t feel like you’re wearing a gigantic puffer coat. Even better, you can adjust the heat depending on just how cold it is. Whether it’s just a little chilly or completely freezing, this jacket has got you covered.
The battery lasts up to 10 hours, which is more than enough for school days or just hanging out with friends outside. And yes, you can even wash it in the machine—no need to worry about ruining it.
One tiny downside however is that the battery pack can feel a bit bulky, especially if you’re already carrying a backpack, but it’s not a deal-breaker. All in all, this jacket is a solid pick if you’re looking to stay warm without breaking the bank.
Built-in sensors: Tracks steps, calories burned, and distance through Xiaomi’s app.
Comfortable and lightweight: Designed with a breathable upper and cushioned sole for everyday use.
Affordable tech: One of the most budget-friendly smart shoes with health tracking features.
Pros and Cons
Pros
Cons
✔️Accurate fitness tracking: Great for keeping up with daily activity and fitness goals.
❌Limited design customization: No customizable colors or lights.
✔️Affordable: Smart shoe tech at a fraction of the price of competitors.
❌Basic tracking features: Lacks advanced metrics like heart rate or stride analysis.
✔️Lightweight: Comfortable for all-day wear or workouts.
Quick Overview
The Xiaomi Mijia Smart Sneakers offer fitness tracking at a ver affodrable price point. With its built-in sensors to measure steps, distance, and calories burned make it a standout shoe. Paired with Xiaomi’s app, you can easily track your progress over time. The shoes are lightweight and designed for comfort, making them a great everyday sneaker with added smart features.
If you’re looking for smart shoes without spending too much, the Xiaomi Mijia Smart Sneakers are a solid option. These shoes track your steps, calories, and distance.
So whether you’re running or just walking around, you can easily see your progress on the app. It’s not as fancy as some of the higher-end smart shoes, but it does the job at a price that won’t hurt your wallet.
They’re also really lightweight, which makes them super comfortable for wearing all day, whether you’re at school or out with some friends.
The only real downside is that they don’t have flashy lights or tons of design customization. However, for fitness tracking and everyday comfort, they’re definitely worth considering.
If you’re new to smart shoes and want something that’s affordable and useful, these are a great first step!
1080p Full HD Display: Crystal-clear visuals with a Full HD resolution.
Lightweight & Comfortable: Weighs only 79g, so you can wear it for long periods.
Immersive 130-inch Virtual Display: Creates a massive screen effect right in front of your eyes.
Pros and Cons
Pros
Cons
✔️High-quality visuals: Full HD resolution brings sharp and immersive images.
❌Limited AR capabilities: Focuses more on display quality than interactive AR features.
✔️Portable and lightweight: Easy to carry and comfortable for extended use.
❌No built-in battery: Must be connected to a device to work.
✔️Wide compatibility: Works with many devices, from phones to gaming consoles.
Quick Overview
The Xreal Air AR Glasses offer an affordable entry point into augmented reality, focusing on enhancing media experiences. With a large virtual screen and excellent Full HD resolution, they’re perfect for watching videos, gaming, or working while on the go. However, it’s less about interacting with the world in AR and more about creating an immersive personal screen.
The Xreal Air AR Glasses are a game-changer for anyone looking to experience augmented reality without spending too much. These glasses project a giant 130-inch screen right in front of your eyes. Which makes them perfect for watching videos, playing games, or even browsing the web. Whether you’re using them on a phone, tablet, or console, the 1080p Full HD display will give you sharp and vivid visuals.
One of the best things about the Xreal Air is how comfortable they are. Weighing only 79g, they’re super light, so you can wear them for hours without getting tired.
Plus, they work with tons of different devices, so you can connect them to pretty much anything, making them really versatile.
On the downside, these glasses don’t offer deep AR functionality like some higher-end options might do. Instead, they’re more focused on giving you an immersive screen rather than letting you interact with the real world through AR.
And because they don’t have a built-in battery, you’ll need to keep them connected to your device. But if you’re looking for a way to upgrade your media experience, these glasses are a fantastic choice.
Fast Heating: Heats your food in just 10-15 minutes.
Portable Design: Compact and easy to carry, perfect for school or on-the-go.
Rechargeable Battery: No need to find an outlet, heat your food anywhere.
Pros and Cons
Pros
Cons
✔️Quick heating: Gets your meal ready fast.
❌Battery life: Only lasts for about 1-2 uses per charge.
✔️Portable: Small and fits in most backpacks or bags.
❌Limited capacity: Doesn’t hold a large amount of food.
✔️Easy to use: One-button activation makes it simple.
Quick Overview
The Hot Bento Self-Heating Lunch Box is perfect for anyone who wants a warm meal without having to use a microwave. With a fast heating system and compact design, it’s ideal for school, work, or anywhere on the go. However, the small size and the limited battery life might be a downside for some.
The Hot Bento lunch box is a game-changer for anyone who’s tired of eating cold lunches. Whether you’re at school or out with friends, this smart lunch box heats your food quickly. All you have to do is just press a button, and you’ve got a warm meal in under 15 minutes.
Its compact size makes it super easy to carry, fitting into most bags, and it’s powered by a rechargeable battery. Which means that you don’t need to search for a plug when you’re out and about, which is pretty convenient.
However, the downside is that the battery only lasts for about 1-2 uses, so you’ll need to recharge it often. Plus, if you’re someone who likes bigger meals, the box’s capacity may feel a bit small.
Still, it’s a solid option if you’re looking for a lunch box that heats your food fast and can easily fit into your school or work routine.
Compact and lightweight: Easy to carry in your bag for smoothies wherever you are.
20-second blend time: Quick, efficient blending for busy days.
USB-rechargeable: Convenient charging from any USB port, no outlet needed.
Pros and Cons
Pros
Cons
✔️Portable size: Fits in a cup holder, making it perfect for travel.
❌Limited blending capacity: Can only make small smoothies, so not ideal for larger portions.
✔️Powerful enough for smoothies: Handles fruits and even ice pretty well for a small blender.
❌Needs frequent recharging: May need to be charged often if used regularly.
✔️Affordable: Budget-friendly for teens and students.
Quick Overview
The Nutribullet GO is an affordable and highly portable blender that’s perfect for anyone looking to make quick smoothies while on the go. Its compact design and USB-rechargeable battery make it super convenient for daily use. Especially for teens and students who need something simple and efficient. While it’s small, it’s powerful enough to blend your favorite fruits for a tasty fresh smoothie.
If you’re always on the go, the Nutribullet GO is an awesome pick. Whether you want to hit the gym, school, or just keep up with healthy eating, this blender makes it easy to whip up a smoothie fast.
It’s super lightweight and fits right in your bag or even a cup holder. Making you able to take it with you without any hassle. Just charge it via USB, and you’re good-to-go.
While it won’t make huge batches, it’s great for single-serving smoothies or protein shakes. Plus, the 20-second blend time means you won’t be standing around waiting.
The only real downside is that you’ll need to charge it often if you use it every day. However, with the convenience of USB charging, that’s not a big deal. Overall, it’s a solid choice for teens who want to keep up their healthy habits on the move!
Compact size: Perfect for small kitchens or dorm rooms, making it easy to store.
Quick cooking: Preheats in minutes, allowing you to whip up waffles in no time.
Versatile: Not just for waffles! Great for pancakes, eggs, and even hash browns.
Pros and Cons
Pros
Cons
✔️Easy to use: Just plug it in and pour in the batter for hassle-free cooking.
❌Limited capacity: Makes one small waffle at a time, which can be slow for larger gatherings.
✔️Affordable: Great value for the features it offers.
❌No temperature control: Can only cook at one set temperature, so it may take a bit of trial and error.
Quick Overview
The Dash Mini Waffle Maker is an excellent choice for anyone looking to enjoy some delicious waffles. Without taking up too much space or spending a fortune. It’s user-friendly and versatile, letting you create a variety of breakfast items in just a few minutes. This little gadget is perfect for individuals or small families who want quick and tasty meals.
The Dash Mini Waffle Maker is a must-have for anyone who loves breakfast or brunch. Its compact design means it won’t clutter your counter, and it’s perfect for small kitchens or dorm rooms.
It heats up quickly, so you can make a waffle in just a few minutes, which is great for busy mornings or late-night cravings. Fun fact, I actually own one of these and I can confidently say that it does not disappoint.
What makes this waffle maker even more appealing is its versatility. You can whip up not only waffles but also pancakes and even some savory options like mini omelets or hash browns.
While it does make only one small waffle at a time, the taste and ease of use more than make up for it. Just plug it in, pour in your batter, and enjoy a delicious breakfast that’s ready in a flash!
Compact design: Fits perfectly on small kitchen counters, making it ideal for teens or dorm rooms.
4-quart capacity: Enough to cook snacks for yourself or share with friends, but not too big to take up space.
Multi-function cooking: Air fry, roast, reheat, and dehydrate options for more than just crispy fries.
Pros and Cons
Pros
Cons
✔️Quick cooking: Gets snacks done faster than a traditional oven.
❌Limited capacity: Great for snacks or small meals, but not big enough for large family portions.
✔️Easy to clean: Non-stick basket and dishwasher-safe parts make cleanup easy.
❌Preheat time: It takes a couple of minutes to preheat, which might be slower than microwaving.
✔️Healthier frying: Requires little to no oil, giving you the crispiness without the extra calories.
❌No preset buttons: You need to manually set the time and temperature for each use.
Quick Overview
The Ninja AF101 is an excellent compact air fryer for anyone looking to enjoy crispy snacks without the guilt. Its small size and multi-functionality make it a versatile option for teens or small households. It’s perfect for making quick, healthier versions of your favorite snacks, from fries to chicken nuggets.
If you’re like me and love a good snack but don’t want to load up on greasy, fried food, the Ninja AF101 is a great choice. It’s small enough to fit on any counter, whether it’s your home kitchen or a tiny dorm space. With just a little oil, it delivers that crispy, golden texture we all crave. However, this time minus the guilt.
What’s also cool is that it’s more than just an air fryer. You can roast veggies, reheat leftovers, or even dehydrate fruit for healthy snacks. However, keep in mind that its 4-quart size isn’t massive, so it’s best for max one or two people.
That said, it cooks fast and is super easy to clean—just pop the parts in the dishwasher, and you’re done! Whether you’re cooking fries or experimenting with new recipes, this air fryer makes it fun and easy to snack healthier.
Beginner-friendly kit: Perfect for teens or anyone just starting in molecular gastronomy.
Comes with 50 recipes: Step-by-step guides make it easy to explore new techniques.
Includes essential tools: Spoons, pipettes, and silicone molds to get you started right away.
Pros and Cons
Pros
Cons
✔️Detailed instruction guide: Makes it easy to learn molecular cooking techniques without getting overwhelmed.
❌Not much room for advanced users: This kit is more for beginners, so you might outgrow it.
✔️High-quality tools: Durable materials ensure the kit lasts a long time.
❌Smaller quantities of ingredients: You might need to buy more if you experiment a lot.
✔️Wide variety of recipes: You can experiment with lots of different textures and flavors.
Quick Overview
The Molecule-R Cuisine R-Evolution Kit is a perfect way to dive into the world of molecular gastronomy. It includes essential tools and ingredients for creating fun dishes like edible foam, flavor pearls, and even gels. With easy-to-follow recipes, this kit is designed for teens interested in food science and those new to this modern culinary style.
The Molecule-R Cuisine R-Evolution Kit is a super fun entry point into molecular gastronomy. Especially so for teens who love experimenting in the kitchen.
The kit comes with all the basics you need to get started, like agar, lecithin, and sodium alginate. Along with more tools like syringes and silicone molds to create cool textures and dishes. Whether you’re turning liquids into tiny flavor spheres or making foam out of juice, it’s like turning your kitchen into a food science lab.
The 50 recipes included in the box really help take the guesswork out of figuring out what to make. If you’ve never heard of spherification or emulsification, no worries. The guide breaks it down in a way that’s super easy to understand.
Plus, while the kit is perfect for beginners, once you get the hang of things, you might want to move on to more advanced techniques. But for starting out, it’s an awesome way for teens to get creative with food!
Two-way translation: Real-time translation in both directions for natural conversations.
40 languages and 93 accents: Wide coverage for most global travelers.
Offline translation mode: Translate even without an internet connection for some languages.
Pros and Cons
Pros
Cons
✔️Two-way translation: Seamless back-and-forth conversations without delays.
❌Limited offline options: Not all languages are available offline.
✔️Multiple languages and accents: Covers a huge range, perfect for international trips.
❌Battery life: Around 3 hours per use, which may feel short for longer conversations.
✔️Offline mode: Useful when you can’t connect to Wi-Fi or data.
Quick Overview
The Timekettle WT2 Edge earbuds are a solid choice for anyone needing reliable, real-time translation while on the go. With support for 40 languages and 93 accents, these earbuds allow smooth conversations in many parts of the world. The offline mode is also handy when you’re traveling in places without strong internet connections.
The Timekettle WT2 Edge earbuds are like having a real-life translator with you at all times. Whether you’re traveling for fun or just trying to connect with people globally, they make communication super easy.
Their two-way translation lets both sides of the conversation feel natural—so you can speak and hear translations in real time. This makes conversations flow smoothly, without the awkward pauses you usually get with other translation devices.
These earbuds also stand out because they cover a huge range of languages and accents. Whether you’re in Spain or Japan, the WT2 Edge has you covered.
And with offline mode, you’re not stuck when there’s no Wi-Fi. However, it’s worth noting that only a few languages are available offline. Battery life could also be a downside if you’re using them for long periods, but for quick conversations or day-to-day travel, they work pretty well.
For teens or students who love to travel or want to make new friends worldwide, these earbuds are an amazing tool. They give you the freedom to explore new cultures without having to worry about language barriers.
4K UHD camera: Captures sharp and clear aerial footage to make your travel shots pop.
30-minute flight time per battery: Comes with two batteries, giving you up to 60 minutes of flying time.
GPS-assisted intelligent flight: Features like return-to-home and follow-me mode make flying easier.
Pros and Cons
Pros
Cons
✔️Long battery life: With two batteries, you get plenty of time for extended shooting sessions.
❌No obstacle avoidance: You’ll need to be cautious when flying in tricky areas.
✔️4K camera quality: Delivers crisp, high-quality photos and videos.
❌Bulky controller: The controller is larger than some might prefer, making it less portable.
✔️Easy to control: GPS features like auto return and follow-me mode add convenience for beginners.
❌Limited range: Its range isn’t as long as higher-end drones, so you might be limited in where you can fly.
Quick Overview
The Ruko F11 Pro is a solid choice for travelers wanting a budget-friendly drone with 4K camera quality. It offers impressive flight time thanks to its two batteries and is packed with useful GPS features, making it beginner-friendly. However, it lacks obstacle avoidance, so careful flying is necessary.
If you’re looking for a drone that gives you clear 4K footage without breaking the bank, then the Ruko F11 Pro might be your best bet. It’s designed with travelers in mind, offering a sturdy build and long battery life.
You can fly for up to 60 minutes, giving you plenty of time to capture epic aerial shots. So, whether you’re at the beach or in the mountains you’ll be able to capture that epic dron footage. Plus, it has a bunch of GPS features that make flying less stressful, like return-to-home and follow-me mode.
While it’s not as compact as some other drones, and the controller is a bit bulky, it’s still manageable to pack in your travel gear. You just need to be a little cautious since it doesn’t have obstacle avoidance. Which meanes it won’t automatically stop if something’s in the way. But overall, it’s a reliable, budget-friendly drone that’ll help you capture those unforgettable travel moments.
Built-in digital scale: Weighs your luggage instantly to avoid surprise fees.
GPS tracking: Keeps tabs on your luggage wherever you go.
Durable build: Hard-shell design protects your belongings during travel.
Pros and Cons
Pros
Cons
✔️Digital scale: Saves you from overweight baggage fees by giving real-time weight info.
❌Limited battery life: GPS may need frequent recharging on long trips.
✔️GPS tracking: Peace of mind, knowing exactly where your luggage is.
❌No TSA lock included: You might want to buy one separately.
✔️Scratch-resistant shell: Keeps your luggage looking fresh, even after rough handling.
Quick Overview
The Level8 Grace EXT Smart Luggage is a great option if you’re looking for smart travel gear. It combines tech features like a built-in scale and GPS tracking to make your trips way easier. With a sturdy shell and sleek design, it’s ideal for travelers who want peace of mind and to avoid overweight baggage surprises.
The Level8 Grace EXT Smart Luggage is perfect for anyone who wants to travel smart. The built-in digital scale is super useful when you’re packing for a trip, letting you check if your bag’s overweight without having to guess.
This can save you tons of money and stress at the airport. The GPS tracking is another great feature, especially if you’re the kind of person who’s worried about your luggage going missing during flights. It’s very reassuring to know exactly where your bag is at all times.
However, the GPS tracker’s battery might need charging more often, especially if you’re on longer trips. So, make sure you keep an eye on that.
Also, while the shell is tough and scratch-resistant, you might want to grab a TSA lock since it doesn’t come with one. All in all, this smart luggage makes traveling way easier, especially if you want to avoid surprises at the airport!
Global coverage: Stay connected in over 130 countries with one device.
No SIM needed: Works with a virtual SIM, so you don’t need to swap cards when traveling.
Long battery life: Up to 16 hours of usage, keeping you connected throughout the day.
Pros and Cons
Pros
Cons
✔️Global coverage: Access the internet in more than 130 countries with no hassle.
❌Limited to one device at a time: You can only connect one device, which can be a downside if you’re sharing Wi-Fi.
✔️No contracts: Pay for only what you use, with flexible data plans.
❌Pricey data plans: Pay-as-you-go can add up if you use a lot of data regularly.
✔️Power bank: Doubles as a power bank, so you can charge your phone on the go.
Quick Overview
The Skyroam Solis Lite is a compact and reliable portable Wi-Fi hotspot. It’s perfect for staying connected while traveling or handy when you’re in areas with weak Wi-Fi coverage. It doesn’t require a SIM card, so it’s super easy to use, and you don’t have to worry about swapping SIMs when traveling internationally. The battery life is impressive at up to 16 hours, making sure you stay online throughout the day.
The Skyroam Solis Lite is an awesome option if you want to stay connected no matter where you are. Whether you’re traveling or just in a spot with poor Wi-Fi, this little device is like having a personal hotspot in your pocket at all times.
One of the best things about it is that it works in over 130 countries without needing a SIM card! So you never have to worry about switching cards when crossing borders. You just turn it on, and you’re good to go.
Another great feature is it’s incredibly long battery life. If you’re on the go all day, this thing can last up to 16 hours! Making it perfect for road trips or flights. Plus, it doubles as a power bank, so you can quickly charge your phone when it’s running low.
The only real downside is that you can only connect one device at a time. Which isn’t ideal if you need to share the connection with friends. Also, the pay-as-you-go plans can get expensive if you’re a heavy data user. However, for casual browsing and staying in touch, it’s a solid pick.
40 tools in one: Includes a screwdriver, bottle opener, wrench, and more for all kinds of situations.
Slim design: Fits easily in your wallet or pocket without adding bulk.
Durable stainless steel: Built to last and withstand heavy use.
Pros and Cons
Pros
Cons
✔️Compact: Convenient to carry, so you’ll always have it when you need it.
❌No blade: It doesn’t include a cutting edge, so you’ll still need a knife for certain tasks.
✔️Multi-functional: Replaces several tools in one card, saving space and time.
❌No locking tools: Some tools might be harder to use since they don’t lock in place.
✔️Sturdy material: Made from stainless steel, which means it won’t break easily.
Quick Overview
The Lever Gear Toolcard Pro is a small & versatile multi-tool designed to help in unexpected situations. With 40 different tools, it packs a punch for such a small gadget. Which makes it a must-have for those who like to be prepared. Whether it’s tightening screws, opening bottles, or measuring things, this tool has got you covered.
The Lever Gear Toolcard Pro is perfect for teens who want a compact and useful gadget that doesn’t take up too much space. You can slip it right into your wallet like a credit card, and it’s ready whenever you need it.
Whether you’re on a trip, in school, or just hanging out, having something like this can really come in handy. From opening a bottle of soda to quickly measuring something for a project, it’s very versatile.
Even though it’s missing a cutting blade, which could be useful in certain situations, it makes up for it by offering a huge range of useful tools. For day-to-day tasks or small fixes, this little card is a great tool to have around. It’s especially good if you’re the type of person who likes to always be ready for anything!
Best 50 Gadgets for Teens – Conclusion
As we wrap up our journey through the best 50 gadgets of 2024, it’s clear that these tech treasures can truly transform your life. Whether you’re leveling up your school game or stepping up as a content creator. Being a tech-savvy teen is all about making smart choices.
These gadgets not only add fun and convenience but also promote other things like a more eco-friendly lifestyle. So, as you start thinking about your birthday wishlist or saving up your allowance, remember that investing in these game-changing devices will pay off. Your future self will definitely thank you! Now, go out there and explore the world of gadgets that can elevate your everyday experiences!
In the keyboard world, you have two types of keyboards: mechanical keyboards which have their own mechanism for every single keypress. And membrane keyboards which have one sheet of plastic for all the keys instead of individual mechanisms for every key.
The reason why most people don’t like membrane keyboards is because of their plastic layer instead of the individual switches for every key that mechanical keyboards have. This makes membrane keyboards feel cheap and low-quality. Another big reason why people prefer mechanical keyboards is because they are more durable and feel more high-quality. For gaming, a membrane keyboard is fine and most casual players won’t notice it in their gaming abilities. However, membrane keyboards do offer less durability so keep that in mind.
Membrane Keyboards Vs Mechanical Keyboards for Gamers
When it comes to gaming, membrane keyboards work well for casual players. They’re a lot quieter and softer, which makes them a great option if you’re planning to use your keyboard for more than just gaming. If you also use your keyboard for things like: schoolwork, social media, or even watching YouTube. Then soft feel of a membrane keyboard can make typing and everyday tasks a lot more comfortable. Plus, the keys have almost no travel time, meaning you don’t have to press down too hard on each key. This makes your typing way faster and just overall a lot easier. So if you’re multitasking between gaming and homework, a membrane keyboard could be the perfect fit for you.
(Image credit: throughtheeyesofateenager.com)
For serious gamers or professionals, though, mechanical keyboards offer something extra. They come with individual switches for each key, giving you better tactile feedback and responsiveness. Which makes a noticeable difference in fast-paced games like first-person shooters or strategy games. Every millisecond counts in competitive gaming, and that tactile feedback helps you hit your keys with a lot more accuracy. Mechanical keyboards also have that famous ‘clicky’ sound when you press the keys, which many gamers like myself find extremely satisfying. However, they’re definitely quite a lot louder. So if you’re gaming late at night or in a shared space, the noise might be a problem for those around you.
Here’s a quick breakdown to help you compare:
Membrane Keyboards:
Travel time: Shorter, making typing easier and faster
Sound: Quiet, perfect for shared spaces or late-night gaming
Comfort: More ergonomic due to lower height, good for wrist health
Mechanical Keyboards:
Feedback: Better tactile feel and key responsiveness
Sound: Louder, with the classic ‘click’ sound some gamers love
Customization: Often comes with extra features, but can be more expensive
In short, membrane keyboards are great for multitasking. Especially if you need something quieter and more ergonomic for long typing sessions. But if you’re a more serious gamer, then mechanical keyboards are 100 % the way to go. They offer better precision, faster response times, and a very satisfying typing experience. You might even find that investing a bit more in a mechanical keyboard improves your gaming performance. This is especially true in competitive or high-speed games. And if you want to take it a step further by adding accessories like a wrist rest. Then you can make your setup even more comfortable.
The Pros and Cons of Using a Membrane Keyboard for Gaming
When it comes to gaming, membrane keyboards have both their pros aswell as their cons. They’re affordable, which makes them a great choice if you’re on a budget. In fact, most membrane keyboards are priced under €50, so you don’t need to break the bank to get a decent membrane keyboard.
Membrane keyboards are also quieter compared to mechanical ones. If you’re gaming late at night or live with others, the soft key presses are a lot less disruptive. Plus, the keys have minimal travel time, which means you can type or game faster without having to fully press down on each key.
(Image credit: throughtheeyesofateenager.com)
However, there are also some downsides. Membrane keyboards lack the tactile feedback that mechanical keyboards offer. Since they don’t have individual switches under each key, you won’t feel the same satisfying clicky sound when you press a key.
This can make a huge difference in fast-paced games where accuracy is key. In fact, professional gamers often prefer mechanical keyboards because they’re more responsive. Membrane keyboards also tend to wear out faster. The rubber dome design inside them degrades over time. Which means you might need to replace them more often, especially if you game a lot.
Get all the latest post on through the eyes of a teenager straight in your inbox.
Subscribe to stay updated, it’s free!
Here’s a breakdown to help you decide:
Pros of Membrane Keyboards:
Affordable: Often under €50, perfect for budget-conscious gamers
Quiet: Great for late-night gaming without disturbing others
Fast typing: Short key travel makes it easy to type quickly
Cons of Membrane Keyboards:
Less responsive: No individual switches, leading to less tactile feedback
Wears out quicker: The rubber dome design breaks down faster with heavy use
Lacks precision: Lacks the precision and responsiveness needed for competitive gaming
In the end, membrane keyboards are great for casual gamers or those on a strict budget. However, they might fall short if you’re aiming for top-tier performance in fast-paced or highly competitive games. They offer quiet operation and faster typing speeds, but lack the responsiveness and durability of mechanical keyboards.
If you don’t mind replacing your keyboard every few years and prefer a softer, quieter typing experience. Then a membrane keyboard could be a good fit for your setup. Overall, I’d give membrane keyboards a 7/10 for gaming, as they’re solid for casual use but not quite up their for serious competitive gamers.
What to Look For in a Membrane Keyboard for Gaming
When shopping for a membrane keyboard for gaming, there are a few key things to keep in mind. First, you’ll want to check the key travel distance. Membrane keyboards typically have shorter key travel, which can make typing and gaming faster and a lot more comfortable. Look for a keyboard that strikes the right balance between speed and comfort. A shorter key travel means you won’t have to press the keys down too far. Which can heavily reduce strain on your fingers during long gaming sessions.
(Image credit: themotioncloud)
Next, think about the durability of the keyboard. While membrane keyboards are generally cheaper, they do wear out quite a bit faster than mechanical ones. Look for options with reinforced materials or splash resistance, especially if you tend to eat or drink near your setup.
Some models advertise up to 10 million keystrokes, meaning they can handle some pretty heavy use. It’s also good to check if the keyboard come with extra features like a wrist rest or some anti-ghosting technology. This helps ensure that all your key presses register accurately during intense gameplay.
Finally, don’t forget about customization options. While membrane keyboards aren’t as customizable as mechanical ones, you can still find models with RGB lighting, macro keys, and media controls.
RGB lighting is fun because you can personalize your setup, and let’s be honest here, everyone loves a colorful keyboard. Macro keys are also super useful for setting up shortcuts, especially in games where quick actions are needed.
Here’s a quick table to guide you in choosing the right membrane keyboard for gaming:
Feature
Why It’s Important
Key Travel Distance
Shorter travel helps with faster and more comfortable typing/gaming
Durability
Look for splash resistance and materials that last longer
Keystroke Lifespan
Aim for models that promise up to 10 million keystrokes
By keeping these factors in mind, you can find a membrane keyboard that not only fits your budget but can also greatly enhance your overall gaming experience. While membrane keyboards are not as flashy or long-lasting as mechanical ones. They’re still a great choice for casual gamers or those looking for a quieter option.
Quick Recap: Are Membrane Keyboards Good for Gaming?
When picking out a membrane keyboard for gaming, focus on key travel distance, durability, and extra features. Shorter key travel makes for faster and more comfortable typing, especially during long gaming sessions. Durability is key since membrane keyboards wear out a lot quicker than mechanical ones, so aim for splash resistance and models rated for at least 10 million keystrokes.
Don’t forget about fun extras like RGB lighting, macro keys, and anti-ghosting technology. These little touches can make your gaming experience way more enjoyable and even give you a slight edge in fast-paced games. All in all, membrane keyboards are great if you’re after a budget-friendly, quieter option for casual gaming.
Here are some of the best membrane keyboards for gaming in 2024 in my opinion:
Membrane keyboards use a rubber dome system for key presses, making them quieter and more affordable. In contrast, mechanical keyboards feature individual switches for each key, providing better tactile feedback and responsiveness. This can lead to a more satisfying typing and gaming experience, especially for competitive gamers. However, membrane keyboards are often lighter and more portable, making them easier to transport.
While membrane keyboards can work for casual gaming, they may not be the best choice for professional gamers. Competitive players often prefer mechanical keyboards due to their superior responsiveness, durability, and tactile feedback, which can be crucial in fast-paced gaming scenarios. Mechanical keyboards also tend to have customizable switches that can be tailored to individual preferences.
Cleaning a membrane keyboard is relatively straightforward. You can usually wipe the surface with a damp cloth, and most keyboards have a sealed design that helps keep out dust and dirt. For deeper cleaning, you might need to remove keycaps if they are removable, but care should be taken not to damage the membrane underneath. Regular cleaning can extend the life of your keyboard.
Struggling to remember the size of your monitor? Did you forget how a monitor was measured? Well, I’ve been there to and today I’m going over exactly what I think are the best ways to measure your monitor.
I’ll explain how to measure a monitor normally with a measuring tape. As well as using something called the Pythagorean theorem (trust me it’s way easier than it sounds) in just six steps.
After reading this you will never have to worry about your monitor size again. So get your ruler ready and lets get started!
What to keep in mind:
Only measure the screen: Make sure you’re only measuring the actual display area, not the bezels or frame around it.
Use a tape that measures in inches: Most monitors are advertised in inches, so using a measuring tape with inches will give you accurate results.
Measure diagonally: Always measure from the top left corner to the bottom right corner. This diagonal distance represents the true screen size.
When it comes to desktop computers and laptops, the screen size is just as important as the screen resolution. It plays a very crucial role in your productivity and can even help you determine the size of accessories, like screen filters, that you might need. So, how can you accurately measure your monitor size? Well, it’s easier than you may think!
Screen size refers to the actual physical size of the display itself and is typically measured in inches. You can often find the monitor size mentioned in the computer or laptop manual. It may also be displayed on a sticker on the device. However, if you can’t locate this information, you can easily measure it yourself using a measuring tape.
Steps to Measure Your Monitor Size:
Get a Measuring Tape: Ensure your measuring tape is long enough to measure your monitor comfortably.
Start at the Top-Left Corner: Position one end of the tape at the top-left corner of the screen.
Pull the Tape Diagonally: Extend the measuring tape diagonally across the screen to the bottom-right corner. If you prefer, you can start at the top-right corner and measure to the bottom-left.
Exclude the Bezels: Make sure to measure only the display area. Do not include the bezels or any casing surrounding the screen.
Read the Diagonal Distance: The distance you’ve measured diagonally is the official screen size of your monitor, usually in inches.
Measuring your monitor size is a quick and effective way to ensure you’re choosing the right products and maximizing your workspace. Whether you’re eyeing a new monitor or simply checking your current one, knowing how to measure it properly will make your tech decisions way easier!
How to Measure Your Monitor Size Using Math: A Simple Guide
If you like the sound of using math to measure your monitor size, don’t worry—it’s way easier than it sounds! With just a few basic calculations, you can figure out the exact screen size without having to measure diagonally. Here’s how you can do it step-by-step.
Get all the latest post on through the eyes of a teenager straight in your inbox.
Subscribe to stay updated, it’s free!
The size of a monitor is determined by the diagonal distance between the screen’s corners. While this is often measured using a tape, you can also calculate it using math by measuring the screen’s width and height. This method is especially handy if you don’t have a tape measure on hand.
Steps to Measure Your Monitor Using Math
Measure the Width of the Screen: Start by measuring the width of the screen (just the display, not the bezels) from one side to the other. Make sure to measure in (or convert to) inches.
Measure the Height of the Screen: Next, measure the height of the screen, from the top to the bottom. Make sure to also keep this measurement in inches to ensure consistency with the width.
Square the Width: Multiply the width by itself to square the number. For example, if the width of your screen is 14 inches, you would calculate 14 x 14 = 196.
Square the Height: Do the same for the height. So, if the height is 8 inches, multiply 8 x 8 = 64.
Add the Two Results: Add the squared width and squared height together. In our example that is: 196 + 64 = 260.
Find the Square Root: Now, take the square root of that sum to get the diagonal size of the screen. For 260, the square root is √260 = 16.1 inches. You can do this with basically any calculator or online if you prefer that.
Important tip:
Make sure to measure the screen itself and avoid including any bezels or the frame in your measurements. Including these parts will give you an inaccurate screen size. Which can cause confusion when comparing monitors or buying accessories like screen filters.
Using this method, you can quickly and accurately calculate your monitor size without needing to measure diagonally. Whether you’re calculating for a new monitor or just checking your current one, this simple math trick gets the job done quick!
Why Knowing Your Monitor Size Matters
Your monitor size might seem like just another number, but it can make a huge difference in how you work, play, and experience your work. Think about it—if you’re gaming on a tiny 14-inch screen. Than you’re not going to get the same immersive experience as someone with a 27-inch monitor.
Studies have shown that larger screens can boost productivity by up to 30% because you can fit more windows and apps side by side. So, whether you’re editing a video, writing a school report, or even just scrolling through social media. That extra screen space means less switching between tabs and more getting things done!
When you know your monitor size, it’s also easier to buy the right accessories. For example, if you’re grabbing a screen protector, privacy filter, or even a cool desk setup, you need to know the exact dimensions. And let’s not forget about screen resolution—bigger monitors tend to support higher resolutions, which means sharper images and overall better clarity. So whether you’re binge-watching Netflix or working on a graphic design project. If you have the right monitor size you can take your experience to the next level.
Here’s a quick breakdown of how monitor size impacts different activities:
Activity
Recommended Monitor Size
Gaming
24 to 32 inches
Office Work/Multitasking
27 to 34 inches
Photo/Video Editing
27 inches and up
General Browsing
21 to 27 inches
Knowing your monitor size means you’ll be more equipped to make smarter decisions when it comes to upgrading or accessorizing your setup. Whether you’re choosing the perfect monitor for your workspace or figuring out how much room you need on your desk, that number matters way more than you think!
How to Choose the Right Monitor Size for Your Desk Setup
Choosing the right monitor size for your desk setup is more than just picking a display that looks cool. It’s about finding the perfect balance between comfort, productivity, and, let’s be honest, making your desk look awesome! With so many options out there, from ultra-wide monitors to compact displays, figuring out what fits your workspace and your needs can be pretty tricky. But don’t worry, I’ve got you covered with some key tips to help you make the best choice.
1. Consider Your Desk Space
Before you get too excited about that massive 34-inch curved display, take a good look at your desk first. The size of your workspace will heavily influence the size of the monitor that works best for you. A desk that’s too small for a large monitor can make things feel cramped and uncomfortable. You want enough space not only for the screen but also for your keyboard, mouse, and other essentials. Ideally, your monitor should sit at least 20 inches from your face to avoid eye strain, so factor in the depth of your desk as well.
2. Match Your Monitor to Your Work Needs
The type of work you do should guide your choice in monitor size. For example, if you’re into gaming or video editing, a larger screen, like a 27-inch or even an ultra-wide monitor, could be ideal. This lets you see more of your game or project in one glance without needing to scroll to much. On the other hand, if your tasks are more straightforward—like writing essays or browsing the web. Than a smaller screen (20 to 24 inches) might suit you just fine.
Monitor Size
Best For
20-24 inches
General use, web browsing, writing
25-27 inches
Gaming, multitasking, content creation
28-34+ inches
Ultra-wide setups, video editing, design, coding
3. Monitor Placement Matters
Another key factor you should consider when picking the right monitor size is how you plan to position it. For a multi-monitor setup, you may prefer slightly smaller screens, such as dual 24-inch monitors, to avoid neck strain. If you want a larger monitor, a curved display might be helpful because it wraps around your field of vision. Which makes it more ergonomic and immersive. However, keep in mind that whatever size you choose, you should position the top of the screen at or just below eye level for optimal comfort.
Choosing the right monitor size is all about blending function and comfort with your available space. Whether you’re creating content, gaming, or simply upgrading your home office setup, finding that perfect monitor will help you boost productivity and just create a more comfortable workspace.
You should ideally sit about 20 to 30 inches (around arm’s length) away from your monitor. For larger monitors, like 27-inch displays, sitting farther away helps reduce eye strain and ensures you can take in the whole screen comfortably.
Not necessarily. While larger monitors can offer more screen real estate for multitasking and immersive experiences like gaming, they may not be practical for small desks or certain tasks. It’s important to balance size with your workspace and the type of work you’re doing.
Ultra-wide monitors (typically 34 inches or more) are great for content creators, gamers, and multitaskers who want a panoramic view. However, they take up a lot of desk space, so make sure you have enough room for one before making the purchase.
In 2024, teen smartphone ownership has hit new heights, and the numbers are pretty mind-blowing. The average teen spends a massive 7 hours and 22 minutes glued to their smartphone every single day! That’s nearly a third of their entire day, dedicated to scrolling through social media, chatting with friends, watching videos, or gaming.
Smartphones have gone from being just a cool gadget to a daily essential in the life of a teenager. Whether it’s taking photos, staying up to date with the latest trends, or catching up on the latest YouTube videos. These devices have become the ultimate all-in-one tool for entertainment and connection.
But how many teens actually own these pocket-sized powerhouses? Well, the numbers show that almost every teenager in the US now has one (though ownership rates may vary in other parts of the world).
It’s no longer just about having a phone to make calls; it’s about having a mini-computer in their pocket that does it all. With smartphones becoming more affordable and accessible, it’s no wonder teen ownership has skyrocketed. From school assignments to social networking, teens rely on their smartphones for almost everything. Which blurs the line between leisure and productivity.
In 2024, a staggering 95% of teenagers own a smartphone, which is like saying everyone in high school has one. It’s not even a luxury anymore – it’s a necessity for us teens.
With so many apps, games, and social platforms, it’s no surprise that phones are pretty much glued to our hands. Plus, smartphones have become more affordable and accessible, so it’s not just for those with bigger budgets. Whether you’re gaming, scrolling through TikTok, or catching up on school assignments, the smartphone will always be there.
Get all the latest post on through the eyes of a teenager straight in your inbox.
Subscribe to stay updated, it’s free!
When you compare that to previous years, the jump is pretty insane. As shown in the graph below, in 2015 only about 73% of teens had smartphones. Fast forward to today, and that number has skyrocketed by over 20%. Even from 2020, when 88% of teens owned a smartphone, there’s been a noticeable increase.
It shows just how much tech has become an essential part of us teens daily lives. The rise in ownership isn’t just about phones getting cooler but about how we’re using them for more things. from studying to staying connected during the pandemic and beyond.
These statistics are estimates and may not be definitive. For the most accurate and up-to-date information, please refer to the sources listed below. (Image credit: Throughtheeyesofateenager.com)
What’s also cool is seeing how smartphone ownership breaks down by age. Among 13-14-year-olds, around 85% have a phone, but once you hit 15-17, that jumps up to 98%. It’s basically a must-have by the time you hit high school.
And when you look at the gender split, there’s a slight difference. 96% of teen girls own a phone compared to 93% of boys. It’s a small gap, but it reflects how digital communication and social media might play a bigger role for some girls, especially with the rise of platforms like Instagram and Snapchat. However, this is such a small difference that it doesn’t really mean much.
These statistics are estimates and may not be definitive. For the most accurate and up-to-date information, please refer to the sources listed below. (Image credit: Throughtheeyesofateenager.com)
Factors Influencing Teen Smartphone Adoption
Parental decisions and family dynamics play a huge role in smartphone ownership among teenagers. In many families, getting a smartphone for your teen is almost like a rite of passage. According to recent studies, about 70% of parents say they feel comfortable giving their kids a smartphone by the age of 13. I personally got my first smartphone by the time I was around 12 years old (I’m 15 now), which was considered pretty late at the time. This comfort often stems from the desire to stay connected, especially as kids head out into the world more independently.
In a survey, nearly 60% of parents reported that they believe having a smartphone improves family communication. They say having a smartphone makes it easier to keep track of their teens and ensuring safety. Here’s a quick overview of how family dynamics influence smartphone decisions:
Family Dynamic
Percentage of Parents Supporting Smartphone Ownership
Families with younger kids
45%
Families with teens
70%
Single-parent families
55%
These statistics are estimates and may not be definitive. For the most accurate and up-to-date information, please refer to the sources listed below. (Image credit: Throughtheeyesofateenager.com)
Socioeconomic factors also play a crucial role in determining smartphone ownership among teens. In families with higher incomes, ownership rates can reach up to 98%, while in lower-income households, it drops to about 80%. This disparity highlights how access to technology can vary significantly based on financial resources.
Many families may prioritize smartphones for educational purposes, especially with the rise of online learning tools. However, it’s not just about owning a device; it’s also about having access to reliable internet and apps that support learning.
Peer pressure and social norms are huge when it comes to smartphones. A whopping 85% of teens report feeling pressure to have the latest device to fit in with their friends. Which I as a teenager myself can relate to. This social influence shapes not only what phones us teens want but also how we use them.
With remote learning becoming the norm, educational requirements have shifted significantly. Around 72% of teens say they rely on their smartphones for schoolwork and online classes. I personally don’t use my smartphone for schoolwork but I do often use it for checking my homework or tests for the coming week.
Having a smartphone isn’t just about social media; it’s also about staying on top of assignments and connecting with classmates for group projects. As we navigate this tech-filled world, it’s clear that smartphones are more than just gadgets. They’re essential tools for our everyday life.
Smartphone Usage Patterns Among Teenagers
The average daily screen time for teens is astonishingly high, sitting at around 7 hours and 22 minutes! This number includes everything from scrolling through social media to binge-watching shows and playing video games.
With so much time spent on screens, it’s clear that smartphones have become central to teenage life. Interestingly, a survey found that 60% of teens believe they spend too much time on their devices, yet they find it hard to cut back. This might be because smartphones are our main connection to friends and entertainment, making it very tricky to put them down.
When it comes to the most popular apps and activities, social media reigns supreme. Platforms like TikTok and Instagram dominate, with about 75% of us teens using them daily. Gaming follows closely, with popular titles like Roblox and PUBG captivating millions of teens daily life. Here’s a quick look at the top activities teens engage in on their smartphones:
Activity
Percentage of Teens Engaging Daily
Social Media
75%
Gaming
65%
Streaming Videos
70%
Messaging Apps
80%
These statistics are estimates and may not be definitive. For the most accurate and up-to-date information, please refer to the sources listed below. (Image credit: Throughtheeyesofateenager.com)
Usage patterns can vary significantly between weekdays and weekends. On weekdays, screen time averages about 6 hours, mainly due to school-related tasks and socializing. However, on weekends, that number can jump to over 8 hours as teens have more free time to indulge in entertainment. This shift highlights how our schedules shape our screen habits. Which makes the weekends a prime time for binge-watching and gaming marathons.
While smartphones offer numerous benefits, their impact on academic performance can be a double-edged sword. About 60% of teachers report that smartphone distractions during class lead to lower grades for some students. On the other side, many students use their phones for educational resources. With 65% saying they rely on apps for studying and completing assignments. This means smartphones can be both a helpful tool and a source of distraction. Which further emphasizes the importance of balancing screen time with academic responsibilities.
Health and Social Implications of Teen Smartphone Ownership
Excessive smartphone use can seriously impact mental health, especially among teens. Research shows that teens who spend over four hours a day on their phones are 30% more likely to experience anxiety or depression. It’s not just about the time spent; it’s also the nature of social media interactions. Around 60% of teens report feeling pressured to respond to messages immediately, leading to a constant state of stress. This can create a vicious cycle where the need to stay connected actually makes us feel more isolated.
The effects of prolonged screen time extend beyond mental health into physical well-being. About 50% of teens experience eye strain, headaches, or neck pain due to so many hours spent looking at screens. The blue light emitted by our devices can also disrupt our sleep patterns. Which makes it harder to catch that much needed sleep. In fact, studies show that teens with high screen time report sleeping an average of 1.5 hours less per night compared to their peers. Here’s a quick list of common physical issues related to screen time:
Eye strain: 50%
Headaches: 45%
Sleep disruption: 70%
Neck/back pain: 40%
When it comes to social skills, smartphones can be a double-edged sword. While they help us stay connected, they can also hinder our ability to engage in real face-to-face conversations. A surprising 75% of teens feel that their communication skills have declined due to their reliance on texting and social media. Many would rather send a quick message than have a phone call or meet up in person. Personally I don’t really enjoy messaging and I would way rather talk face-to-face to someone.
Cyberbullying is another serious issue affecting about 40% of teens. The anonymity of online platforms makes it easier for bullies to target their victims. To tackle these issues, schools are increasingly focusing on digital citizenship and online safety education. It’s crucial for teens to learn how to navigate online spaces responsibly and know when to seek help if they encounter bullying online.
Parental Control and Monitoring of Teen Smartphone Use
Parental control apps and features have become increasingly prevalent as parents seek to manage their teens’ smartphone use. Recent studies indicate that around 65% of parents use some form of monitoring or control app. These apps can restrict screen time, filter content, and track teens location. Which makes the parents feel more secure about their kids’ online activities. However, while these tools can be helpful, they often raise questions about privacy and trust. It’s important for families to discuss how these features work and why they are being used.
When it comes to the effectiveness of smartphone usage limits set by parents, the results can be pretty mixed. A survey found that 70% of teens reported that they often ignore or bypass these limits, citing that they find ways around restrictions. However, some teens do acknowledge that limits help them manage their time better. With about 40% saying they appreciate having boundaries, even if they push back against them. Here’s a table summarizing the effectiveness of these limits:
Response to Limits
Percentage of Teens
Often ignore or bypass limits
60%
Appreciate having boundaries
40%
These statistics are estimates and may not be definitive. For the most accurate and up-to-date information, please refer to the sources listed below. (Image credit: Throughtheeyesofateenager.com)
Communication between parents and teens about responsible smartphone use is crucial for fostering a healthy relationship with technology. Interestingly, only 40% of parents regularly discuss digital habits with their teens. This lack of dialogue can lead to misunderstandings and conflicts regarding smartphone use. Here’s a quick list of key challenges parents face in monitoring their teens’ smartphone activity:
Privacy concerns: Many teens feel that monitoring invades their privacy.
Technological know-how: Some parents struggle to keep up with the latest apps and trends.
Resistance from teens: Teens may push back against limits or monitoring, viewing it as control.
Balancing trust and oversight: Parents want to ensure safety without damaging their relationship with their teens.
By addressing these issues openly, parents and teens can create a more balanced and understanding approach to smartphone use.
2024 Teen Smartphone Ownership: conclusion
In conclusion, the landscape of teen smartphone ownership is more prevalent than ever. With staggering statistics revealing that 95% of 15- to 16-year-olds (in the US) now own smartphones. This tech surge comes with its own set of challenges, from the excessive daily screen time averaging over seven hours. To concerns about mental health, physical well-being, and social interactions.
Yet, it’s not all negative; open communication between parents and teens, along with effective monitoring strategies, can help mitigate these issues. As we navigate this digital age, fostering responsible smartphone use is essential. So, the next time you spot a teenager immersed in their device, remember just how integral smartphones have become to their daily lives—and maybe take a moment to reflect on your own screen time, too! Also be sure to check the sources linked below for the most relevant information.
There are several effective parental control apps that help manage teen smartphone usage. Popular options include Norton Family, which offers web filtering, time management, and location tracking. Qustodio provides detailed activity reports and the ability to block inappropriate content. Bark focuses on monitoring social media interactions and alerting parents to potential issues like cyberbullying or self-harm. Each app has its strengths, so parents should choose one that aligns with their specific needs and their teen’s tech habits.
To communicate effectively, create an open environment where teens feel comfortable sharing. Start conversations by expressing concerns without judgment, and ask about their feelings regarding smartphone use. Collaboratively set limits and establish regular check-ins to reinforce trust and encourage open dialogue about digital habits.
Smartphones offer educational benefits, providing access to learning resources and apps like Duolingo and Khan Academy. They also enhance communication, allowing teens to maintain friendships and support networks. Additionally, platforms like TikTok encourage creativity and self-expression, contributing positively to personal development when used responsibly.
Imagine this: You’re out and about, capturing memories with friends, when suddenly your phone dies. Ugh, talk about a buzzkill! But fear not, fellow tech enthusiasts! A portable charger can be your trusty sidekick in these dire situations. Did you know that the average person checks their phone 96 times a day? That’s a lot of battery drain! In this guide, we’ll walk you through everything you need to know to choose the best portable charger for your smartphone in 2024. Let’s power up your knowledge!
When you’re shopping for power banks or battery packs, you’ll often see “mAh” listed in the specs. mAh stands for milliampere-hour, which measures the energy storage capacity of a battery. In simple terms, it’s like the size of a fuel tank – the higher the mAh, the more power it can hold. If you’re always on the go and your phone battery drains quickly, a power bank with a high mAh rating would be a great option. It means you’ll get more charges out of it before it needs to be recharged itself.
(Image credit: Electron To-Go)
But how much capacity do you actually need? Well, you can calculate this based on your phone’s battery size. For example, if your phone has a 3,000 mAh battery and you want to charge it fully twice, you’d need a power bank with at least 6,000 mAh. Of course, there’s always some energy lost during the transfer, so adding a bit of extra capacity – say, a 7,000 or 8,000 mAh power bank – would be a good idea. This ensures you get the full charges you’re expecting without running out of juice.
Here’s a simple guide to help you calculate the capacity you need:
Phone Battery Size (mAh)
Power Bank Capacity Needed (mAh)
2,500 mAh
5,000 – 6,000 mAh
3,000 mAh
6,000 – 7,000 mAh
4,000 mAh
8,000 – 10,000 mAh
5,000 mAh
10,000 – 12,000 mAh
While it’s tempting to grab the highest capacity power bank out there, there’s a trade-off between power and portability. A 20,000 mAh power bank can give you multiple charges, but it’s also going to be bulky and heavy. If you’re looking for something portable to toss in your bag or pocket, it’s better to balance capacity with convenience. A smaller power bank with around 10,000 mAh might not charge your phone as many times, but it will be lighter and easier to carry around. So, think about how much power you actually need versus how much you’re willing to carry.
Fast Charging Technologies Explained
When it comes to fast charging, two of the most popular technologies are USB Power Delivery (PD) and Quick Charge. USB Power Delivery is a universal standard that works with many devices, allowing for higher power output and faster charging across phones, tablets, and even laptops. Quick Charge, developed by Qualcomm, is often found in Android devices and works by delivering high voltage at low current to charge batteries faster. Both are great, but they’re not always compatible with every device. USB PD is more versatile, while Quick Charge tends to only work with certain phone models.
(Image credit: Cabletime)
Matching your phone’s fast charging capabilities with the right charger is crucial. If your phone supports USB PD but you’re using a Quick Charge adapter, you won’t get the fastest charging speed possible. Many newer phones now support USB PD, but some older models might still rely on Quick Charge. To make sure you’re getting the best performance, check your phone’s charging specs. Using the wrong charger won’t damage your phone, but it can slow down charging times significantly, which defeats the whole point of fast charging.
Here’s a quick breakdown of some common fast-charging types:
Charging Technology
Max Output Power
Compatibility
USB Power Delivery (PD)
Up to 100W
Universal, works with most devices
Quick Charge 4+
Up to 27W
Primarily Android devices
Adaptive Fast Charging
Up to 25W
Samsung devices
To future-proof your purchase, it’s worth investing in a charger that supports the latest standards. With USB PD becoming more common, especially as more laptops and tablets adopt it, a charger that supports higher wattages could be a smart move. You may also want to look for chargers that support multiple standards. Options like USB PD and Quick Charge ensure you’re covered no matter what device you’re using. This way, your charger will stay relevant as you upgrade your tech, and you won’t need to keep buying new ones every time you get a new phone or gadget.
Size and Portability Considerations
When choosing between pocket-friendly and high-capacity power banks, the trade-off often comes down to size. A pocket-friendly option usually offers around 5,000 to 10,000 mAh, which is enough for one or two full charges of most smartphones. These smaller chargers are lightweight, easy to carry, and perfect for those who need just a quick top-up during the day. On the other hand, high-capacity options – think 20,000 mAh or more – can charge your phone multiple times but tend to be bulkier and harder to slip into a pocket. It’s all about balancing convenience with the amount of power you need.
Weight is another key factor when deciding on a power bank for daily carry. A smaller, 5,000 mAh power bank might weigh only 150 grams, while a 20,000 mAh one could easily tip the scales at 400 grams or more. If you’re constantly on the move, lugging around a heavy power bank can be a hassle. For daily use, something lightweight is ideal, but if you’re heading out for a long trip, the extra weight of a higher capacity power bank might be worth it.
Get all the latest post on through the eyes of a teenager straight in your inbox.
Subscribe to stay updated, it’s free!
Here are some general weight ranges for different capacities (these are generalizations, often the weight of the powerbank can vary a lot between models, brands etc.):
5,000 mAh: Around 100-150 grams
10,000 mAh: 200-250 grams
20,000 mAh: 350-450 grams
The form factor of a power bank is just as important as its capacity or weight. Slim power banks are great for slipping into your pocket or small bag, making them ideal for casual use. However, they might lack the ruggedness you’d want for outdoor adventures. If you’re an outdoorsy type, a rugged power bank is the way to go. These models are bulkier but often waterproof and shock-resistant. This makes them perfect for camping or hiking. For something in the middle, consider compact but durable options that offer a good balance of size, toughness, and portability. So whether you’re looking for slim, rugged, or something in between, there’s a power bank form factor suited for your lifestyle.
Input and Output Ports: What to Look For
When choosing between USB-A and USB-C, the main difference comes down to speed and compatibility. USB-A is the classic, rectangular port you’ve probably used for years. It works fine but doesn’t offer the fastest charging or data transfer speeds. On the other hand, USB-C is the newer, smaller, and reversible port that’s quickly becoming the standard for most devices. It supports faster charging, quicker data transfers, and works with a wider range of gadgets. If you’re using newer tech like a modern smartphone or laptop, a USB-C power bank is the better choice. But if you’ve still got older devices hanging around, having both USB-A and USB-C ports can give you the flexibility to charge anything.
(Image credit: CNN/Jason Cipriani)
Multiple port options are a real lifesaver if you need to charge several devices at the same time. Imagine needing to charge your phone, wireless earbuds, and a tablet all at once—having just one port won’t cut it. Many power banks now come with multiple ports, including USB-A, USB-C, and even micro-USB, so you can charge all different types of devices. Here’s how you might break it down:
USB-A: Ideal for older gadgets like headphones or cameras.
USB-C: Great for newer devices like smartphones, laptops, or tablets.
Wireless charging: No cable? No problem. Just wack your phone on top if it supports wireless charging.
Speaking of wireless charging, it’s becoming a super popular feature in portable chargers. The best part? No cables are required. If your phone supports wireless charging, you just place it on top of the power bank, and you’re good to go. Some power banks even let you charge one device wirelessly and another via USB at the same time. This way, you can also charge your devices that don’t support wireless charging. Keep in mind, though, that wireless charging can add a little bulk to the power bank, but if you hate messing with cables, it’s a solid trade-off.
Brand Reliability and Safety Features
When it comes to portable chargers, some brands stand out for their quality and reliability. If you’re in the market for a power bank, here are a few top brands known for their exceptional performance & quality:
Anker: Known for its durability and high-speed charging capabilities, Anker offers a range of power banks with solid build quality and efficient performance.
Aukey: Known for its innovative features and sleek designs, Aukey’s power banks often come with a variety of ports and quick charging options.
RAVPower: RAVPower provides reliable and high-capacity power banks that are great for extended trips and heavy usage.
Zendure: Famous for its rugged and durable power banks, Zendure’s products are designed to withstand rough handling and harsh conditions.
When choosing a portable charger, safety is ofcourse very important. Look for safety certifications to ensure that the power bank meets strict safety standards. Key certifications to keep an eye on include:
UL Certification: Indicates that the power bank has passed rigorous safety tests for electrical and fire hazards.
CE Marking: Shows that the product complies with European safety, health, and environmental protection standards.
FCC Certification: Ensures that the device doesn’t cause harmful interference with other electronic devices.
Built-in protections against overcharging and short circuits are crucial features. They can prevent damage to your devices and ensure safety when using them. Many high-quality power banks come with these safety features:
Overcharge Protection: Stops charging once your device is fully charged, preventing battery damage and overheating.
Short Circuit Protection: Automatically shuts down the power bank if a short circuit is detected, protecting both the charger and your devices.
Temperature Control: Monitors the temperature of the power bank and adjusts charging speeds to avoid overheating.
By paying attention to these features, you can ensure that you’re choosing a portable charger that not only performs well but also keeps your devices safe and secure.
Additional Features Worth Considering
LED indicators and digital displays can be really handy when using a power bank. Most basic chargers come with LED lights that show how much charge is left, usually with a few dots representing different battery levels. It’s simple but effective. However, some higher-end models feature digital displays that show the exact percentage of remaining battery. This gives you a much clearer idea of how much power you have left, so you know when it’s time to recharge your power bank. If you’re someone who prefers more precise information, a digital display can be something to keep in mind while shopping for powerbanks.
Here’s a quick breakdown of the two options:
Feature
Pros
Cons
LED Indicators
Simple, easy to read, found on most models
Less precise
Digital Display
Exact battery percentage shown
Usually found on more expensive models
Pass-through charging is a feature that lets you charge your power bank while it’s charging your devices at the same time. This can come in handy when you have limited outlets or in a hurry. You don’t have to wait for the power bank to charge up first before using it to charge your phone. However, not all power banks offer pass-through charging. But if you’re often juggling multiple devices or short on time, it’s a feature worth looking for.
The choice between built-in cables and separate cables depends on your needs. Built-in cables are super convenient since you don’t have to worry about forgetting or losing a cable—it’s attached right to the power bank. These are great for quick, on-the-go charges, especially if you tend to forget to pack your charging accessories. However, separate cables give you more flexibility, allowing you to use different types of cables depending on what device you’re charging. If you’ve got a mix of devices (USB-C, Lightning, etc.), having separate cables might be the better option for you.
Here’s a quick comparison:
Built-in Cables: Convenient, no need to carry extra cables, but limited to one type of device.
Separate Cables: More versatile for different devices, but you’ll need to remember to bring them along.
Price vs. Performance: Getting the Best Value
When it comes to budget-friendly portable chargers, you can find plenty of options that don’t sacrifice quality. You don’t need to spend tons of money to get a reliable power bank that will keep your devices charged. Brands like Anker and Aukey offer affordable models that still deliver solid performance. These chargers typically have capacities of around 5,000 to 10,000 mAh, which is perfect for everyday use. While they may lack advanced features like digital displays or multiple ports, they get the job done without breaking the bank.
Here are some of the best budget-friendly portable chargers:
For the average user, mid-range portable chargers can provide a perfect balance of capacity, features, and price. These chargers often have around 10,000 to 20,000 mAh. This allows you to charge your phone multiple times before needing to recharge the power bank itself. Mid-range models from brands like RAVPower and Mophie often include handy features like USB-C. They also offer pass-through charging, these features make them versatile enough for both daily use and short trips. If you’re looking for a reliable option with some added perks but without going completely overboard, these power banks are your best bet.
For those who need something a bit more powerful, high-end portable chargers are designed for power users and frequent travelers. These models often have capacities of around 20,000 mAh or more. This capacity allows you to charge not just phones, but laptops and other larger devices. High-end brands like Zendure and Mophie offer features like wireless charging, multiple ports, and even rugged designs for increased durability. These chargers are perfect if you’re constantly on the go and need something that can handle multiple devices and longer trips.
In summary, if you’re looking for the best portable charger in each category, here are the top picks:
Best Budget-Friendly Option: The Anker PowerCore Slim 10,000 mAh offers excellent value with a slim design and enough capacity for daily use.
Best Mid-Range Charger: The RAVPower 20,000 mAh Power Bank balances great capacity, useful features like USB-C, and a reasonable price, making it ideal for the average user.
Best High-End Charger: For power users and travelers, the Zendure A8PD 26,800 mAh stands out with its massive capacity, multiple ports, and rugged build, perfect for extended trips and multi-device charging.
HOW TO CHOOSE THE BEST PORTABLE CHARGER: Conclusion
Choosing the best portable charger for your smartphone doesn’t have to be a shocking experience! By considering factors like capacity, charging speed, size, and additional features, you’ll be well-equipped to find your perfect power companion. Remember, the best charger is the one that fits your lifestyle and keeps your devices juiced up when you need them most. So go ahead, break free from those pesky wall outlets, and embrace the freedom of portable power. Your future self (and your smartphone) will thank you!
Charging time varies based on the capacity of the power bank and the charger you’re using. Smaller power banks (around 5,000-10,000 mAh) usually take 3-5 hours, while larger ones (20,000 mAh or more) can take 6-10 hours. Using a fast charger with USB-C or a charger that supports Power Delivery can significantly reduce charging time.
Yes, you can take a portable charger on a plane, but it must be in your carry-on luggage, not checked baggage. Most airlines allow power banks with capacities up to 100Wh (about 27,000 mAh), but it’s always good to double-check with your airline before flying.
Lithium-ion batteries are cheaper and have a higher energy density, meaning they can store more power. Lithium-polymer batteries, while more expensive, are generally lighter, safer, and have a lower risk of leakage. Many high-end power banks use lithium-polymer for better safety and durability.
In today’s digital age, students like myself face a crucial decision when it comes to their primary learning device: tablet or laptop? With technology evolving at breakneck speed, the lines between these devices are blurring, making the choice more complex than ever. Did you know that 65% of students now use either a tablet or laptop as their main study tool? Let’s dive into the tablet vs laptop debate and help you make an informed decision that’ll supercharge your academic journey!
The Rise of Digital Learning: Why Device Choice Matters
Technology has undeniably transformed modern education, making it more dynamic and accessible. Gone are the days when learning was confined to textbooks and lectures. Now, students have a huge collection of digital tools at their fingertips—everything from interactive apps to online courses. For instance, platforms like Khan Academy and Coursera let you dive into subjects at your own pace and explore topics in depth. But it’s not all smooth sailing. The sheer volume of resources available can be overwhelming, and sifting through them to find quality content can sometimes be tricky.
(Image credit: TJ Donegan)
One of the best things about tech in education is how it can be personalized to each students needs & abilities. Adaptive learning software makes lessons fit to individual needs, making it easier for students to understand challenging concepts. This can be a game-changer, especially for those with diverse learning styles or who need a bit of extra help. Still, it’s essential for teachers and parents to help students use these tools wisely to avoid distractions and keep their learning on track. However, as a highschool student myself, adaptive learning software really makes it easier for me to understand more challenging subjects like maths or languages.
Choosing the right device can seriously impact how well you learn. Whether it’s a high-performance laptop for running complex software or a tablet for note-taking and reading, the right device can make all the difference. Hybrid devices that blend features of both tablets and laptops are also worth considering if you need a bit of both worlds. For this I would recommend the Lenovo IdeaPad Flex 5 because of it’s affordability and performance.
Here’s a quick rundown of what to look for in a device to match your academic needs:
Performance: Make sure it has enough power and memory for your tasks.
Portability: If you’re always on the go, a lightweight device is best.
Battery Life: Long battery life means fewer interruptions during long study sessions.
Display Quality: A high-resolution screen can make reading and design tasks much easier on the eyes.
When selecting the best tech for students, here are two top choices for laptops and iPads:
Best Laptops for Students:
Lenovo IdeaPad Flex 5 – Offers a great balance of affordability and performance, with a versatile design ideal for various academic needs.
Acer Aspire 5 – Known for its solid performance and budget-friendly price, making it a reliable choice for students who need a dependable laptop for everyday tasks.
Best iPads for Students:
iPad 10th Generation – Provides a good mix of performance and affordability, suitable for note-taking and light productivity tasks.
iPad 9th Generation – Offers excellent value with solid performance and compatibility with the Apple Pencil, perfect for students who need a reliable tablet for academic work.
These options ensure students have the tools they need to enhance their learning experience and stay productive whilst being affordable.
By picking a device that fits your needs, you’ll be set up to make the most of your tech and support your academic goals. Whether you’re diving into coding, design, or just need a reliable tool for note-taking, the right device can boost your productivity and enhance your learning experience.
Tablets: Portable Powerhouses for On-the-Go Students
Tablets have become a popular choice for academic use, and it’s easy to see why. They’re versatile, portable, and packed with features that can enhance your learning experience. For students, tablets offer a unique blend of functionality and convenience. They’re perfect for reading e-textbooks, taking notes, and even running educational apps that make learning interactive and engaging. Plus, their lightweight design means you can easily carry them around campus or from class to class without feeling weighed down.
(Image credit: Tablet News)
When it comes to popular tablet models for students, there are a few standouts that cater to different needs and budgets. For instance, the Apple iPad is a top choice for its smooth performance and extensive app ecosystem. It’s ideal for students who want a high-quality device with a range of educational and productivity apps. On the more budget-friendly side, the Samsung Galaxy Tab A offers solid performance at a lower price point, making it a great option for students who need a reliable tablet without breaking the bank. Another noteworthy option is the Microsoft Surface Go, which provides the versatility of a laptop in a tablet form, perfect for those who need to run more demanding applications or multitask.
Here’s a quick list of key features to look for in a student-friendly tablet:
Performance: Ensure the tablet has a fast processor and sufficient RAM to handle your academic tasks smoothly.
Portability: A lightweight and compact design will make it easy to carry between classes.
Battery Life: Look for a tablet with long battery life to get you through a full day of lectures and study sessions.
Screen Quality: A high-resolution display will reduce eye strain and enhance your reading and multimedia experiences.
Storage Capacity: Choose a tablet with enough storage for your e-books, notes, and other academic materials. Some models offer expandable storage options, which can be a bonus.
By focusing on these features, you can find a tablet that’s not only perfect for your studies but also fits into your lifestyle. Whether you’re taking notes, reading textbooks, or using educational apps, the right tablet can make your academic life a lot easier and more enjoyable.
Laptops: Versatile Workhorses for Comprehensive Computing
Laptops have become indispensable in the academic world, offering a range of benefits that make studying and managing schoolwork more efficient. Their versatility and power mean they can handle everything from writing essays and conducting research to running complex software for subjects like graphic design or programming. Unlike tablets, laptops typically provide a full keyboard and larger screen, which can be crucial for tasks that require extensive typing or detailed work. Additionally, many laptops offer robust multitasking capabilities, allowing students to work on multiple projects or assignments simultaneously without slowing down.
(Image credit: PCWorld/Sam Singleton)
When it comes to selecting a laptop, there are several top choices that cater to various student needs. For students who need high performance, the MacBook Air is a great pick with its sleek design and powerful specs, making it ideal for demanding tasks. For a more budget-friendly option, the Acer Aspire 5 offers solid performance and good build quality at a lower price point. If you’re looking for something that combines performance with flexibility, the Microsoft Surface Laptop Studio is an excellent choice, providing a versatile design that doubles as a tablet, perfect for students who need to switch between different modes of use.
Here’s a rundown of essential specifications to consider when choosing a student laptop:
Processor: A fast processor (like Intel Core i5 or AMD Ryzen 5) ensures smooth performance for multitasking and demanding applications.
RAM: At least 8GB of RAM is recommended to handle multiple programs and browser tabs efficiently.
Storage: Opt for a laptop with at least 256GB of SSD storage for faster boot times and ample space for files and software. Some models also offer expandable storage options.
Battery Life: Look for a laptop with long battery life to get through a full day of classes and study sessions without needing a charge.
Display: A high-resolution display (Full HD or better) will enhance your viewing experience, making it easier to read and work on detailed projects.
Choosing a laptop with these specifications will ensure you have a reliable and efficient tool for your academic journey. Whether you’re writing papers, working on group projects, or running specialized software, the right laptop can make all the difference in staying organized and productive throughout your studies.
Cost Comparison: Balancing Budget and Features
When deciding between a tablet and a laptop for academic use, understanding the cost differences can help you make an informed choice. Initially, tablets often come with a lower price tag compared to laptops, making them an attractive option if you’re looking for a more budget-friendly device. For example, you might find a decent tablet for around $200 to $300, whereas laptops generally start at around $400 and can easily go up from there depending on the specifications and brand.
However, the initial purchase price is just one part of the equation. Long-term costs can also add up, including expenses for accessories, software, and potential upgrades. Tablets might require additional investments in accessories like keyboards or styluses, which can range from $50 to $150. On the other hand, laptops often come with higher upfront costs but might not require as many additional accessories, though they can also need software updates and occasional upgrades to keep up with demanding tasks.
To give you a clearer picture, here’s a cost comparison table that outlines the typical initial and long-term costs for both tablets and laptops:
Cost Factor
Tablets
Laptops
Initial Purchase Price
$200 – $300
$400 – $1,200
Keyboard/Case
$50 – $150
Often included, $50 – $100 if purchased separately
Stylus/Accessories
$20 – $100
Not usually required
Software
Often free or inexpensive apps available
$100 – $200 for software licenses
Upgrades
Limited, typically not needed
$100 – $300 for RAM/SSD upgrades
In terms of value for money, it often comes down to what you need the device for. Tablets offer a more affordable initial purchase and are great for tasks like note-taking and reading. However, if you need a device for more intensive academic work, such as running complex software or multitasking, a laptop may offer better long-term value despite the higher upfront cost. With a laptop, you’re investing in a more robust and versatile tool that can handle a broader range of academic tasks, which might be worth the additional expense if you’re looking for long-term usability and performance.
Ultimately, the choice between a tablet and a laptop depends on your specific needs and budget. Both have their advantages and potential additional costs, so weighing these factors can help you decide which device offers the best bang for your buck in the long run.
Portability and Battery Life: The Mobile Student’s Perspective
When choosing between a tablet and a laptop for academic use, it’s important to weigh factors like weight, battery life, and how the device impacts your study habits and productivity.
For students who are constantly on the move, the weight and size of your device can make a big difference. Tablets are generally lighter and more compact, making them easy to carry around in a backpack or even a large purse. This portability is ideal for daily commutes or moving between classes. On the other hand, laptops, while more powerful, are bulkier and can weigh anywhere from 2 to 5 pounds. If you’re lugging a laptop around all day, it might become cumbersome, especially if you’re already carrying other textbooks and supplies.
(Image credit: Kim Komando)
Battery life is another crucial factor. Here’s a comparison of what you might expect:
Tablets: Typically offer between 8 to 12 hours of battery life on a single charge. This range is usually sufficient for a full day of classes and studying, allowing you to work throughout the day without needing to recharge.
Laptops: Battery life can vary significantly depending on the model and usage. Many laptops provide 6 to 8 hours of battery life, though some high-end models can last up to 12 hours. If you’re using power-hungry applications or multitasking heavily, you might find yourself needing to recharge more frequently.
The choice between a tablet and a laptop can also affect how you study and your overall productivity. Tablets are great for quick note-taking, reading, and accessing educational apps. They’re convenient for jotting down ideas or accessing information on the go. However, they may not be as efficient for tasks that require extensive typing or multitasking. Laptops, on the other hand, provide a full keyboard and more powerful processing capabilities, making them better suited for writing essays, conducting research, and running complex software. The larger screen size also facilitates multitasking, such as having multiple windows open at once, which can lead to increased productivity for tasks that require detailed work or substantial typing.
Choosing the right device involves balancing these factors based on your daily needs and study habits. If portability and battery life are top priorities, a tablet might be the way to go. But if you need a robust tool for intensive tasks and multitasking, a laptop could offer the productivity boost you’re looking for.
Software and App Ecosystem: Tools for Academic Success
When deciding between a tablet and a laptop for academic use, it’s essential to consider how each device stacks up in terms of educational app availability, compatibility with school systems, and multitasking capabilities.
Educational apps and programs are crucial for modern learning, and their availability can greatly influence your choice of device. Tablets offer access to a wide range of educational apps designed for interactive learning, such as digital textbooks, note-taking apps, and study aids. Popular platforms like the Apple App Store and Google Play Store have numerous apps tailored for various subjects and grade levels. However, while tablets have strong app ecosystems, laptops typically provide broader software options for academic use, including full desktop versions of productivity suites and specialized software for subjects like coding or graphic design.
Compatibility with school systems and requirements is another critical factor. Many educational institutions use specific platforms and tools for assignments, collaboration, and communication. Laptops generally offer better compatibility with these systems due to their support for a wide range of operating systems and software applications. For instance, if your school uses a particular learning management system (LMS) or requires specific software for coursework, a laptop is more likely to meet these needs. Tablets can sometimes face limitations with certain software or may require workarounds to access specific academic resources.
When it comes to multitasking capabilities and workflow efficiency, laptops usually have the upper hand. Their larger screens and more powerful processors make it easier to work on multiple tasks simultaneously. For example, you can have a research paper open in one window while referencing a digital textbook in another, or run several applications at once without experiencing slowdowns. Tablets, while highly portable and convenient, often have smaller screens and less processing power, which can limit your ability to multitask effectively. However, tablets can still handle basic multitasking and are often sufficient for tasks like checking emails or taking notes during lectures.
Here’s a comparison table that highlights these aspects:
Aspect
Tablets
Laptops
Educational Apps
Wide range of interactive apps available; good for quick tasks
Access to full desktop software; broader range of programs
Compatibility with School Systems
May face limitations; some systems might require workarounds
Generally better compatibility with various school systems and software
Multitasking Capabilities
Smaller screen and less powerful; suitable for basic multitasking
Larger screen and more powerful; ideal for extensive multitasking and workflow efficiency
Choosing between a tablet and a laptop involves balancing these factors based on your academic needs and workflow preferences. If you prioritize portability and app access, a tablet might be the best choice. However, if you need robust software compatibility and superior multitasking capabilities, a laptop could provide the efficiency and flexibility required for a demanding academic workload.
Typing and Note-Taking: The Core of Student Productivity
When deciding between a tablet and a laptop for academic purposes, there are a few key factors to consider, such as keyboard type, handwriting support, and ergonomics, all of which can influence your overall study experience.
(Image credit Pitman Training)
The choice between on-screen and physical keyboards can significantly impact your typing comfort and efficiency. Tablets typically use on-screen keyboards, which are handy for quick typing and versatile in switching between different languages or layouts. However, for long typing sessions, such as writing essays or detailed reports, on-screen keyboards can be less comfortable and slower compared to physical keyboards. Laptops come with physical keyboards that offer a more tactile and comfortable typing experience, which can be crucial for students who need to type frequently and efficiently.
Handwriting and stylus support is another area where tablets have an edge. Many tablets support styluses, making them excellent for taking handwritten notes, sketching diagrams, or annotating documents. This feature provides a natural writing experience and is especially useful for subjects that benefit from drawing or freehand notes. While some laptops also offer stylus support, it is more commonly associated with tablets, making them a preferred choice for students who value direct screen interaction.
Ergonomics also play a vital role in your study routine. Tablets, due to their smaller size and versatility, might not always provide the best ergonomic support. Holding a tablet for extended periods or using it in awkward positions can lead to neck or wrist strain. Laptops, with their larger screens and built-in keyboards, generally offer better ergonomic options. Using a laptop on a desk with an external keyboard and mouse can help maintain a more comfortable and healthy posture, which is crucial for long study sessions.
Here’s a breakdown of how these factors might impact your choice:
On-screen vs Physical Keyboards: On-screen keyboards are good for quick tasks but can be less comfortable for extended typing. Physical keyboards on laptops are better for long typing sessions.
Handwriting and Stylus Support: Tablets excel in this area with support for styluses, ideal for note-taking and drawing. Laptops have less focus on this feature.
Ergonomics: Tablets can lead to strain if used for long periods. Laptops generally provide better ergonomic setups for extended use.
Balancing these aspects based on your study habits and needs will help you choose the device that best supports your academic work. If you value flexibility and stylus use, a tablet might be your best bet. However, if you need a comfortable typing experience and ergonomic support, a laptop could be the better choice.
Entertainment and Downtime: Because All Work and No Play…
When choosing between a tablet and a laptop for both academic and leisure activities, it’s essential to consider how each device performs in gaming, media consumption, and balancing study with relaxation.
The gaming capabilities of tablets and laptops vary significantly. Tablets are often preferred for casual gaming due to their portability and touchscreens. They are ideal for quick, on-the-go gaming sessions and can handle many popular casual games effectively. However, tablets generally have less powerful hardware compared to laptops, which can limit their ability to run high-end games smoothly. Laptops, on the other hand, are designed for more intensive gaming experiences. With their powerful processors and dedicated graphics cards, laptops can handle complex graphics and high frame rates, providing a more immersive gaming experience. If you’re into serious gaming or need high performance, a laptop is usually the better choice.
(Image credit: PCWord/Iyas Akhtar)
In terms of media consumption, both tablets and laptops offer distinct advantages. Tablets are highly portable and provide a more personal viewing experience, making them perfect for watching videos, reading e-books, or streaming content while on the move. The touch interface allows for easy navigation through media apps and the compact size makes them convenient for various settings. Laptops, with their larger screens, offer a more expansive viewing experience that enhances movie watching or streaming. They also typically feature better sound systems, making them suitable for a richer media experience. For tasks like video editing or content creation, laptops provide more robust capabilities and a larger screen that can improve workflow and efficiency.
Balancing academic work with leisure activities is another important consideration. Tablets are great for quick access to study materials and can serve as a convenient tool for casual breaks or light gaming. Their portability makes them easy to use between classes or during commutes. However, for more substantial academic tasks, such as writing essays or conducting research, a laptop offers a more powerful and versatile solution. It provides a full keyboard and a larger screen, which are beneficial for extended typing sessions and multitasking. A laptop can efficiently handle both academic responsibilities and leisure activities, making it a well-rounded choice for managing your study and relaxation time.
Here’s a summary of how these aspects might influence your choice:
Gaming Capabilities: Tablets are good for casual gaming, but laptops offer better performance for high-end games.
Media Consumption: Tablets are portable and great for personal viewing, while laptops provide a larger screen and better sound for an immersive experience.
Balancing Study and Leisure: Tablets are convenient for quick tasks and breaks, but laptops are better for intensive academic work and offer a comprehensive solution for both study and leisure.
Choosing the right device involves assessing your needs for gaming, media consumption, and how you balance academic and leisure activities. If portability and casual use are priorities, a tablet might be ideal. But if you need robust performance and versatility for both studying and entertainment, a laptop could be the better choice.
Tablets vs Laptops for Students in 2024: Conclusion
Whew! We’ve covered a lot of ground in our tablets vs laptops showdown. The truth is, there’s no one-size-fits-all answer – your perfect device depends on your unique needs, budget, and study style. Consider your course requirements, daily routine, and personal preferences when making your choice. Remember, the best device is the one that empowers you to learn effectively and efficiently. So, are you Team Tablet or Team Laptop? Whatever you choose, here’s to crushing your academic goals with the perfect tech sidekick!
Yes, some high-end tablets offer impressive gaming capabilities. Tablets with powerful processors, high refresh rate displays, and dedicated graphics can handle many modern games quite well. For top-tier gaming, however, laptops with dedicated graphics cards and more powerful processors generally provide a superior experience.
Laptops typically offer broader software compatibility due to their more robust operating systems like Windows or macOS. They can run a wide range of academic software, from complex data analysis tools to advanced programming environments. Tablets run on mobile operating systems like iOS or Android, which might have limited versions of some software but are improving in terms of available apps.
While you can perform basic video editing on tablets, for more complex and demanding video projects, a laptop with a powerful processor and dedicated graphics is preferable. Laptops offer more advanced editing software and better performance for handling large files and intricate editing tasks.
Imagine a world where your screens are as thin as paper, with colors so vivid they seem to pop right out of the display. Welcome to the realm of OLED technology! Did you know that OLED screens can achieve a contrast ratio of 1,000,000:1, compared to just 1,000:1 for typical LED-LCD displays? That’s a million times more contrast! But is OLED all sunshine and rainbows? Let’s dive into the electrifying world of Organic Light-Emitting Diodes and uncover the pros and cons that might just change the way you look at screens forever.
–Innovative Tech: Transparent, foldable, and rollable designs are expanding OLED’s potential.
What is OLED Technology?
OLED, or Organic Light-Emitting Diode, represents a major leap in display technology. Unlike traditional screens that use a backlight, OLED displays generate their own light through organic materials that emit light when an electric current is applied. This allows each pixel to produce its own light, resulting in vibrant colors and deep blacks. Because of this self-lighting feature, OLED screens can be incredibly thin and flexible, leading to innovative designs like curved and foldable displays. This technology has become widely used in a range of devices, including smartphones, high-end TVs, monitors, and wearables.
In contrast to OLED, LED and LCD technologies operate differently. LED screens are essentially a type of LCD that uses LEDs for backlighting. While LED screens offer some improvements over traditional LCDs in terms of brightness and energy efficiency, they still rely on a backlight to illuminate the display. This can limit the contrast and color richness of the image. OLED screens do not require a backlight because each pixel emits its own light, allowing for better contrast and more vibrant colors. LCD screens, which use liquid crystals and a backlight, generally result in less contrast and less vivid colors compared to OLED.
The evolution of OLED technology has been marked by several key milestones:
Overall, OLED technology has revolutionized the display industry, offering unmatched visual quality and flexibility. Its ability to produce rich colors and deep blacks, combined with its design versatility, makes it a standout choice in modern tech. As OLED continues to evolve, it promises even more exciting advancements in display technology.
The Dazzling Pros of OLED
OLED technology offers several standout features that set it apart from traditional display types. One of the most notable aspects is its unrivaled image quality. OLED screens provide exceptional color accuracy and contrast, thanks to each pixel emitting its own light. This results in vibrant colors, deep blacks, and incredible detail that make images appear lifelike and immersive. Whether you’re watching a movie, playing a game, or viewing photos, OLED’s superior picture quality delivers a truly stunning visual experience.
Another significant advantage of OLED displays is their sleek and flexible design. Unlike conventional screens that require bulky backlighting, OLED screens are incredibly thin because each pixel emits its own light. This allows for innovative design possibilities, such as curved or even foldable screens. The flexibility of OLED technology not only contributes to the sleek aesthetics of modern devices but also enables manufacturers to create unique and futuristic products.
(Image credit: AVinteractive.com)
In addition to their impressive design, OLED screens are also known for their energy efficiency. Since OLED pixels emit light individually, they only use power for the parts of the screen that are lit. This means that darker images consume less power compared to traditional displays that use a constant backlight. This efficiency makes OLED displays a more eco-friendly option, reducing overall energy consumption and extending battery life in portable devices.
Speed is another area where OLED shines. OLED displays feature lightning-fast response times, which means they can refresh and react to changes on the screen almost instantaneously. This capability is particularly beneficial for fast-paced activities like gaming or watching action-packed videos, where quick response times ensure smooth and fluid visuals without any noticeable lag or motion blur.
Get all the latest post on through the eyes of a teenager straight in your inbox.
Subscribe to stay updated, it’s free!
Finally, OLED technology offers excellent viewing angles. Because each pixel generates its own light, OLED screens maintain consistent color and brightness levels even when viewed from extreme angles. This feature ensures that everyone in the room gets the best possible view, making OLED displays ideal for group watching or sharing presentations.
To summarize, OLED technology excels in:
Unrivaled image quality
Sleek and flexible design
Energy efficiency
Lightning-fast response times
Excellent viewing angles
These attributes make OLED displays a standout choice, providing an exceptional visual experience and greater design possibilities for modern devices.
The Not-So-Bright Side: OLED Cons
OLED technology may be amazing, but it’s not without its downsides. One of the biggest issues is burn-in, also known as the persistent image problem. This happens when static images, like logos or menus, stay on the screen for too long, leaving a faint ghost-like image behind. Even though newer OLED screens have features to help prevent this, it’s still something you need to be aware of, especially if you’re using the display heavily for long periods.
(Image credit: Reddit/peterspliid)
Another thing to consider is the lifespan of OLED displays. Unlike regular LED or LCD screens, OLED uses organic materials that naturally degrade over time. The blue pixels, in particular, tend to wear out faster than the red and green ones, which can lead to a shift in colors as the display ages. While manufacturers have improved this over the years, OLED screens still have a shorter life compared to other display types, which could be a problem if you plan on keeping your tech for a long time.
And then there’s the price. OLED screens are expensive. The technology behind them is cutting-edge, which means the cost of making them is higher than standard displays. If you’re shopping for a large OLED TV or monitor, get ready for some serious sticker shock. Although prices have been dropping slowly, OLED is still considered a premium product, so be prepared to pay extra for that top-tier experience.
(Image credit: Reddit/Odd-Ad-5171)
Size is also a bit of a limitation for OLED. Producing large OLED displays is tricky and expensive, which is why you mostly see them in smaller devices like smartphones, high-end TVs, and some monitors. Making huge OLED screens for commercial use is still a challenge. Although the technology is improving, OLED hasn’t hit the big leagues when it comes to larger formats just yet.
Finally, there’s the issue of blue light. While OLED gives you deep blacks and vibrant colors, it also emits a lot of blue light, which can lead to potential eye strain and even affect your sleep patterns. The blue pixels in OLED are particularly strong, and staring at your screen for too long can cause discomfort. Many devices have introduced blue light filters or night modes to help with this, but it’s still something to keep in mind if you’re spending long hours in front of your screen.
So, while OLED offers some incredible features, you should be aware of:
The risk of burn-in
A shorter lifespan compared to other displays
The high price tag
Limitations in large-scale production
Blue light issues that could affect your eyes
These are all important things to think about if you’re considering diving into OLED tech.
OLED vs. Other Display Technologies
When comparing OLED vs. LED-LCD, the differences are pretty significant. OLED, or Organic Light-Emitting Diode, is known for its self-lighting pixels, which means each pixel lights up on its own without needing a backlight. This allows for perfect blacks and incredible contrast because the screen can completely turn off pixels in dark scenes. LED-LCD, on the other hand, uses a backlight that shines through a layer of liquid crystals to create the image. While LED-LCD screens are generally brighter, they can’t match the depth of blacks or the color accuracy that OLED delivers. So, if you’re after stunning visuals with deep contrast, OLED takes the win, but if you prefer a brighter display and a lower price, LED-LCD might be more your style.
Then there’s QLED, which is Samsung’s answer to OLED. QLED stands for Quantum Dot LED, and while it sounds similar to OLED, the technology is quite different. QLED still relies on an LED backlight like traditional LED-LCDs, but it adds a layer of quantum dots that enhances brightness and color accuracy. This means QLED can get even brighter than OLED, making it great for rooms with a lot of natural light. However, it still struggles with delivering the deep blacks that OLED does so effortlessly. QLED offers some improvements over regular LED-LCDs, but it doesn’t quite reach OLED’s level when it comes to pure picture quality, especially in darker settings.
(Image credit: HelloTV)
Looking forward, MicroLED might just be the next big thing. MicroLED combines the best of both worlds: like OLED, each pixel in a MicroLED screen lights up on its own, allowing for perfect blacks and stunning contrast. But, unlike OLED, it doesn’t use organic materials, so it avoids the issues of burn-in and shorter lifespan. MicroLED displays are also super bright, even more so than QLED, and they offer incredible durability. The downside? Right now, MicroLED is expensive and hard to produce, especially in smaller sizes. But as the technology develops, it could become a serious challenger to both OLED and QLED, offering the best of both worlds with none of the drawbacks.
So, here’s the breakdown:
OLED: Best for perfect blacks, contrast, and color accuracy.
QLED: Samsung’s bright, colorful alternative, but it still uses a backlight.
MicroLED: The future of display tech, with no burn-in and amazing brightness, but it’s still in the early stages.
Each of these technologies has its strengths, but OLED currently leads the pack when it comes to overall picture quality.
The Future of OLED: What’s on the Horizon?
Transparent OLED is one of the most exciting innovations out there, and it really feels like a window into the future — literally. Transparent OLED displays allow you to see through the screen when it’s not in use, making them ideal for things like interactive storefront windows or futuristic advertising. Imagine walking past a window, and suddenly it becomes a digital display, showing off products or information, then disappearing back into a clear pane of glass. This tech opens up a whole world of creative possibilities, from augmented reality displays to sleek, space-saving designs for homes and offices. The ability to have a screen that you can see through when it’s off is a game-changer in design, and it feels like we’re just scratching the surface of what Transparent OLED can do.
(Image credit: Engadget/Billy Steele)
Next up is the world of foldable and rollable displays, where flexibility is truly unleashed. With OLED’s thin and bendable nature, we’re now seeing devices that can fold in half or roll up like a scroll. Think of foldable smartphones that give you a regular-sized phone when closed and a mini tablet when opened, or rollable TVs that can disappear into a piece of furniture when not in use. This flexibility allows for more portable and space-saving designs, and it’s only a matter of time before this technology becomes more mainstream. Foldable screens are already starting to appear in laptops, and it won’t be long before they’re integrated into everything from wearables to large-scale displays. The idea of rolling up your screen and carrying it with you like a sheet of paper? That’s the kind of futuristic tech we’ve been dreaming of.
(Image credit: OLED SPACE)
Finally, OLED in everyday life is becoming more and more common — it’s not just limited to high-end TVs or smartphones anymore. You can now find OLED technology in everything from smartwatches to car dashboards and even virtual reality headsets. Its versatility and ability to deliver crisp, vibrant visuals make it perfect for any application where screen quality matters. In the automotive industry, for example, OLED displays are popping up in control panels and rearview mirrors, giving drivers a better, clearer look at their surroundings. In health and fitness, OLED’s lightweight and low-power design makes it ideal for wearables like fitness trackers. As OLED continues to develop, we’re going to see it integrated into even more aspects of daily life, enhancing everything from the gadgets we use to how we interact with the world around us.
OLED technology is evolving fast, and the future is packed with possibilities. Here’s a quick breakdown of what we can expect to see:
Transparent OLED: Interactive windows and futuristic displays.
Foldable and Rollable Screens: Devices that fold, bend, or roll up for ultimate portability.
OLED Everywhere: From car dashboards to smartwatches and VR headsets, OLED is expanding into everyday life.
As OLED continues to push boundaries, we’re looking at a future where screens are more flexible, immersive, and integrated into our daily lives than ever before.
Pro’s and Con’s of OLED: Conclusion
As we’ve seen, OLED technology is like a double-edged sword – cutting through the limitations of traditional displays while occasionally nicking itself in the process. Its stunning picture quality and innovative design possibilities are truly game-changing, but the specter of burn-in and the hefty price tag can’t be ignored. As OLED continues to evolve, addressing these cons while amplifying its pros, one thing’s for sure – the future of displays is looking brighter than ever. So, what’s your take? Are you ready to embrace the OLED revolution, or will you be sticking to your trusty LED for now? Whatever you choose, keep your eyes peeled – the world of display technology waits for no one!
Burn-in can happen, especially with static images left on the screen for long periods (like logos or news tickers). However, modern OLED TVs have built-in features to reduce the risk, and normal everyday use typically doesn’t lead to burn-in.
Like most displays, OLED TVs emit blue light, which can cause eye strain and interfere with sleep patterns. Many TVs now come with blue light filters or night modes that reduce the amount of blue light emitted, making them easier on the eyes.
OLED TVs typically don’t have superior built-in sound quality compared to other types of TVs. The thin design of OLEDs often means that there isn’t as much room for high-quality speakers. For the best audio experience, investing in a separate soundbar or home theater system is recommended.
Is your iPad feeling sluggish lately? You’re not alone! Did you know that the average iPad user can accumulate up to 5GB of cached data in just a few months? Yikes! But don’t worry – I’ve got your back. In this guide, we’ll dive into the world of cache clearing on your iPad. It’s like giving your digital companion a refreshing spa day! We’ll explore why clearing cache matters, and I’ll walk you through various methods to get your iPad running smoothly again. Ready to speed things up? Let’s jump in!
To screenshot on your iPad, locate and press the Top and Volume Up buttons simultaneously, then quickly release them. Find the screenshot in the lower-left… Read more
Cache is essentially a temporary storage area on your iPad that holds data from apps and websites you frequently use. This stored data helps your device load content faster when you revisit an app or website because it doesn’t have to download the same information again. For instance, when you open a website you visit often, the cache allows the page to load almost instantly since the images, logos, and other elements are already stored locally on your iPad. In short, the cache is there to make your device more efficient, reducing load times and improving the overall user experience.
(Image credit: Ask Leo)
However, while cache plays a vital role in speeding up tasks, it can also accumulate over time and start to slow down your iPad if it isn’t cleared out periodically. One of the key benefits of clearing your cache is that it can significantly improve your device’s performance. As the cache builds up, it can take up valuable storage space, which might be limited depending on your iPad model. By clearing it out, you free up this space, making room for new apps, photos, or updates. This also helps in maintaining the smooth operation of your device, as it reduces the chances of lagging or freezing that can occur when your iPad’s storage is nearing its capacity.
On the flip side, excessive cache buildup can lead to a variety of issues. For one, it can cause apps to behave unpredictably, crashing more often or failing to load altogether. This happens because the cached data may become outdated or corrupted over time. Additionally, too much cache can slow down your iPad, as it tries to manage the large amount of stored data, which can strain its resources. In some cases, you might even notice that your battery life isn’t as long as it used to be, as your iPad works harder to process all the cached information. Thus, regularly clearing your cache is a simple yet effective way to keep your iPad running efficiently.
Method 1: Clearing Safari Browser Cache
To access Safari settings on your iPad, start by tapping the “Settings” app on your home screen. Once you’re in the Settings menu, scroll down until you find “Safari” in the list of options on the left side of the screen. Tap on “Safari,” and you’ll be taken to a screen where you can manage all your Safari settings, including privacy and security options, search engine preferences, and more. This is where you’ll go to clear your browsing data and manage your cache.
(Image credit: Onsitego
To clear your website data, follow these step-by-step instructions:
Once you’re in Safari settings, scroll down to the section labeled “Privacy & Security.”
Tap on “Clear History and Website Data.”
A prompt will appear, asking if you’re sure you want to clear history and data. Confirm by tapping “Clear” to remove all stored history, cookies, and other browsing data.
Within this menu, you’ll also find different options for clearing specific types of data, rather than wiping everything at once. For instance, if you tap on “Clear History and Website Data,” you may notice that you can choose from options like “All History,” “Today,” or “Today and Yesterday.” Selecting “All History” will remove all browsing history and website data from the beginning of time, essentially giving Safari a fresh start. If you choose “Today,” only the data from the current day will be erased, leaving your older browsing history intact. Meanwhile, “Today and Yesterday” will clear the data from the last two days, which can be useful if you want to keep your history mostly intact while removing recent activity.
Get all the latest post on through the eyes of a teenager straight in your inbox.
Subscribe to stay updated, it’s free!
Each of these clearing options allows you to tailor your privacy settings according to your needs. Whether you want to erase everything for a complete reset or just remove recent data to free up space, Safari gives you the flexibility to manage your browsing data in a way that best suits your preferences.
Method 2: Clearing App Cache Individually
To manage your iPad’s storage and optimize its performance, start by navigating to the “Settings” app on your home screen. Once you’ve opened Settings, scroll down the menu on the left until you find “General.” Tap on “General,” and then select “iPad Storage” from the list of options that appears. This section provides an overview of your device’s storage usage, showing how much space each app occupies and giving you various tools to manage your storage effectively.
(Image credit: Square Repair)
Within the iPad Storage settings, you can find and select specific apps that are taking up significant space. The list of apps is organized by the amount of storage they use, with the largest ones at the top. To get more details, simply tap on any app. This will open a screen showing how much space the app itself takes up, along with the size of its associated documents and data. From here, you can make informed decisions about which apps to keep, offload, or delete.
If you want to free up space without losing your app data, you can choose to “Offload Unused Apps.” To do this, tap on the app you want to offload, then tap “Offload App.” This will remove the app from your iPad, but keep its documents and data intact, so if you reinstall the app later, everything will be just as you left it. Alternatively, if an app has accumulated a lot of documents and data that you no longer need, you can clear these by tapping “Delete App” on the same screen. This option will remove both the app and all of its data, freeing up even more space on your device.
These tools make it easy to manage your iPad’s storage, helping you keep your device running smoothly by getting rid of unnecessary clutter and ensuring you have enough space for the apps and files you actually use.
Method 3: Clearing Cache Through App Resets
Resetting an app on your iPad can be a useful troubleshooting step when an app isn’t working properly, such as when it’s freezing, crashing, or behaving unpredictably. Resetting an app essentially returns it to its default state, as if you had just installed it for the first time. This process involves deleting the app and all its associated data from your device, and then reinstalling it fresh from the App Store.
(Image credit: OSX Daily)
To reset an app to its default state, follow these steps:
Locate the app you want to reset on your home screen.
Press and hold the app icon until a menu appears, then tap “Remove App.”
Confirm by selecting “Delete App,” which will remove both the app and all its data from your iPad.
Next, go to the App Store, search for the app you just deleted, and tap the download icon to reinstall it.
Once the app is reinstalled, it will be in its default state, free of any previous settings, data, or potential bugs that may have been causing issues.
However, it’s important to be cautious when using this method, as resetting an app will result in the loss of any data associated with it. For example, if it’s a game, you might lose your progress, or if it’s a note-taking app, any unsynced notes could be deleted. Therefore, it’s crucial to back up any important data before you reset the app, if possible. You should only use this method when you’ve exhausted other troubleshooting options, like force-quitting the app or restarting your iPad, and when you’re certain that any data loss won’t be problematic. Resetting an app can be a powerful fix, but it should be used with care.
Method 4: Using Third-Party Cleaning Apps
When it comes to managing cache on your iPad, reputable cache cleaning apps can be a helpful tool for keeping your device running smoothly. These third-party apps are designed to clear out unnecessary files, such as cache, temporary files, and other junk data that can accumulate over time. By automating the process, these apps make it easy to maintain your iPad’s performance without having to manually dig through settings.
(Image credit: Cleaner Pro)
Using third-party cache cleaning apps comes with both benefits and drawbacks. On the positive side, these apps can save time and effort, especially if you’re not familiar with the manual methods of clearing cache. They often provide additional features like identifying large files, optimizing storage, and even boosting battery life by managing background processes. Some apps also offer regular maintenance reminders, helping you keep your iPad in top shape without having to remember to do it yourself.
However, there are also some potential downsides to consider. Not all cache cleaning apps are created equal; some might not be as effective as they claim, or worse, could introduce security risks by accessing too much of your personal data. Additionally, many of these apps are free but offer in-app purchases or subscriptions for full functionality, which can be an ongoing expense. It’s essential to choose a reputable app from a trusted developer to avoid these pitfalls.
A few popular options available on the App Store include Cleaner Pro, which offers a simple interface for clearing cache and managing storage, Smart Cleaner, known for its ability to quickly identify and delete unnecessary files, and Phone Cleaner for Media Files, which specializes in managing and cleaning up large media files like photos and videos. These apps are widely used and have good user reviews, making them reliable choices for those looking to optimize their iPad’s performance with minimal hassle.
Tips for Maintaining a Clutter-Free iPad
Establishing a regular cache clearing schedule is an effective way to ensure your iPad continues to run smoothly over time. While the frequency of clearing cache depends on how intensively you use your device, a good rule of thumb is to clear the cache every few weeks or at least once a month. This routine maintenance helps prevent the buildup of unnecessary files that can slow down your iPad, ensuring that apps and websites continue to load quickly and operate efficiently.
In addition to regularly clearing your cache, there are other maintenance tasks that can keep your iPad in optimal condition. One important task is updating your apps and iPadOS whenever new versions are available. Updates often include performance improvements, bug fixes, and security patches that are crucial for maintaining the smooth operation of your device. Restarting your iPad occasionally is another simple but effective practice, as it clears out temporary files and resets system resources, helping to resolve minor glitches and improve overall performance.
Best practices for app and file management also play a significant role in keeping your iPad running well. Regularly reviewing the apps you have installed and deleting those you no longer use can free up valuable storage space and reduce background activity that might be draining your battery. It’s also helpful to organize your files and media into folders and periodically move older, less frequently accessed items to cloud storage or another backup solution. This not only declutters your device but also ensures that your most important data is easily accessible and secure.
By combining a regular cache clearing schedule with these additional maintenance tasks and best practices, you can keep your iPad running smoothly and efficiently, maximizing its lifespan and performance.
How to Clear Cache on iPad: Conlusion
Whew! We’ve covered a lot of ground, haven’t we? From Safari sweeps to app resets, you’re now armed with the knowledge to keep your iPad running like a well-oiled machine. Remember, clearing cache isn’t just about freeing up space – it’s about giving your trusty tablet a new lease on life. So why not make it a monthly ritual? Your iPad will thank you with zippier performance and more room for the things you love. Don’t let cached data slow you down – take charge and clear that cache today! Have any questions or favorite cache-clearing tricks? Drop them in the comments below – I’d love to hear from you!
Signs that you might need to clear your cache include sluggish app performance, slow loading times, or if you’re running low on storage. If apps are not behaving as expected or if you notice a significant drop in performance, clearing the cache can be a good troubleshooting step.
Clearing cache generally does not affect your saved data or personal information, such as emails, contacts, or photos. However, it can remove certain settings or preferences saved within apps, meaning you might need to reconfigure some app settings or log in again.
Before resetting an app, back up your data by checking if the app has its own backup feature or syncing options. For apps like games or productivity tools, look for cloud storage or export features. Additionally, ensure that your iPad is backed up to iCloud or a local computer to safeguard all your data.
Did you know that 54% of PS5 users overlook the simple power-saving tricks built into their console?
Learning how to turn off your PS5 isn’t just about pushing a button. It’s also about keeping your console’s performance smooth and extending its lifespan.
Since I’ve been exploring the PS5 for a while, I’m here to share everything you need to know to power down your system safely and easily. So, let’s get into the top methods and best practices to optimize your PS5 right from the start.
Quick Summary:
To turn off your PS5, you can use the DualSense controller’s PS button, the physical power button, voice commands, or the PS5 mobile app.
You can also manage power settings like Rest Mode, automatic shutdown timers, and HDMI device link to customize your console’s power-saving features.
Troubleshoot common power issues by holding the power button for a forced shutdown or updating the firmware if Rest Mode isn’t working correctly.
When it’s time to turn off your PS5, there are a few ways to get it done without a hassle. Here’s a quick look at each option.
1. Using the DualSense Controller’s PS Button Menu
This is hands-down my favorite way to turn off the PS5. You don’t have to move from the couch, and it’s super quick—ideal when you’re winding down from a long gaming session.
Press the PS Button: On your controller, press the PS button in the middle. This will bring up the control center at the bottom of your screen.
Navigate to Power Options: Scroll down to the Power icon, located at the far right of the control center.
Select Power Off or Rest Mode: You’ll now see options for Power Off and Enter Rest Mode. Select Power Off to turn the console completely off or rest mode to well, put it in rest mode.
This method is fast and convenient, ensuring that you don’t need to get up to power down your console.
Get all the latest post on through the eyes of a teenager straight in your inbox.
Subscribe to stay updated, it’s free!
Plus, it’s easy to switch between Rest Mode or a full shutdown based on your preference.
2. Pressing the Physical Power Button on the Console
If you’re near your PS5 console, you can use the physical power button located on the front of the system.
It’s ideal for gamers who have their console close to where they’re sitting or just prefer a direct approach.
(Image credit: throughtheeyesofateenager.com)
Locate the Power Button: On the PS5, the power button is just below the disc drive on the front panel. It’s a small button that’s easy to find by feel.
Press and Hold the Button: Press the power button and hold it down for a few seconds until you hear a beep. This indicates that the console is shutting down. The power indicator light will also turn off when the system is completely powered down.
This method is as easy as it gets and works perfectly if you need to quickly shut off your PS5.
3. Voice Commands Through the DualSense Controller
For those of us who like to keep things hands-free, the DualSense controller actually offers a handy voice command option.
You can simply use your voice to turn off your PS5, making it as easy as saying “Hey PlayStation.”
(Image credit: throughtheeyesofateenager.com)
Activate Voice Commands: Hold down the PS button on the controller to open the voice command menu.
Use a Command: Once the menu appears, say “Turn off the PS5” or “Go to Rest Mode.”
Confirm the Command: The system will prompt you to confirm your action, and once confirmed, it will either shut down completely or enter Rest Mode.
This method is perfect for multitaskers or gamers who don’t want to stop their game to power off the system.
4. Using the PS5 Mobile App (Remote Play)
(Image credit: Playstation)
You can also turn off your PS5 remotely using the PS5 mobile app, which offers another level of convenience. Whether you’re away from home or simply prefer to control the system from your phone, here’s how to do it:
Download the PS5 App: Ensure you have the PS App installed on your phone.
Connect to Your PS5: Open the app and connect to your PS5 via Remote Play.
Select Power Options: In the app’s control center, navigate to the power settings and select either Rest Mode or Power Off.
This is an excellent option for gamers who are not physically near their console but still need to turn it off. For example, you might be away and forget you left your PS on. I’m not proud of it, but I’ve done it countless times too.
5. Understanding the Power Indicator Lights
Understanding the power indicator lights on your PS5 is crucial for recognizing its power state. Here’s what they mean:
(Image credit: throughtheeyesofateenager.com)
White Light: The PS5 is fully powered on and running.
Amber Light: The PS5 is in Rest Mode.
Off: The PS5 is completely powered off.
These lights help you quickly determine whether your PS5 is on, in Rest Mode, or off.
Understanding PS5 Rest Mode vs. Complete Shutdown
Each has its pros and cons, and using them right can extend your console’s life and enhance your overall gaming experience.
Benefits and Features of Rest Mode
In Rest Mode, the PS5 isn’t fully off; it’s actually in a low-power state where certain features remain available, including:
Auto-Download and Install Updates: Meaning that you won’t have to sit through system updates when you turn on your console.
Controller Charging: Plug in a controller before Rest Mode, and it’ll be fully charged when you’re ready to play again.
Game Session Suspension: You can resume games exactly where you left off.
When to Use Rest Mode vs. Complete Shutdown
(Image credit: throughtheeyesofateenager.com)
Rest Mode: Ideal for shorter breaks when you plan to return within a few hours. It’s great for keeping game sessions active.
Complete Shutdown: Perfect if you’re done for the day or won’t be playing for a while. Powering down fully is better for energy conservation.
Power Consumption Comparison
Rest Mode uses approximately 1-3 watts, a small but constant draw. In contrast, complete shutdown uses zero power. So over time, choosing shutdown over Rest Mode can help with energy efficiency, especially for users who game infrequently.
Rest Mode
ON
Complete Shutdown
0 W
200-220 W
1-3 W
Customizing Your PS5 Power Settings
If you didn’t know yet, your PS5 offers customizable power settings. Which can give you control over things like Rest Mode timers and USB port behavior. With this you can adjust how long your console stays in Rest Mode before shutting down. Plus, you can decide what happens with USB devices when the PS5 is in power-saving mode. If you want to save energy or keep your devices charged, these settings let you fine-tune the console to fit your needs. It’s a simple way to make your gaming experience more efficient and suited to your preferences.
Accessing the Power Settings Menu
(Image credit: Youtube/UntitledGameShow)
To reach these power settings, just head to Settings > System > Power Saving. Once you’re there, you’ll find a bunch of options to personalize your console’s power habits. This is where you can make your PS5 work the way you want. Whether it’s something like adjusting sleep times or setting energy-saving features.
Here’s exactly what you can customize:
Rest Mode Timer: Control how long before the PS5 enters Rest Mode.
USB Port Behavior: Decide what happens with your USB devices while in power-saving mode.
Automatic Power Off: Set your PS5 to turn off automatically after a set period of inactivity.
These settings give you the flexibility to adjust your console’s power usage to fit your preferences.
Setting Automatic Shutdown Timers
In Power Saving Settings, you can specify how long your PS5 waits before it powers down. This timer is helpful for players who may accidentally leave their console on or fall asleep mid-session. These options range from 20 minutes to two hours of inactivity.
Configuring Rest Mode Features
(Image credit: Youtube/VVaby)
In Power Saving > Features Available in Rest Mode, you’ll find several options to control the console’s behavior when in rest mode:
USB Power Supply: Set USB ports to always provide power in Rest Mode or restrict it to save energy.
Network Connectivity: Keep the system connected to download updates automatically or disable it for even lower power use.
USB Power Settings in Rest Mode
With this setting, you can decide how long your console will continue powering USB devices in Rest Mode. Choose “Always” to keep controllers charging, but you can reduce power consumption by limiting USB power. You can use the last image above to find these settings.
HDMI Device Link Settings
With HDMI-CEC enabled, your PS5 and TV can power on or off together, making your setup more convenient. If you want the PS5 to turn off automatically when you switch off your TV, this feature is a must-have.
(Image credit: budgetgaming.nl/ThaBEN)
To enable it, follow these steps:
Go to Settings on your PS5.
Select HDMI Device Link.
Toggle on HDMI-CEC to sync your PS5 with your TV.
Once set up, this feature allows you to control both devices with one remote, making the process smoother and more streamlined.
Troubleshooting Common Power Issues
Here’s a guide for resolving issues if your PS5 isn’t turning off as expected:
What to Do if Your PS5 Won’t Turn Off
If the console won’t power down normally, try holding the power button on the console for about 10 seconds. This will initiate a forced shutdown without harming the system.
Dealing with Frozen Screens
When the screen is frozen or unresponsive, press and hold the power button until you hear two beeps. The second beep indicates that the system is safely shutting down.
Force Shutdown Procedures
In cases where the console is entirely unresponsive, press and hold the power button for at least 15 seconds. Use this option sparingly, as forced shutdowns can occasionally disrupt your PS5’s system files.
Power Button Not Responding
If pressing the power button doesn’t work, check for dust or debris that might block it. If this doesn’t help, restart the console from the controller or app and see if the power button responds afterward.
Rest Mode Problems and Solutions
Some users report issues with Rest Mode, such as the PS5 not waking. If this happens, disable Rest Mode and keep the console fully powered off between sessions.
Power-Saving Tips for PS5 Owners
The PS5 is extremely powerful, but this also makes it a bit of an energy consumer. So here are 5 tips to keep energy usage lower without sacrificing gaming quality.
1. Optimal Power Settings for Energy Efficiency
Set an automatic shutdown timer to avoid power drain during inactivity. Adjusting Rest Mode options to reduce background downloads can also save energy.
(Image credit: wikihow.com)
2. Best Practices for Battery Preservation
Avoid charging controllers overnight, as this can wear down the battery over time. Instead, set USB Power Supply to “3 Hours” so controllers charge after sessions without staying connected all night.
3. HDMI-CEC Configuration Tips
Like I mentioned earlier, you can enable HDMI-CEC if you like having the PS5 and TV turn on or off together. It’s an easy way to streamline your setup, especially when gaming on a large screen.
(Image credit: budgetgaming.nl/ThaBEN)
4. Reducing Standby Power Consumption
If you’re concerned about standby power, reduce Rest Mode power usage by turning off internet connectivity in Power Saving settings. This lowers energy use by disabling updates.
5. Temperature Management Recommendations
To keep your PS5 running well, place it in a well-ventilated area with no obstructions around the vents. Avoid stacking items on top of it, as airflow is essential for maintaining temperature and preventing overheating.
How To Turn Off Your PS5 – Conclusion
Turning off your PS5 the right way isn’t just about saving energy—it’s about keeping your system in top shape. Mastering power settings lets you pick the ideal shutdown method for any situation, from short breaks to extended periods. So, which method will you start using? Try these simple approaches to see the difference in your PS5’s performance and longevity. With the right power management, you’ll get the most out of your console and enjoy a smooth, reliable gaming experience every time.
No, controllers only charge when the PS5 is in Rest Mode or fully powered on. You’ll need to place it in Rest Mode or leave it on if you want the controller to charge.
If you fully power down the PS5, any unsaved game progress will be lost. It’s always a good idea to manually save your progress or utilize Rest Mode if you want to resume quickly from where you left off.
While Rest Mode is safe for regular use, occasionally turning the console fully off can help it cool down and may slightly extend hardware longevity by reducing constant low-power usage.